Creating a Loop, Uploading Documents, & Submitting for Review

Creating a "Loop"
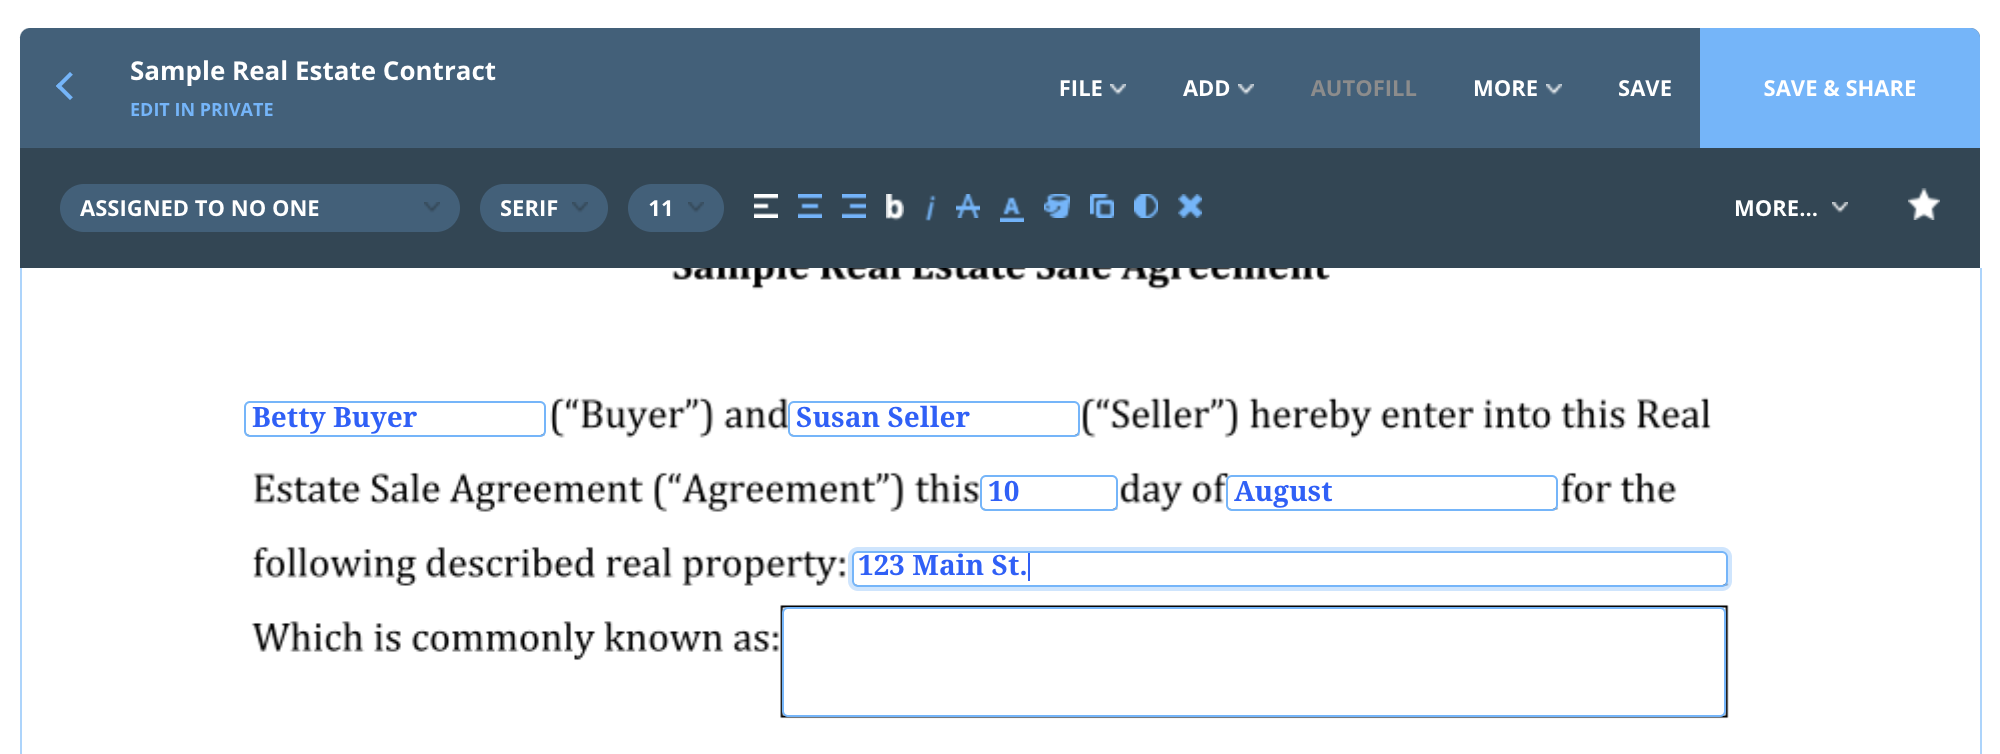
Once you have logged into Dotloop and selected your default profile (Your Realty Group Team Profile), you will create a "loop", which is Dotloop terminology for creating a transaction within the system!
Please Note: You must be in your Realty Group Team profile when creating loops. Your dashboard should have your name, state you work in, and "Realty Group" as shown below

Please watch the short video below that walks you through creating a loop and filling out the complete loop details:
As stated in the video, it is very important that all the following details are added to your loop and updated when needed:
- Full property address (house number, street, city, zip code, and state
- Loop Type (Purchase, listing, etc)
- Loop Status (Pre Offer, Under Contract, Active, etc) (make sure to update this when it changes!)
- Purchase Price (make sure to update this if it changes!)
- Closing date (make sure to update this if it changes!)
Adding Documents
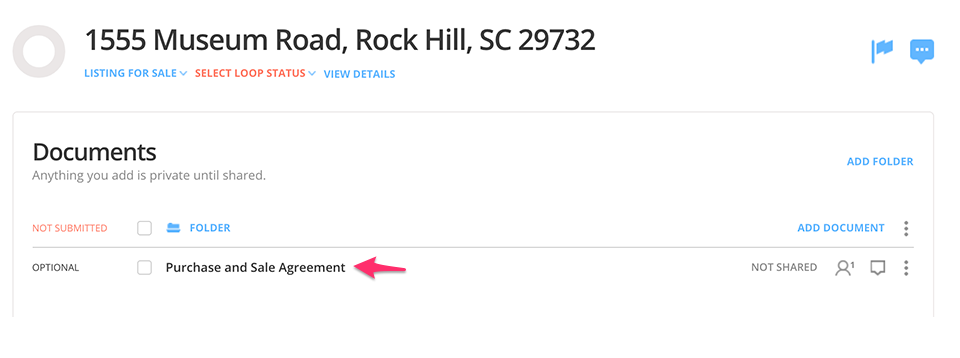
One of the first things you'll need to do after creating a loop is add documents. You will have the option to add documents from your templates, computer, or by email. Once you add a document to your loop it cannot be deleted, only archived.
Once inside your loop, the first section listed is Documents. There are three blue boxes representing the 3 options for adding documents to your loop:
- Add from Templates
- Browse your computer to upload a PDF
- Send via email attachment
If you're practicing with a test loop, try uploading a document using each method.
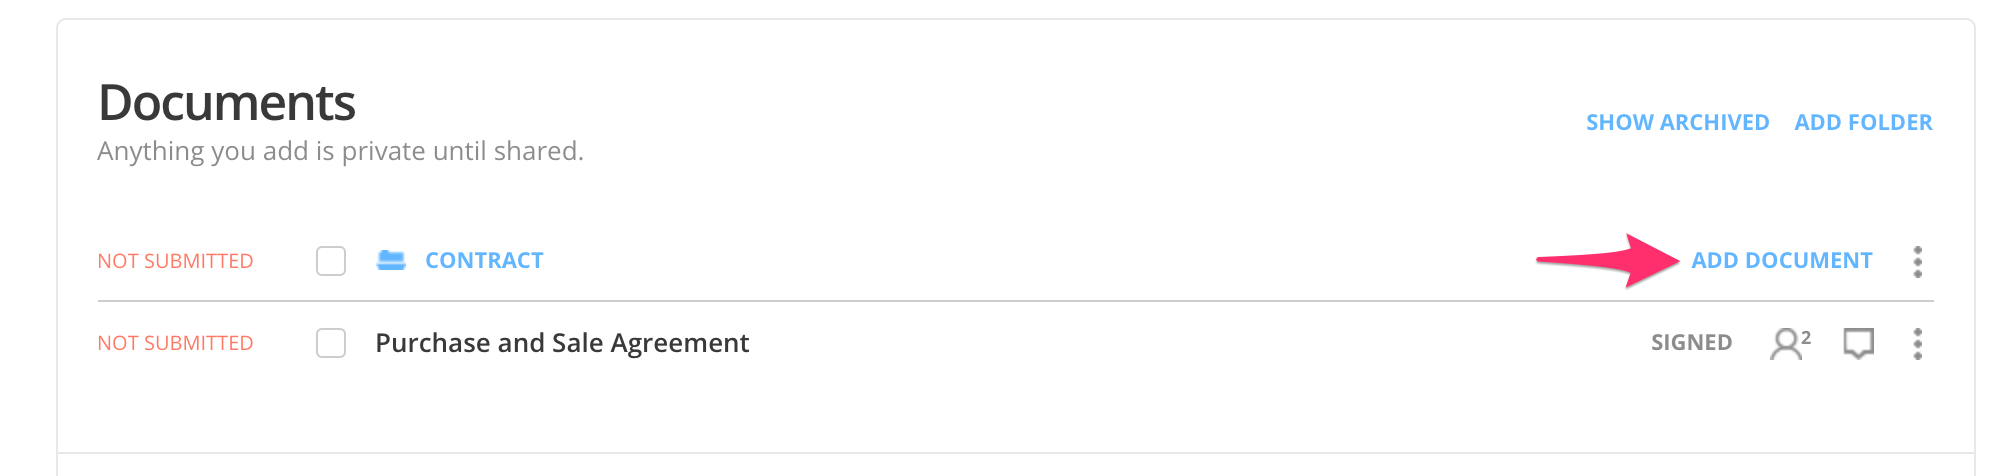
If you are using a loop template, you may see some documents are already in the Documents section. In that case, click the Add Document link to the right of the folder. The 3 options for adding documents will appear.
Step 2: Add documents from Templates
Click the first blue box in the Documents section that reads "TEMPLATES - Add an interactive form by selecting one from templates".
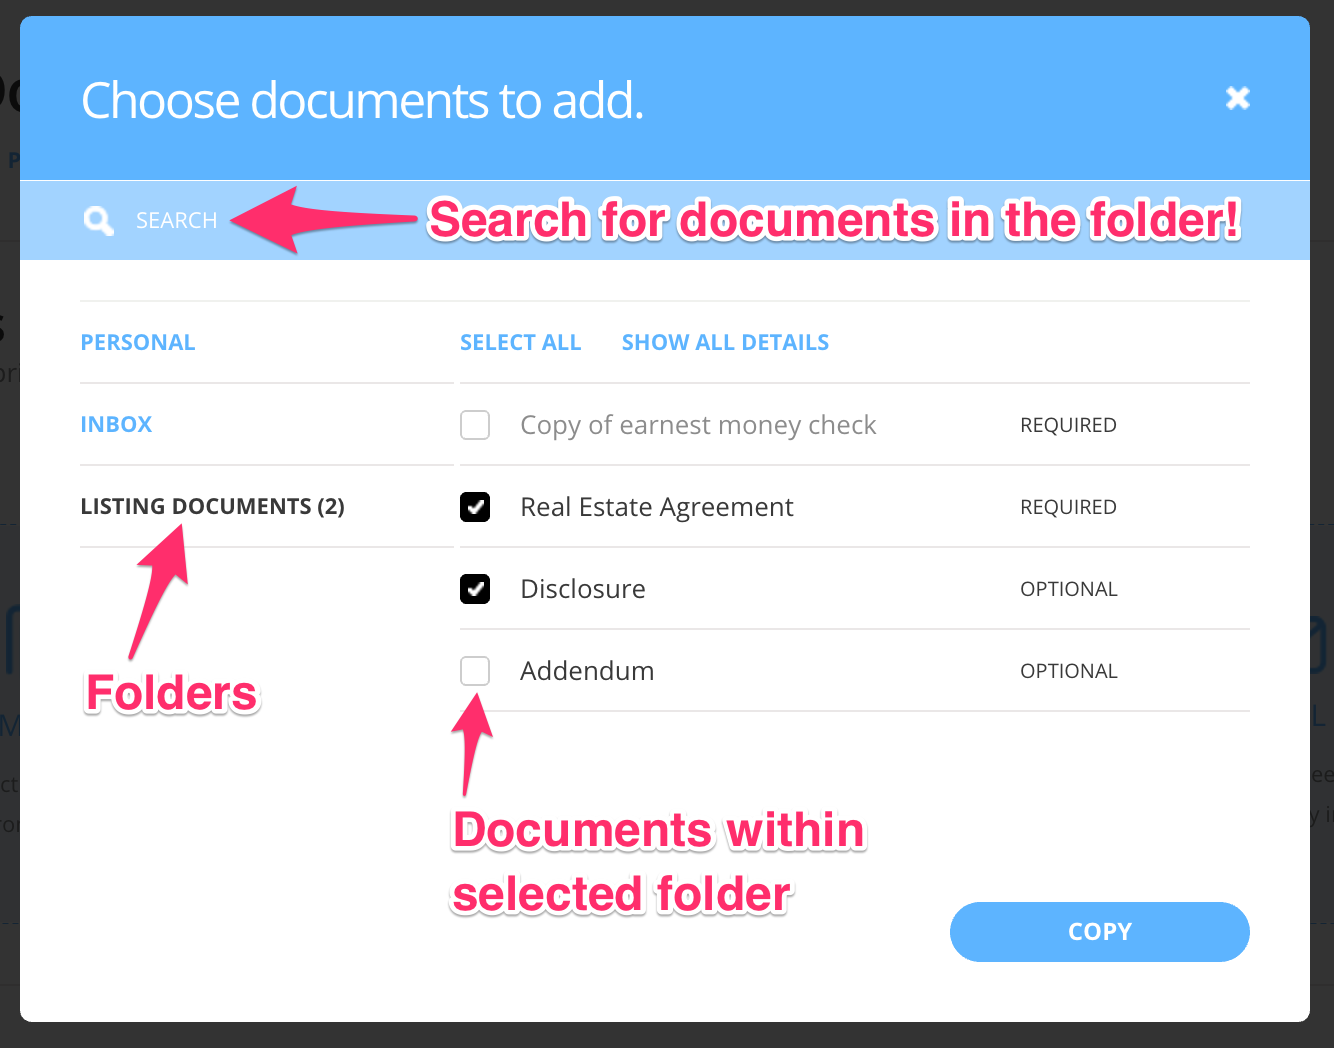
Choosing to add documents via Templates presents you with a window showing documents available in the Templates section of your profile. The folders will be displayed on the left and will mirror the folders in the templates section.
Click on one of these folders to display the documents within that folder on the right. You may also use the search bar to search for a document title. Check the box to the left of a document to select it (you can select multiple documents within multiple folders). Once you have selected your template choices, click the Copy button on the bottom of the window.
If you don't have any Template documents available, don't worry, you'll learn how to create those in a later lesson. You may skip this step for now and continue by uploading a PDF from your computer.
Step 3: Add documents from your computer
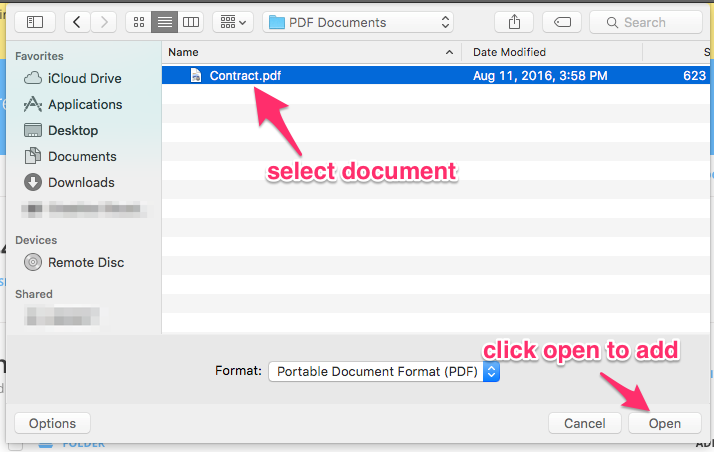
Click the second blue box in the Documents section that reads "BROWSE - Search and add any PDF from your computer into this folder".
Selecting this option opens a window that displays the files on your computer, allowing you to select a document to add. After clicking Open, the PDF file will upload to the loop.
Step 4: Send documents to the loop via email
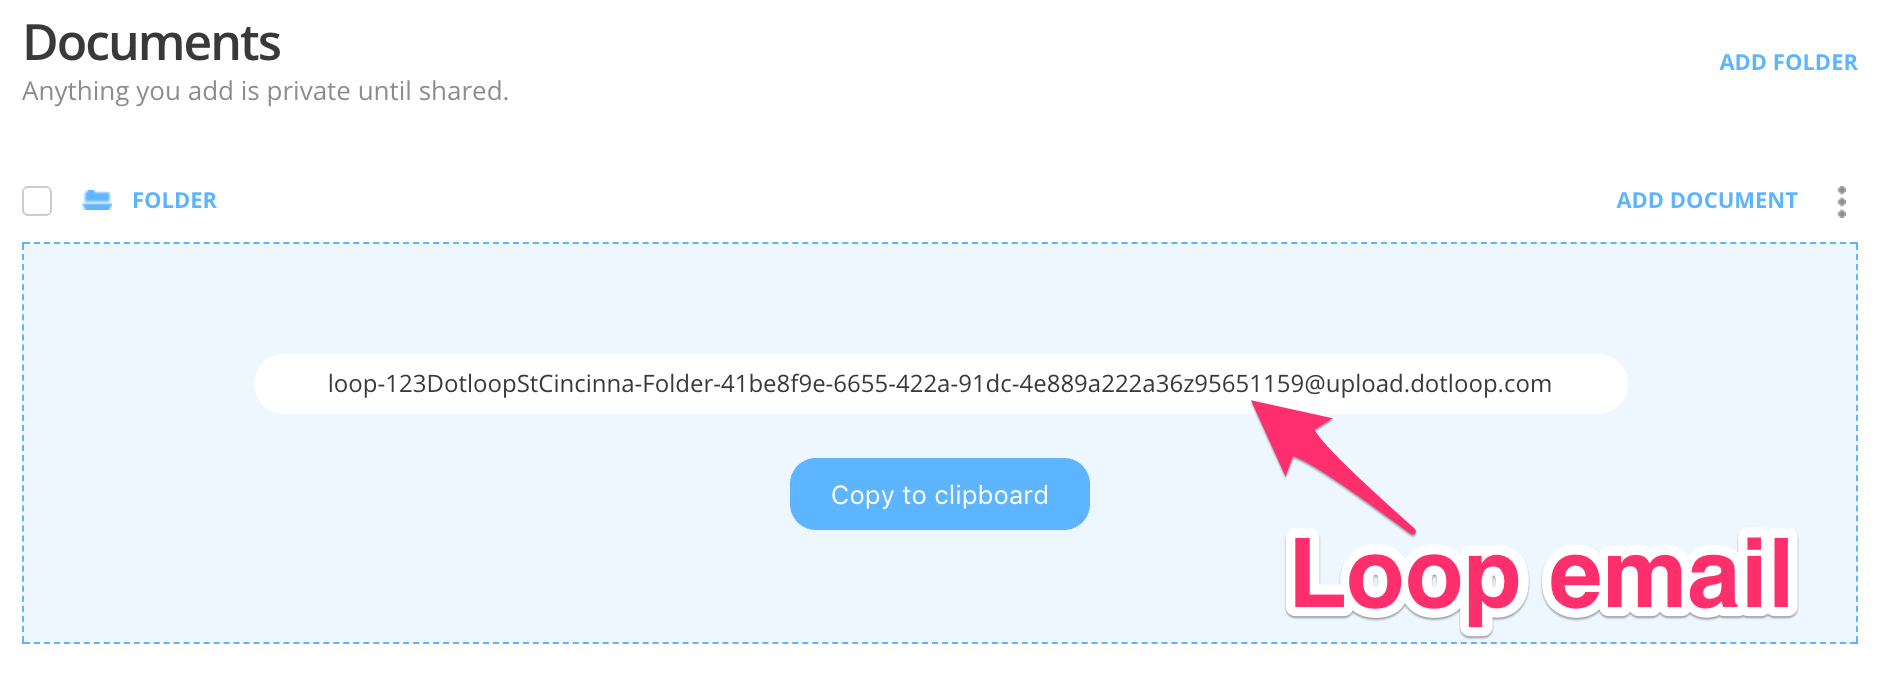
Click the third blue box in the Documents section that reads "EMAIL - Attach the files you need to an email and send them directly into this folder".
Selecting the Email option presents you with the email address of the loop. Click the Copy to clipboard button. This automatically copies the address for you.
Using any email service, locate an email containing a PDF attachment that you wish to add to the loop. Forward that email to dotloop by pasting into the TO: field.
Once you have sent the email to dotloop with a PDF attachment, dotloop will return an email once it is received, letting you know the status of the upload. If the status is successful, reload your loop and the document(s) will be uploaded and waiting for you.
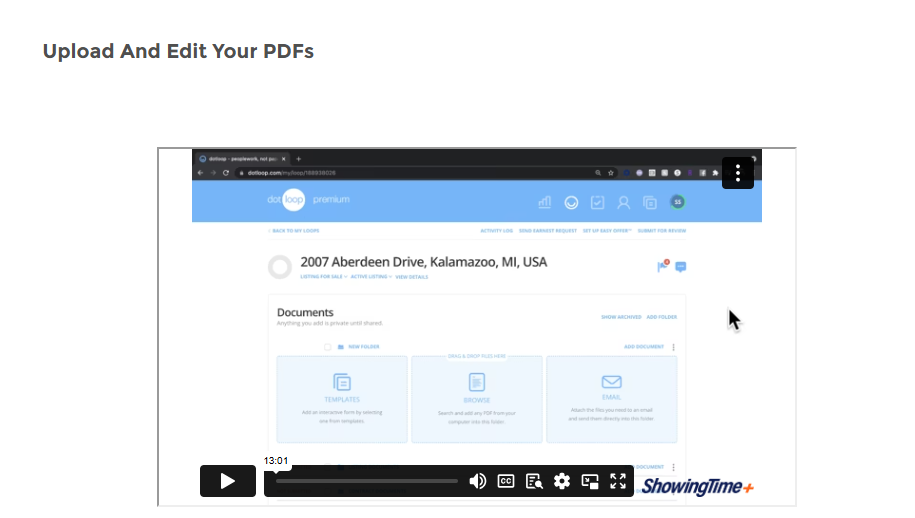
Editing Documents
The dotloop Document Editor in a loop is where interactive documents are prepared for sharing and signing for a particular transaction. It is also where flat PDFs/non-interactive documents can be made into interactive documents within a loop. There are many features offered in the loop document editor including autofill and signature/initial assignments that prompt your clients to sign.
Click the image below for a short video and full help article on uploading and editing documents!
Adding People to your Loop
Once you've added documents, now it's time to add people to your loop. Adding a person to a loop does not give them access to anything in the loop, it simply allows you to have them in the loop for when you're ready to share documents to them or introduce them to someone else in the loop.
Some of the first people you might add to a loop include clients and team members. If your account is provided by your company, you may automatically have an admin added to each loop.
Scroll down the the People section of the loop and follow these steps.
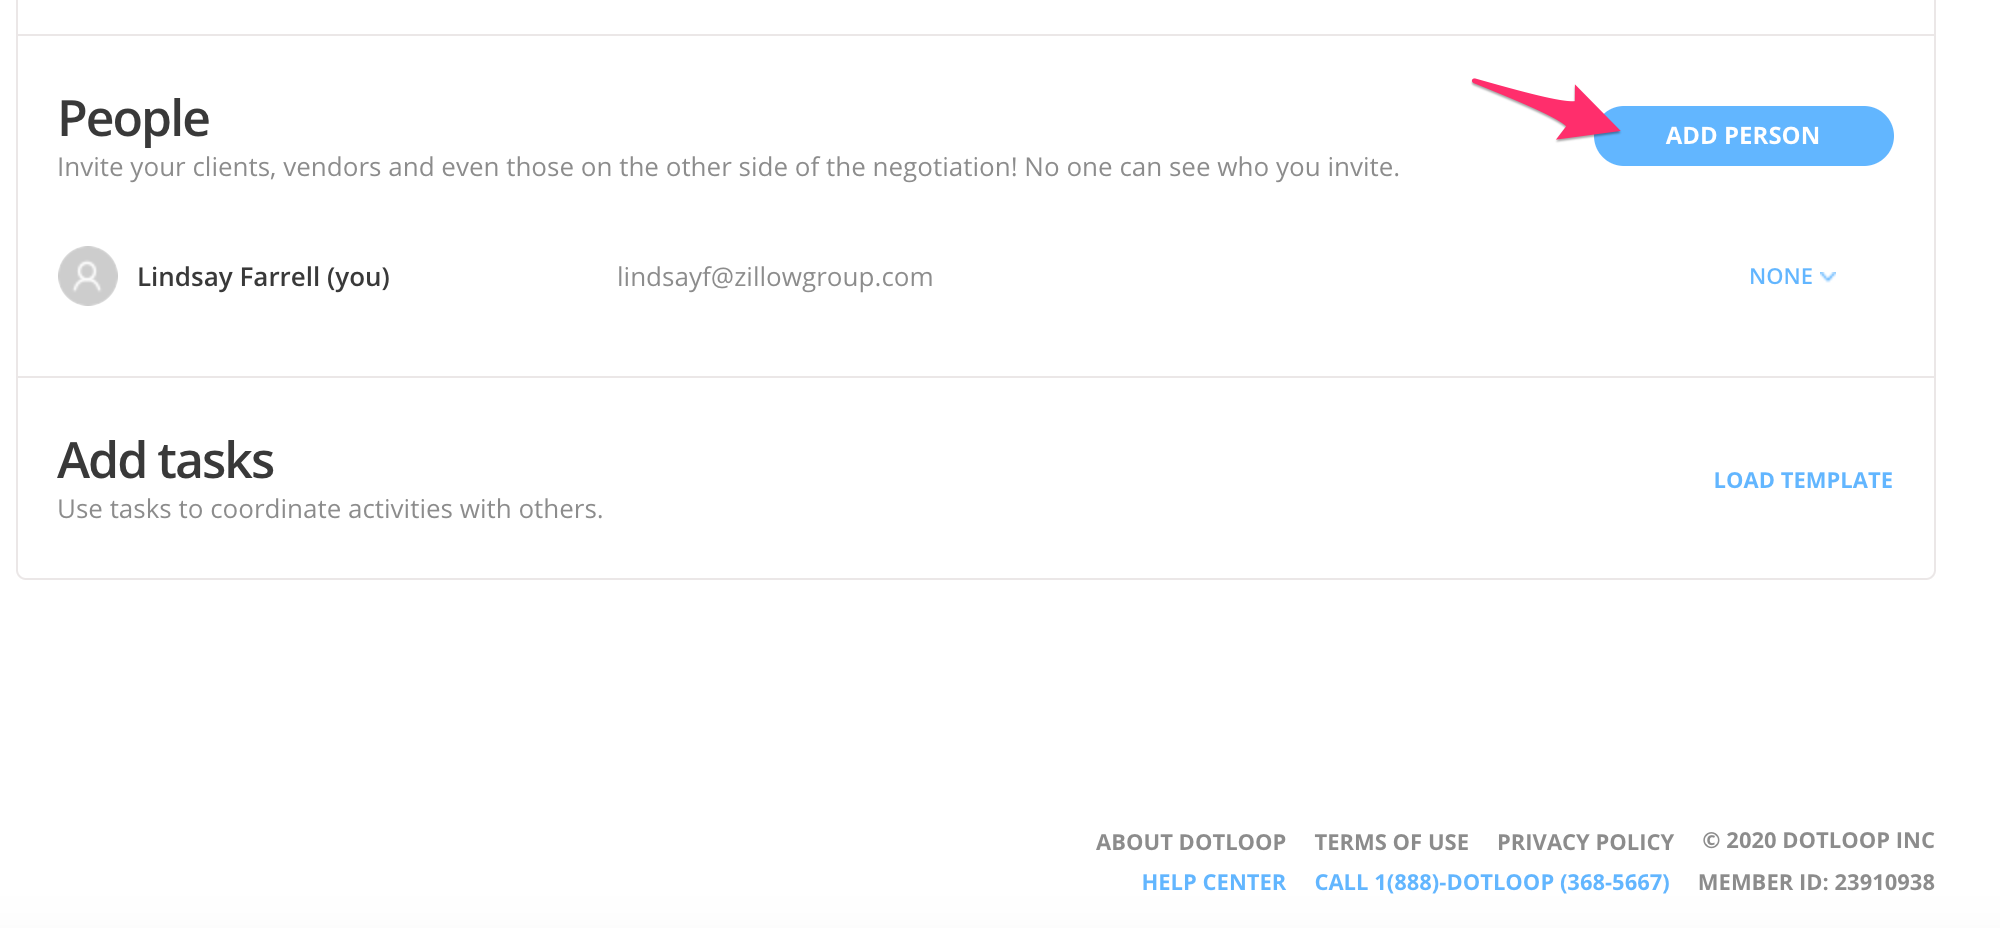
While in your loop, click on the Add Person button at the bottom of the page in the section labeled People.

Fill in all the information you can, including the name (as it needs to appear on the signature line), email address, and the role. You also have the option to send an intro email, which will let them know that you have added them to a loop.
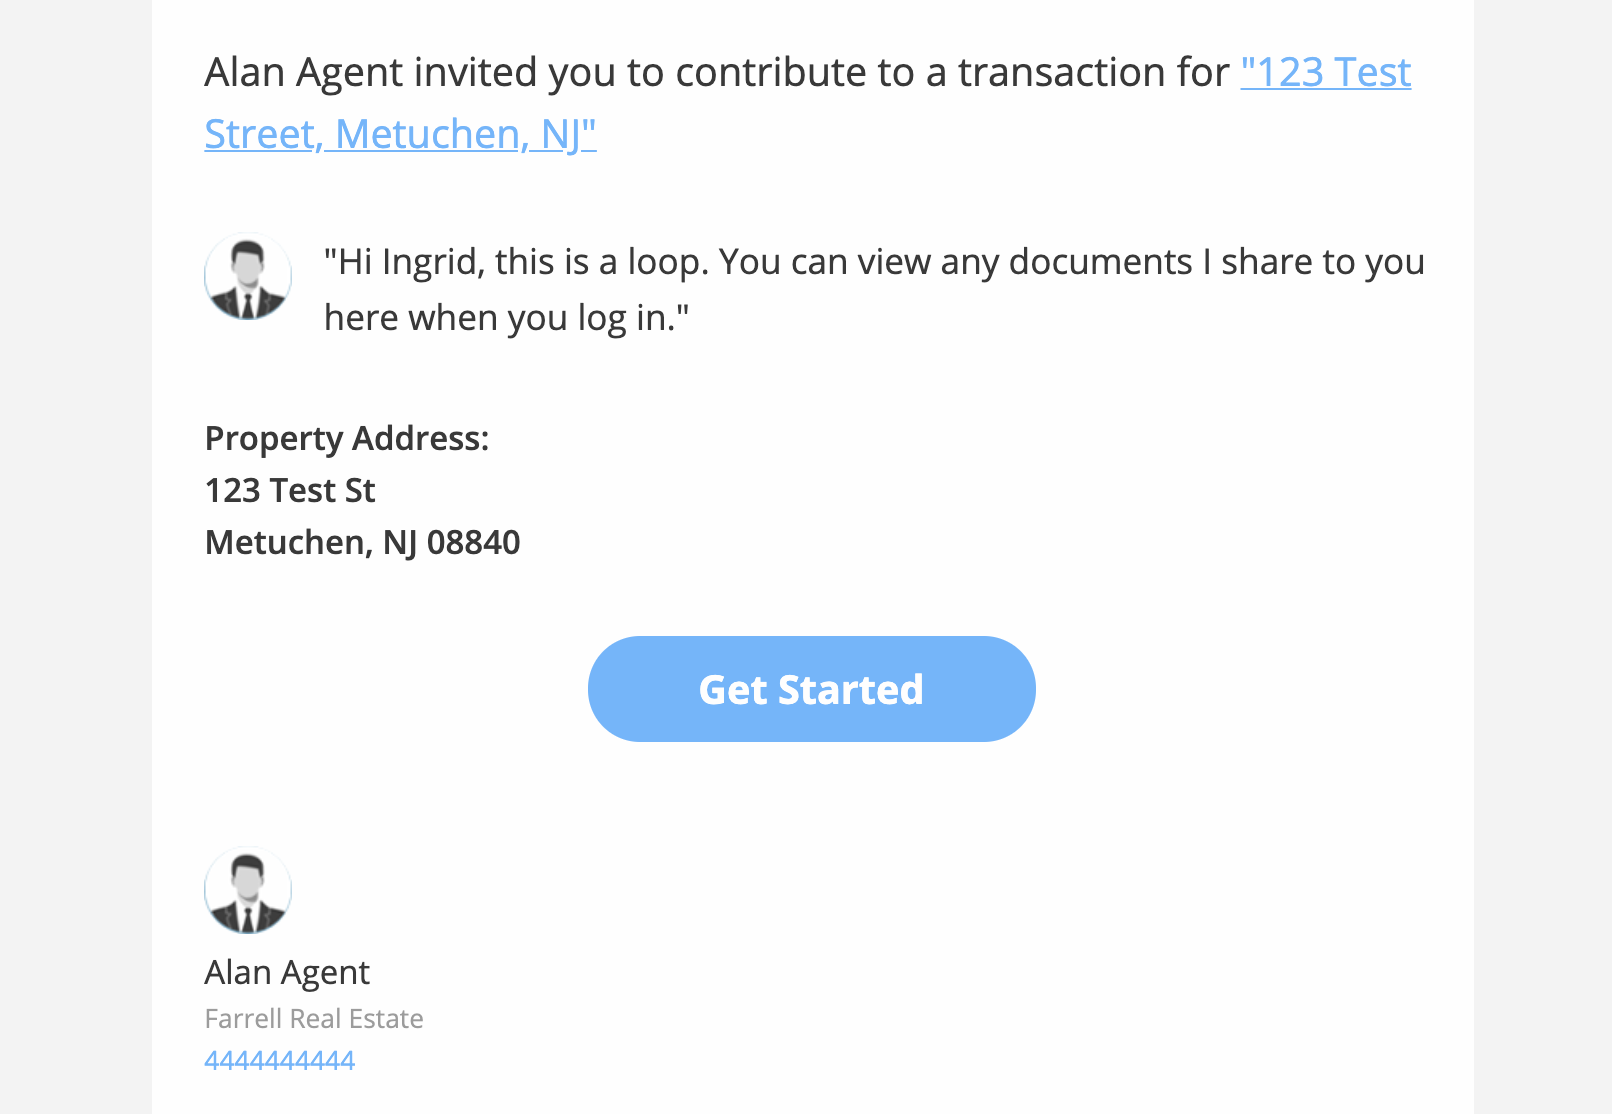
Here is an example of what that intro email looks like.
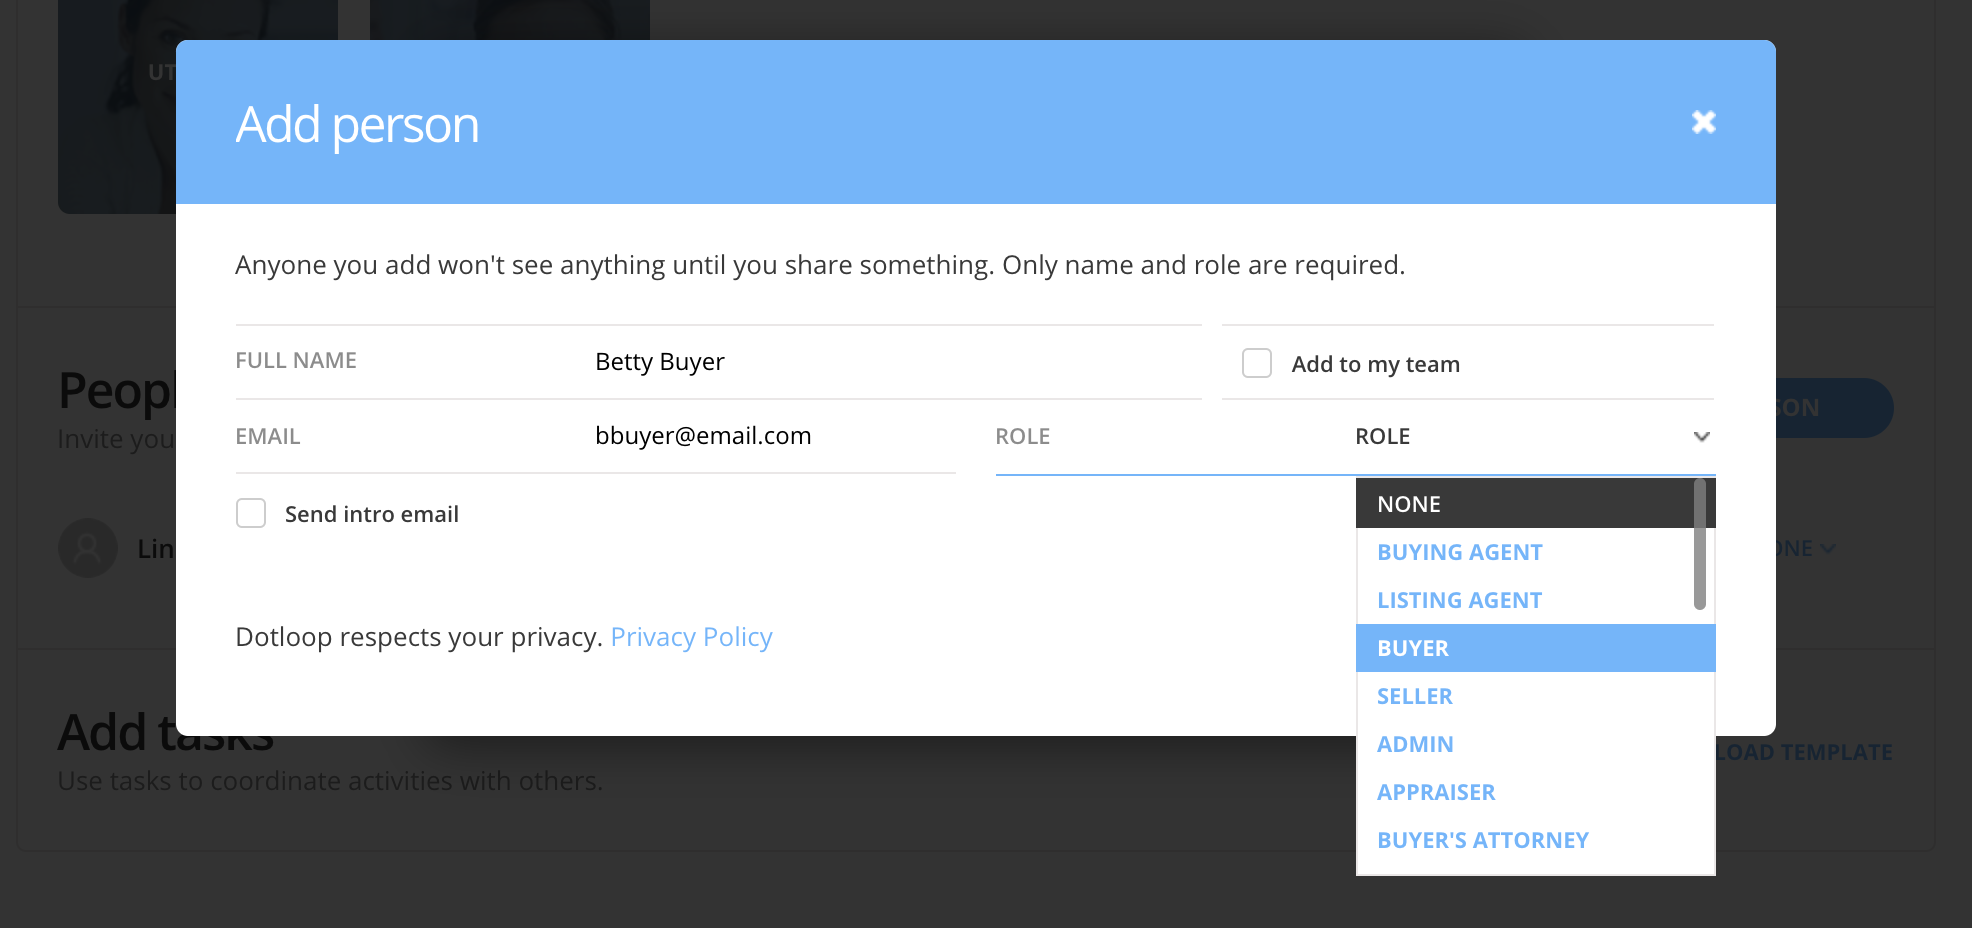
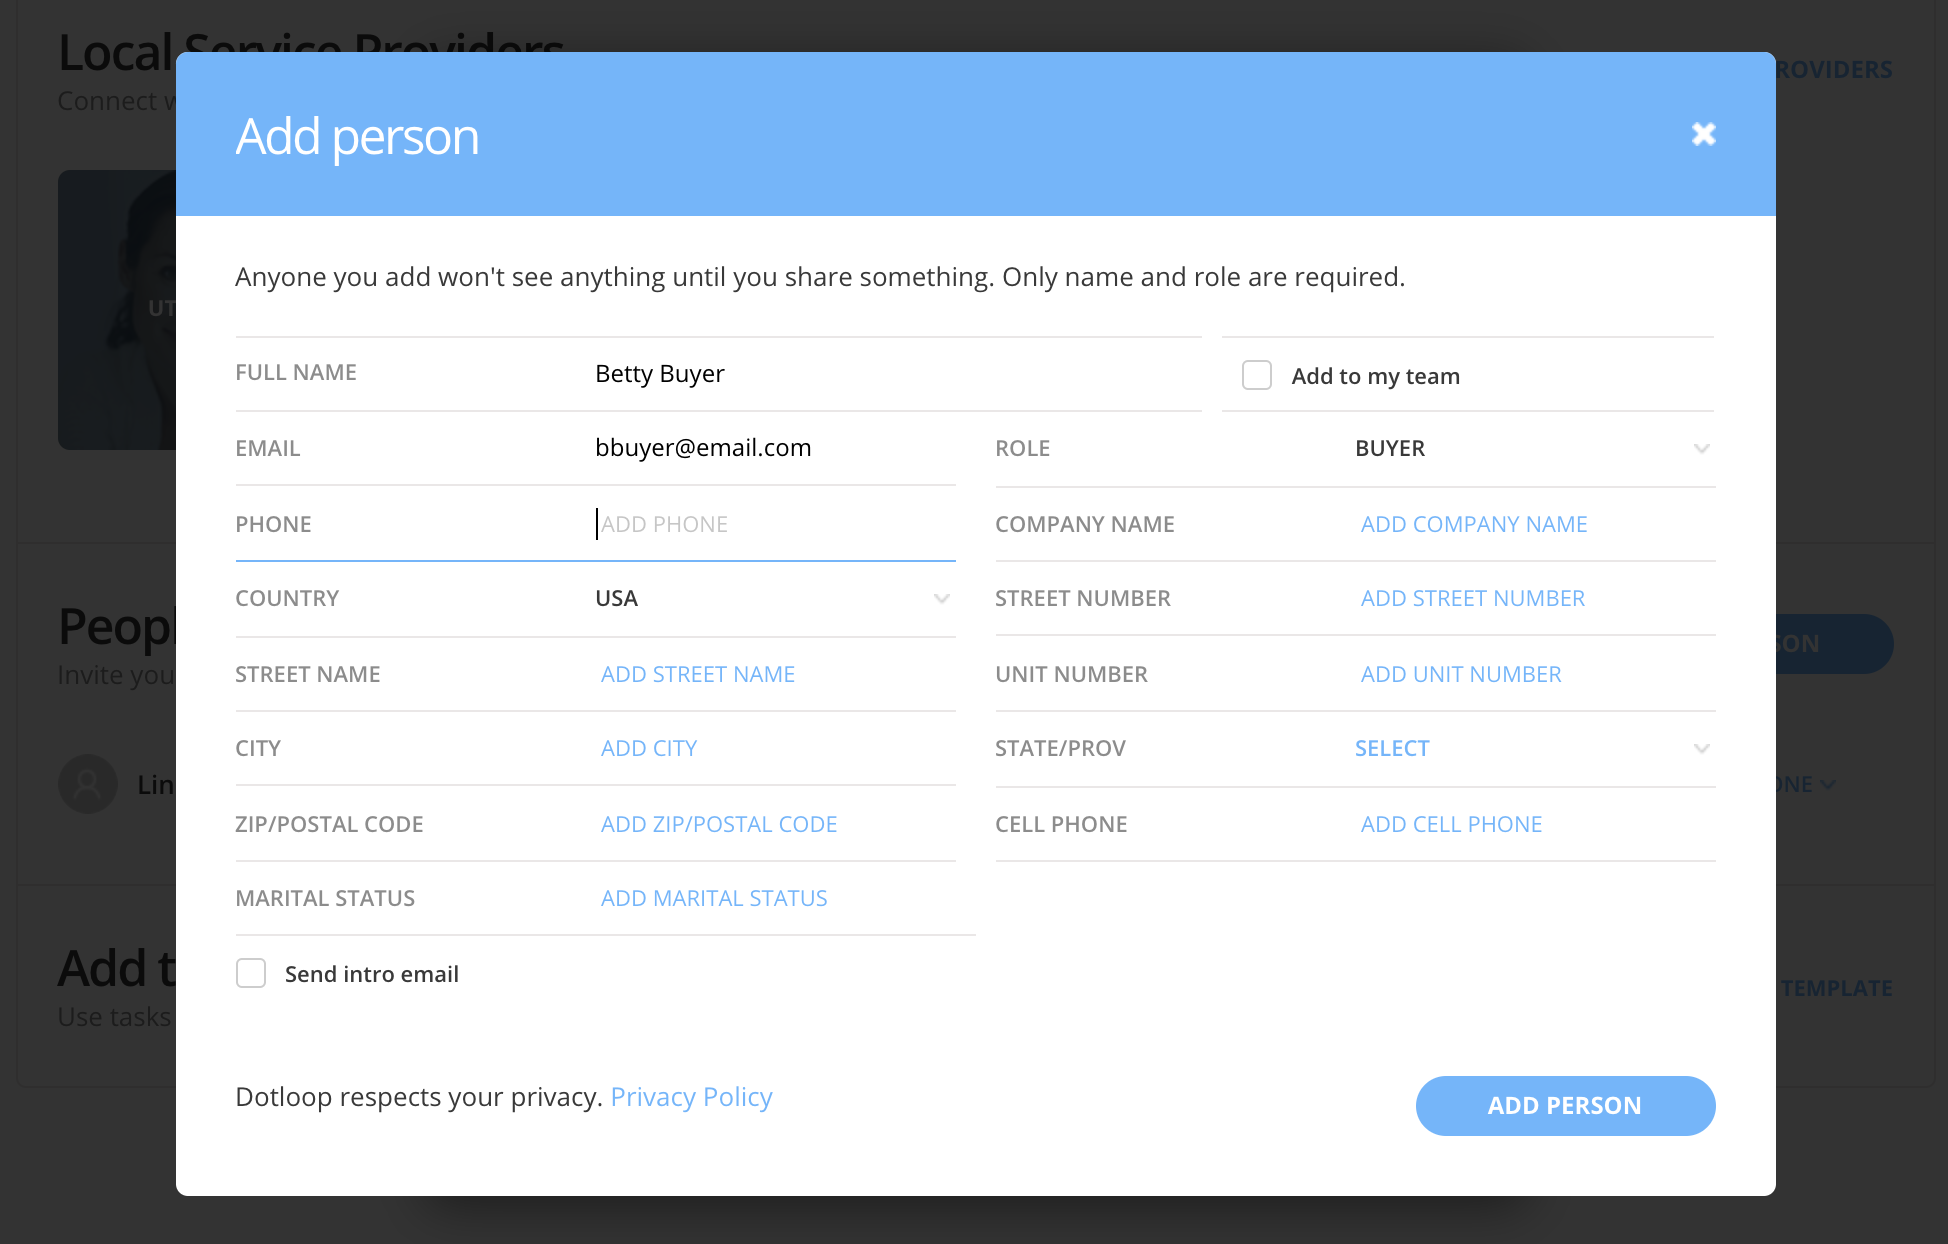
When you select a role, you will be presented with more information to fill out for that specific role. This information will help autofill documents where available.
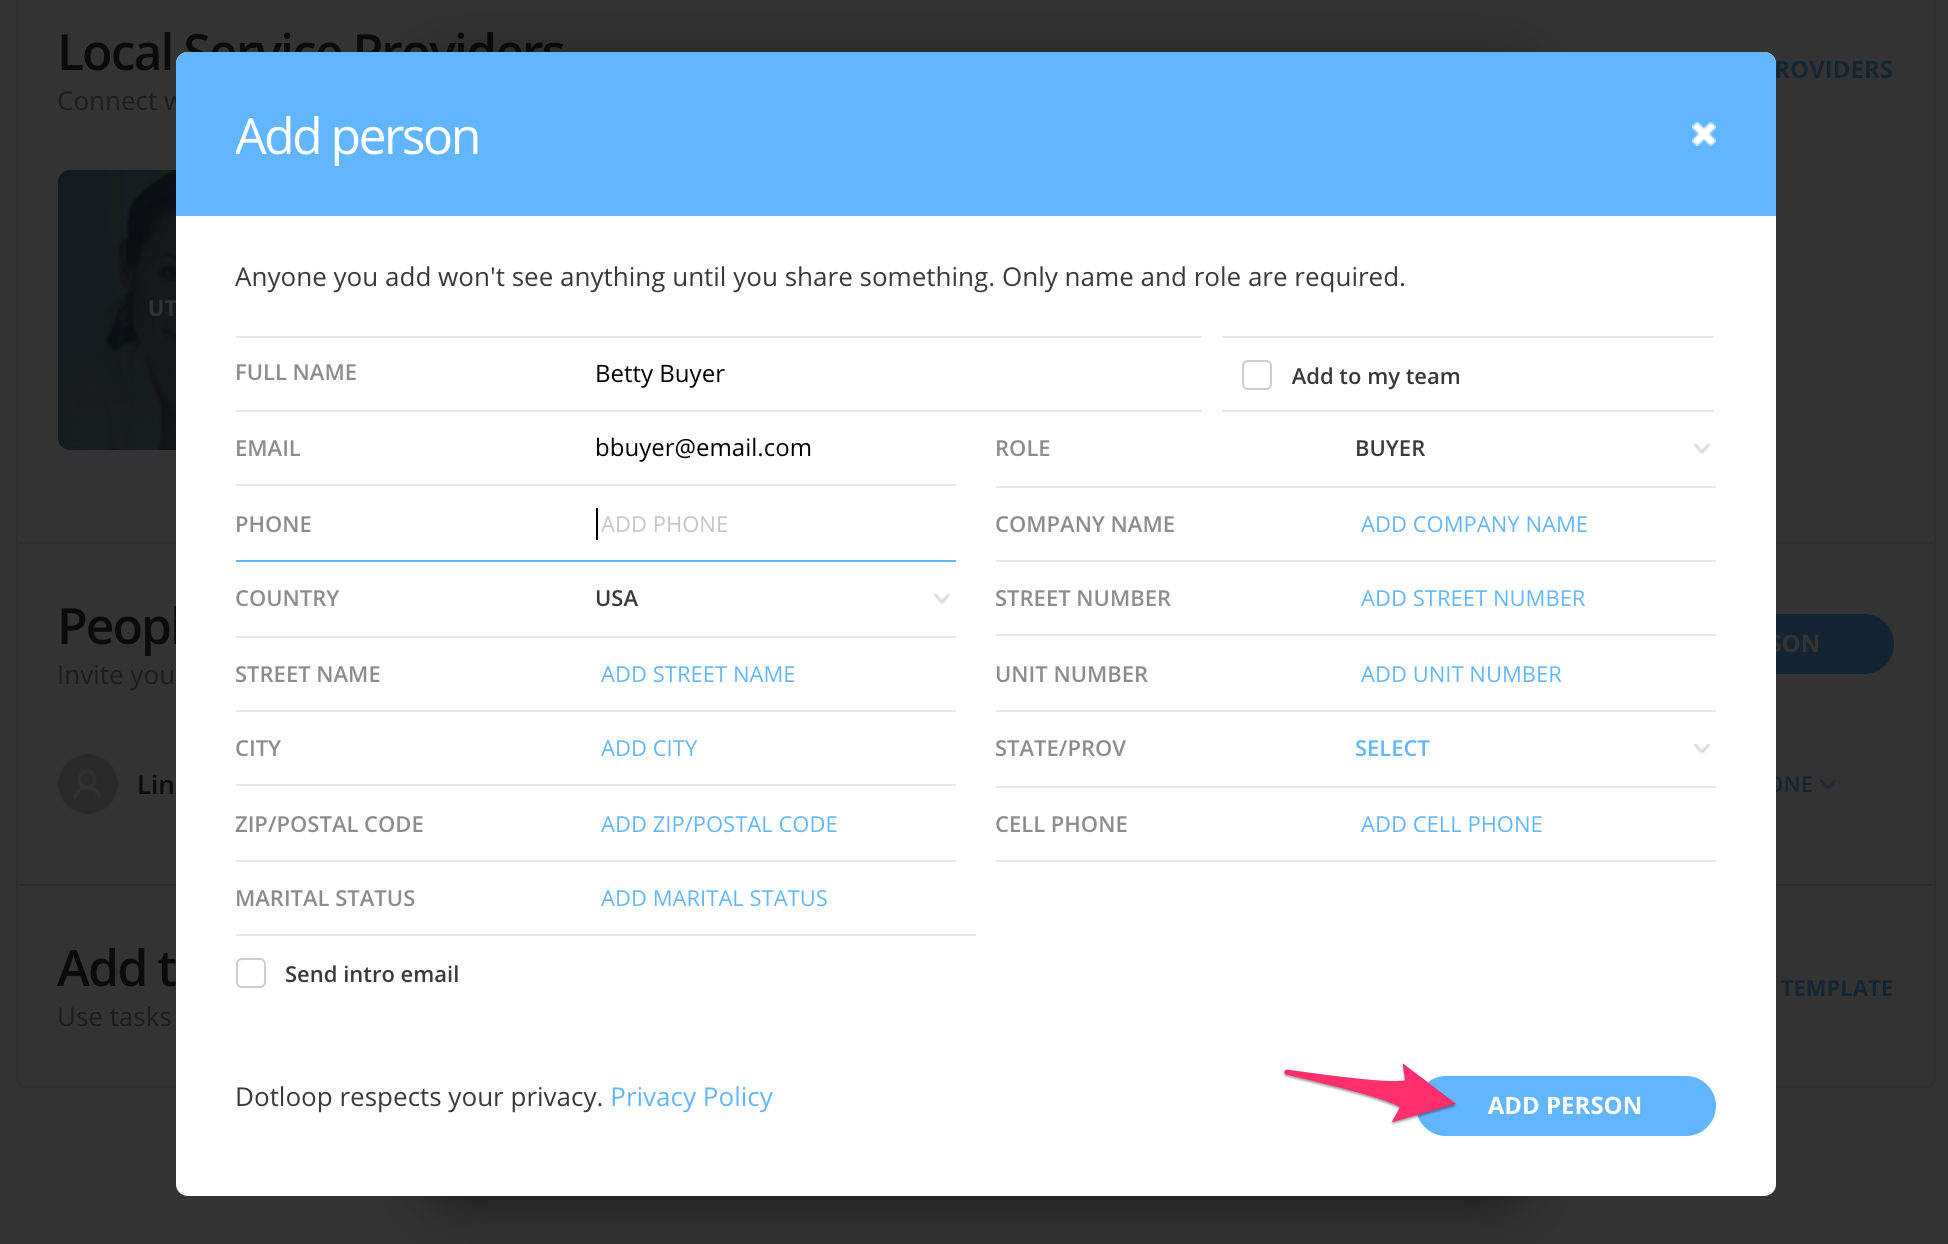
When finished, click the Add Person button at the bottom at the bottom of the window. Repeat these steps for as many people as you need to add to the transaction.
Note: If your admin is already in your people section you can change their role to Listing Broker or Buying Broker to assist with their information autofilling into documents.
Note: You can only use one email address per person within a loop.
In some situations, you may have a person who will be working on the transaction with you and will need full access to the loop. In this situation, you can add the person to your loop team. Once this is done, they will receive a notification to accept the invitation in the loop.
Note: when adding someone to your loop team you must understand that they will have full access to everything in the loop, and that once the invitation is accepted you will no longer be able to share anything to this person (because they already have access), but most importantly, this cannot be undone.
Preparing Interactive Documents
The dotloop Document Editor in a loop is where interactive documents are prepared for sharing and signing for a particular transaction. There are many features offered in the loop document editor including autofill and signature/initial assignments that prompt your clients to sign.
This article covers working with interactive dotloop documents (documents that have already been set up) in a loop. These interactive documents are provided either by your company, association, or are set up by you. They may be automatically added to a loop if you choose to use a loop template, or you may import them into the loop from the Templates section. To learn how to make a flat PDF in a loop interactive, check out this article.
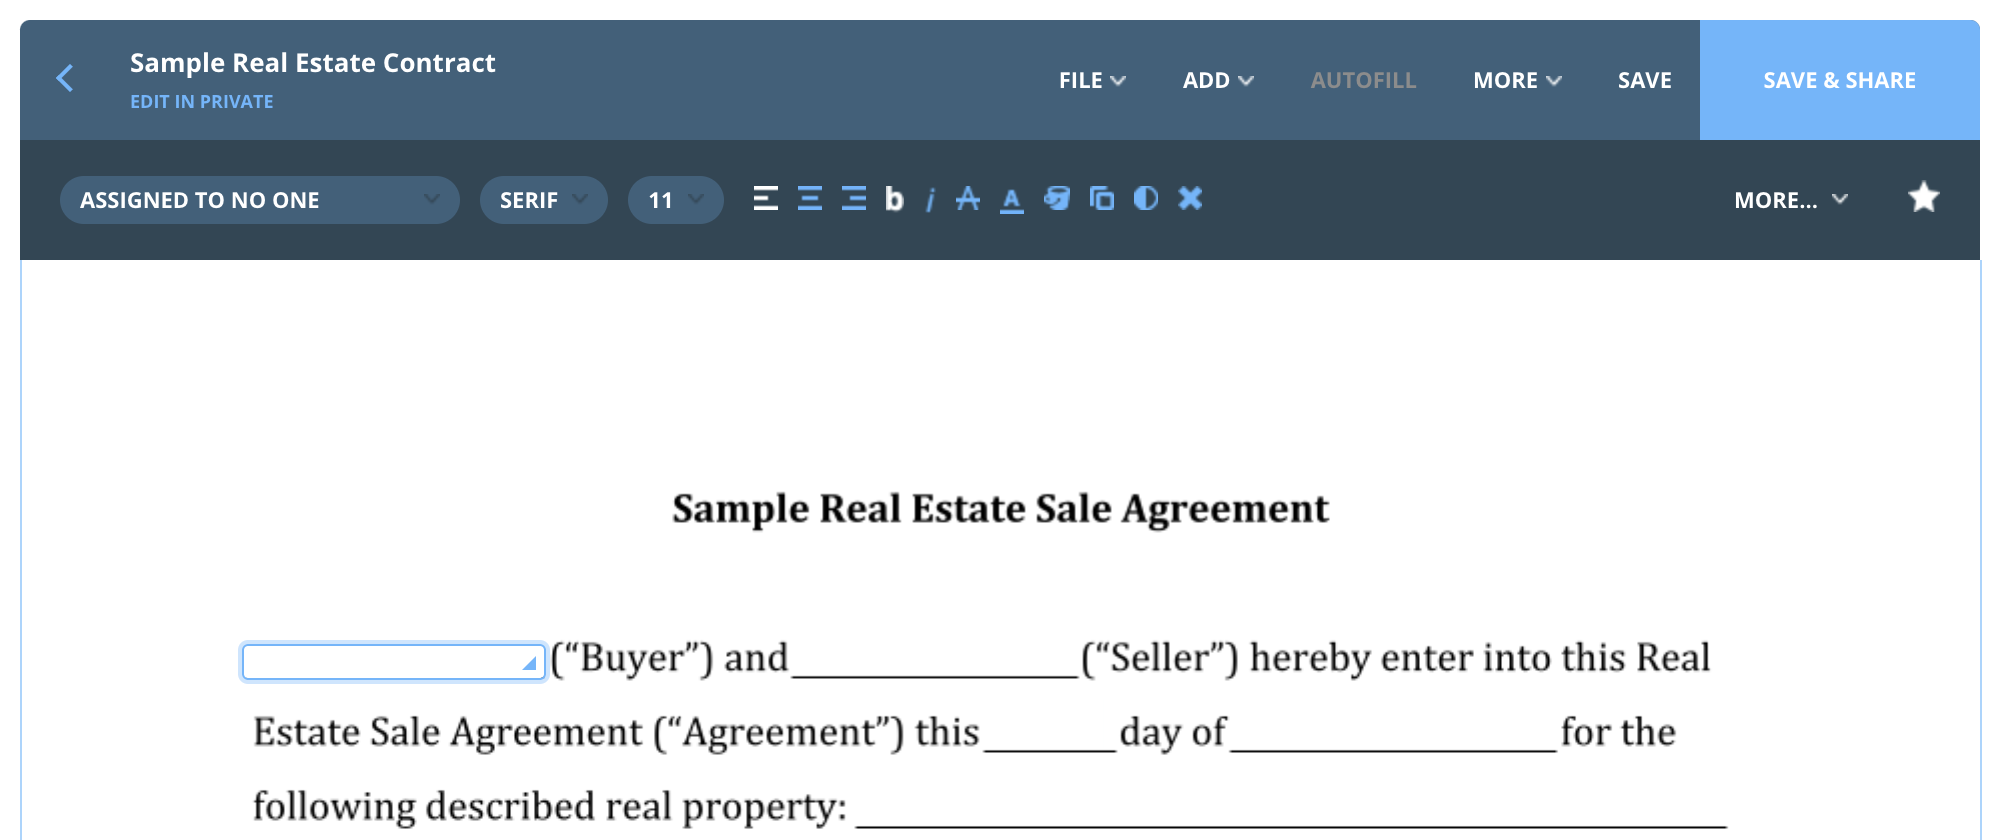
Open a document by clicking the document title in the Documents section.
Upon opening a document for the first time, you are prompted to Autofill. This is a feature that allows the document to fill any information available from your loop and profile details, as well as from the people in the loop. The information presented here is all the possible information that is available to autofill on the document.
Note: If the Autofill window does not appear, click on Autofill in the document toolbar.
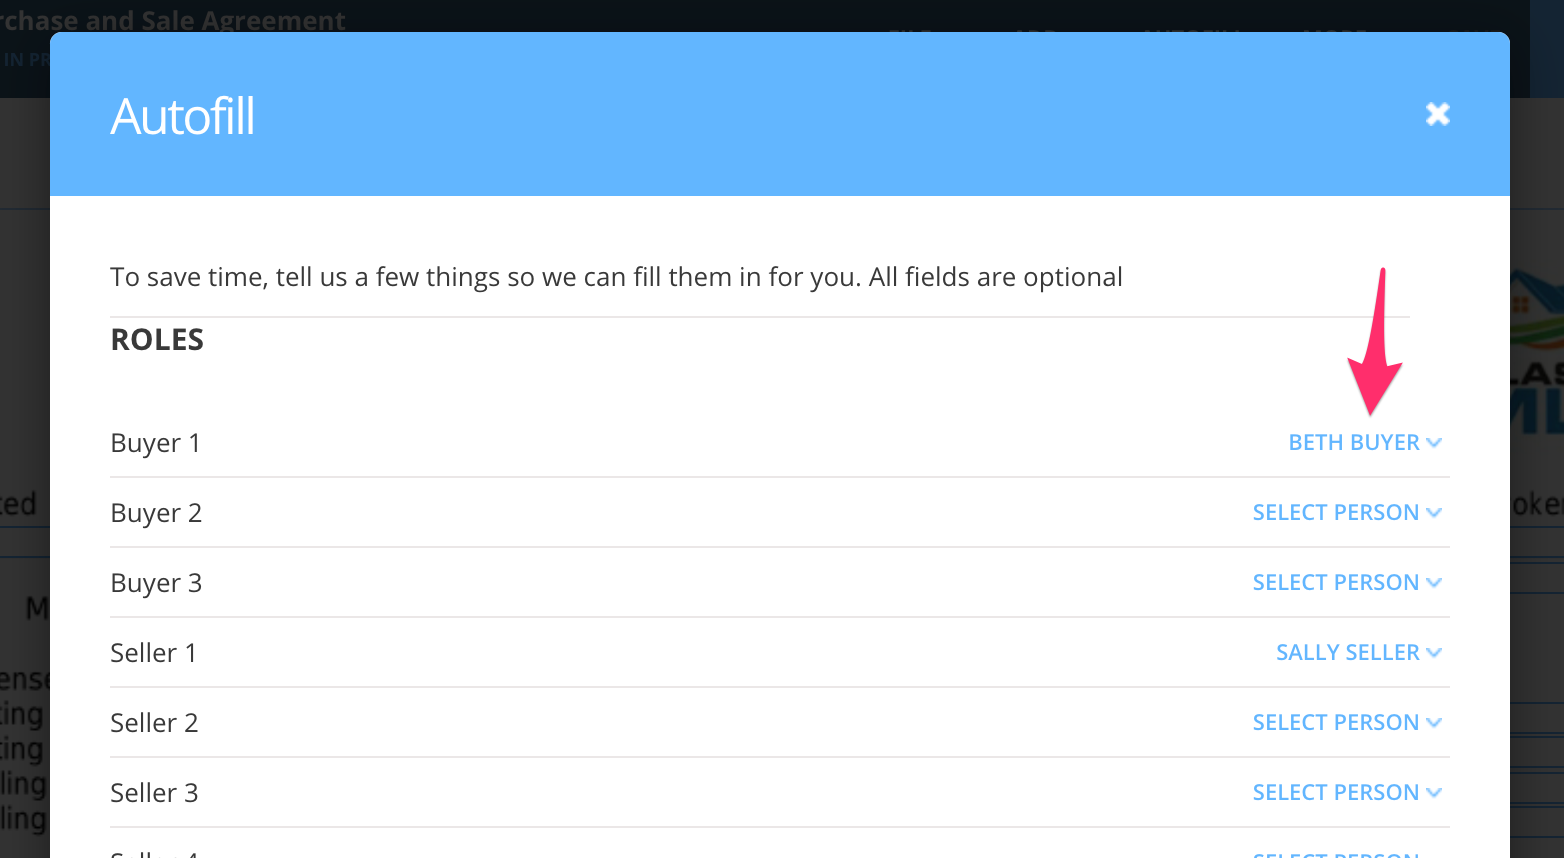
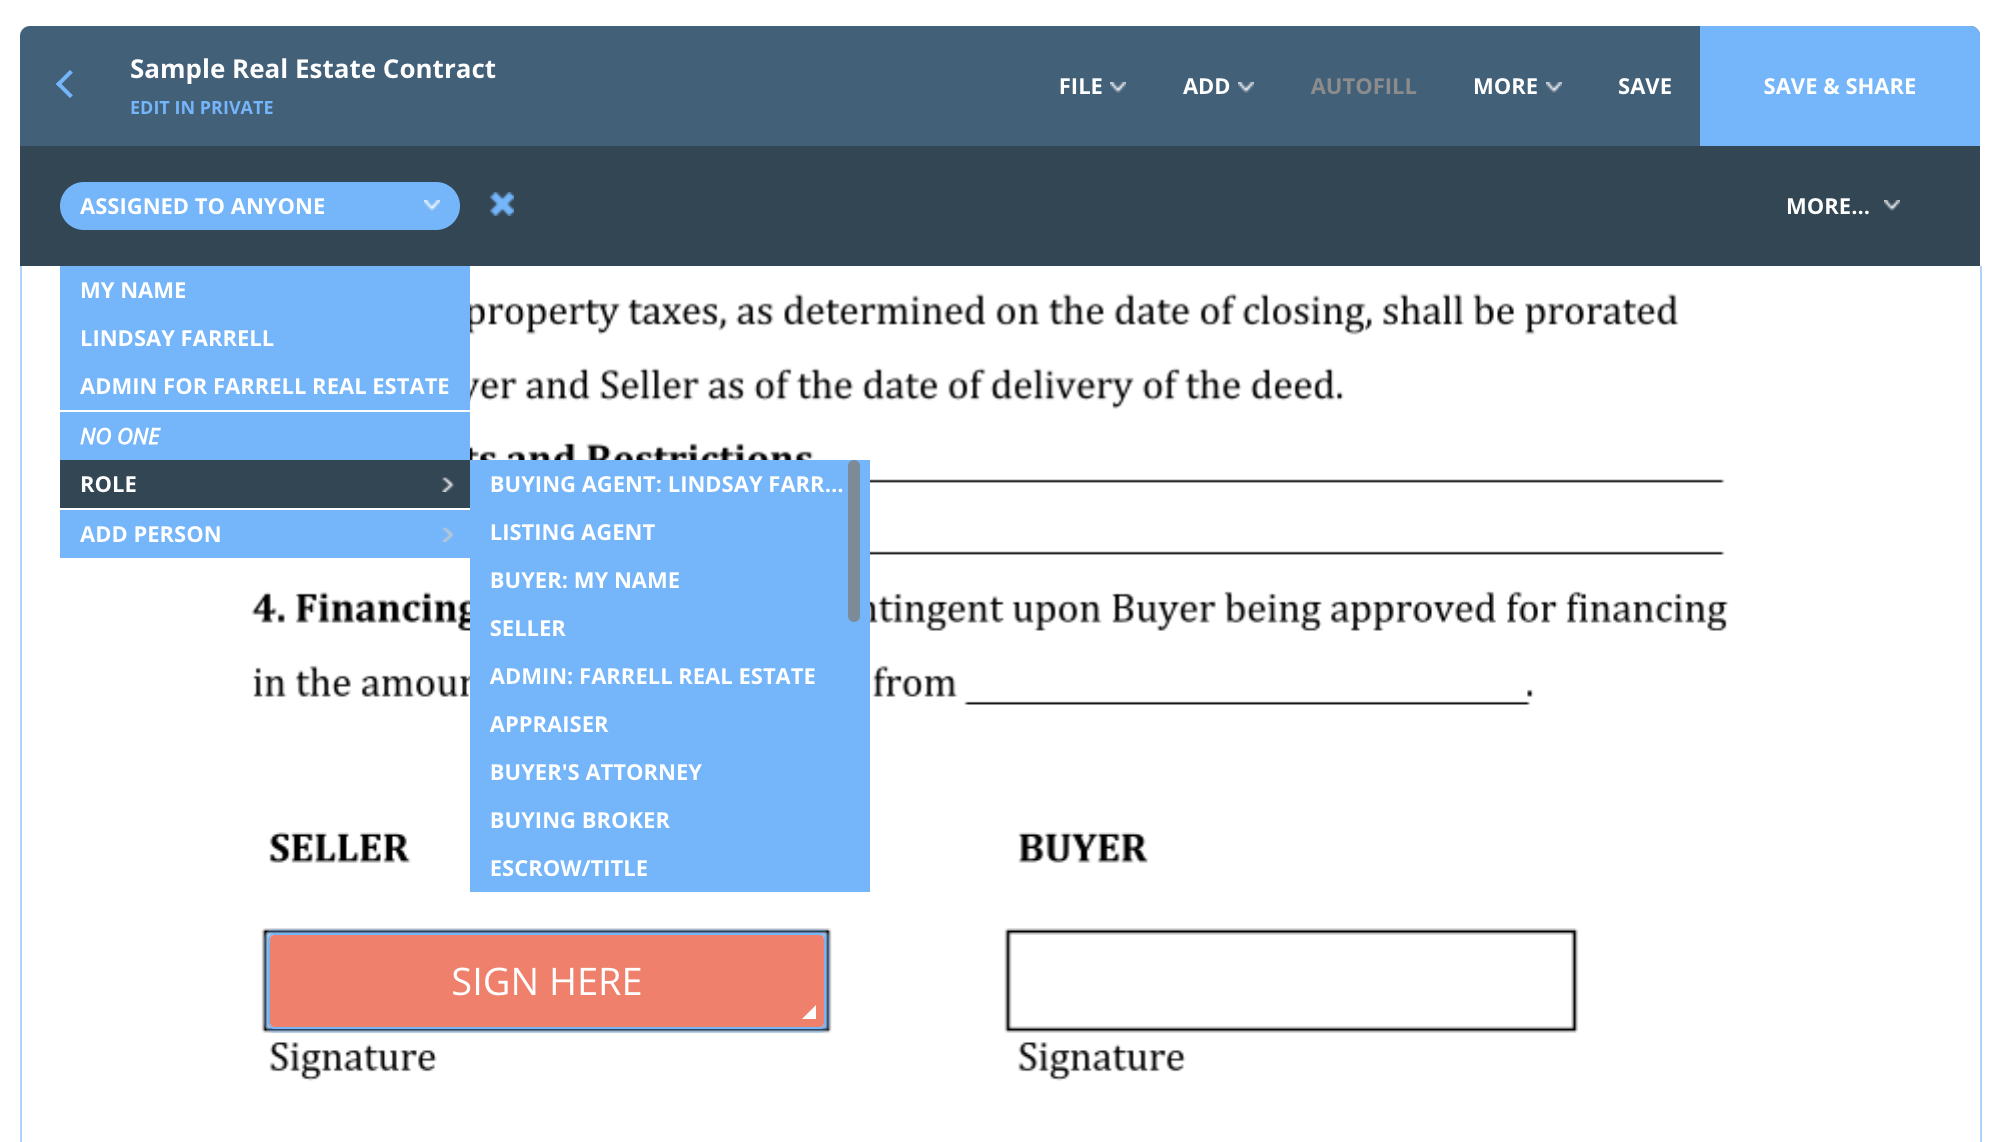
Scroll through the Roles section and confirm that the correct people are assigned to the correct roles. Look for their names in the list of blue links on the right side of the window. You may edit assignments by using the dropdown list for each role.
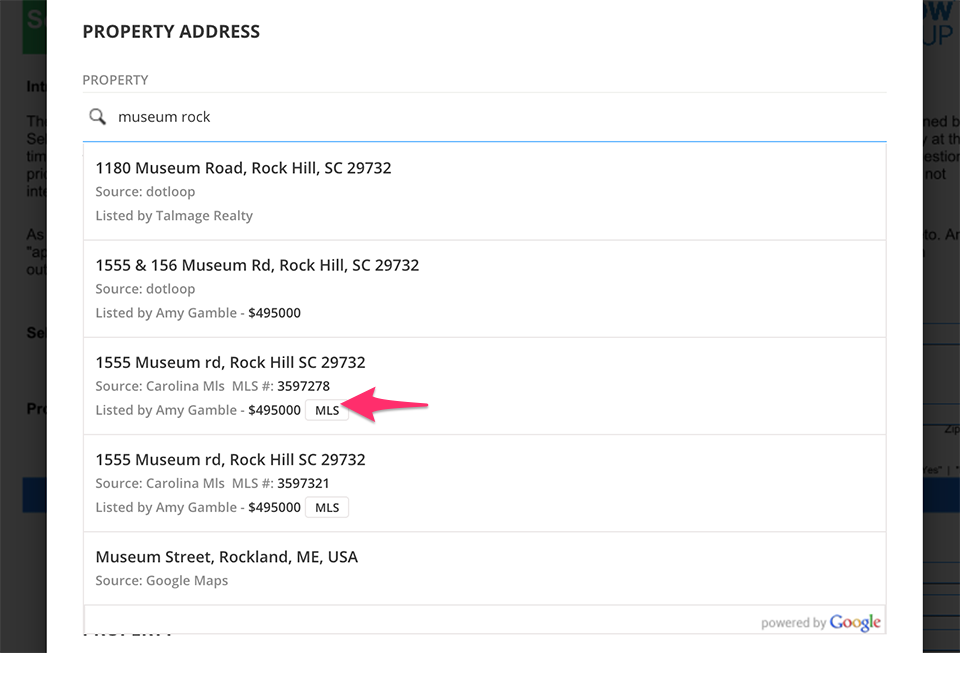
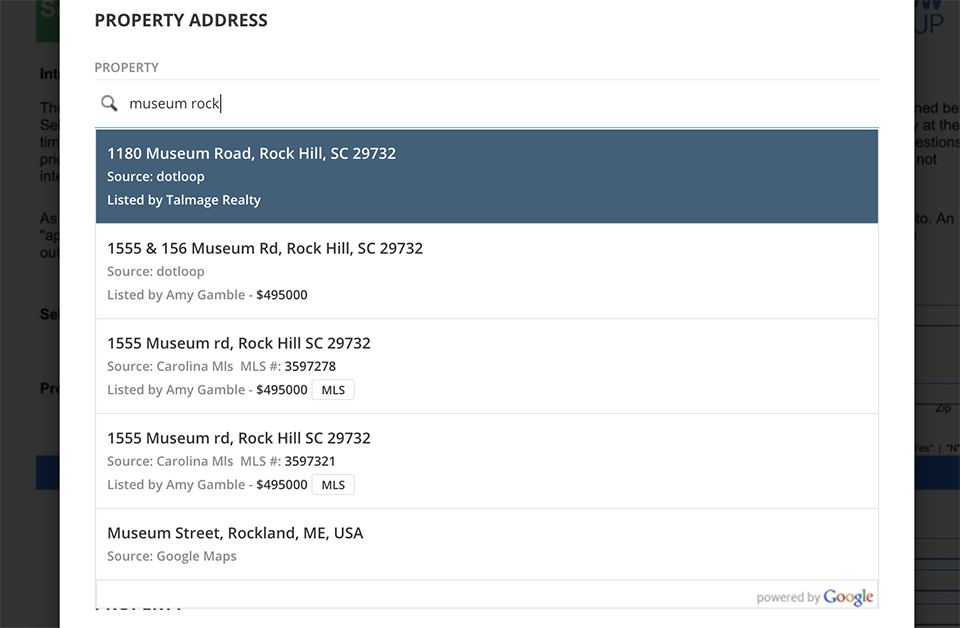
While still on the Autofill window, scroll to the next section - Property Address.
Next to the magnifying glass type in the property address or MLS number to find the listing you would like to link to. Once you’ve typed in the property address or MLS number look for a listing that shows the name of the MLS below the address. If the listing shows the name of the MLS, that means that all of the MLS listing information will autofill into your document. Click on the listing to select it. Depending on what your MLS requires you may be asked to enter your MLS ID.
Note: if you do not see an MLS listing for the property, this could be for one of a few reasons: dotloop doesn't have an agreement with the MLS, the brokerage that owns the listing data doesn’t have their listings opted into our feed, the listing isn’t an active residential listing, or if it’s newly listed it can take a day or two for the MLS to push it to the dotloop system. You may still continue to manually type in the property information in the fields below.
Click the Import Data button to pull all of the information from the MLS into your Autofill window.
Note: Once you select a listing to link your loop with, you cannot undo this selection. Please make sure you are selecting the proper listing before continuing. Also, if you would like to repurpose a loop for another listing or address we suggest you archive the current loop and create a new loop.
While still on the Autofill window, scroll to the next section - Property Address.
Next to the magnifying glass type in the property address or MLS number to find the listing you would like to link to. If you are a Buying Agent, you will usually only be linking to listings that are marked "source: dotloop". This means that the listing agent on the other side of the transaction has created a listing loop on dotloop, and any relevant information from their loop will be autofilled.
Note: If you do not see a dotloop listing for the property, the listing agent may not have created a loop for, or does not use dotloop for transactions. No worries! You may simply use the Google Maps option or manually enter the address information.
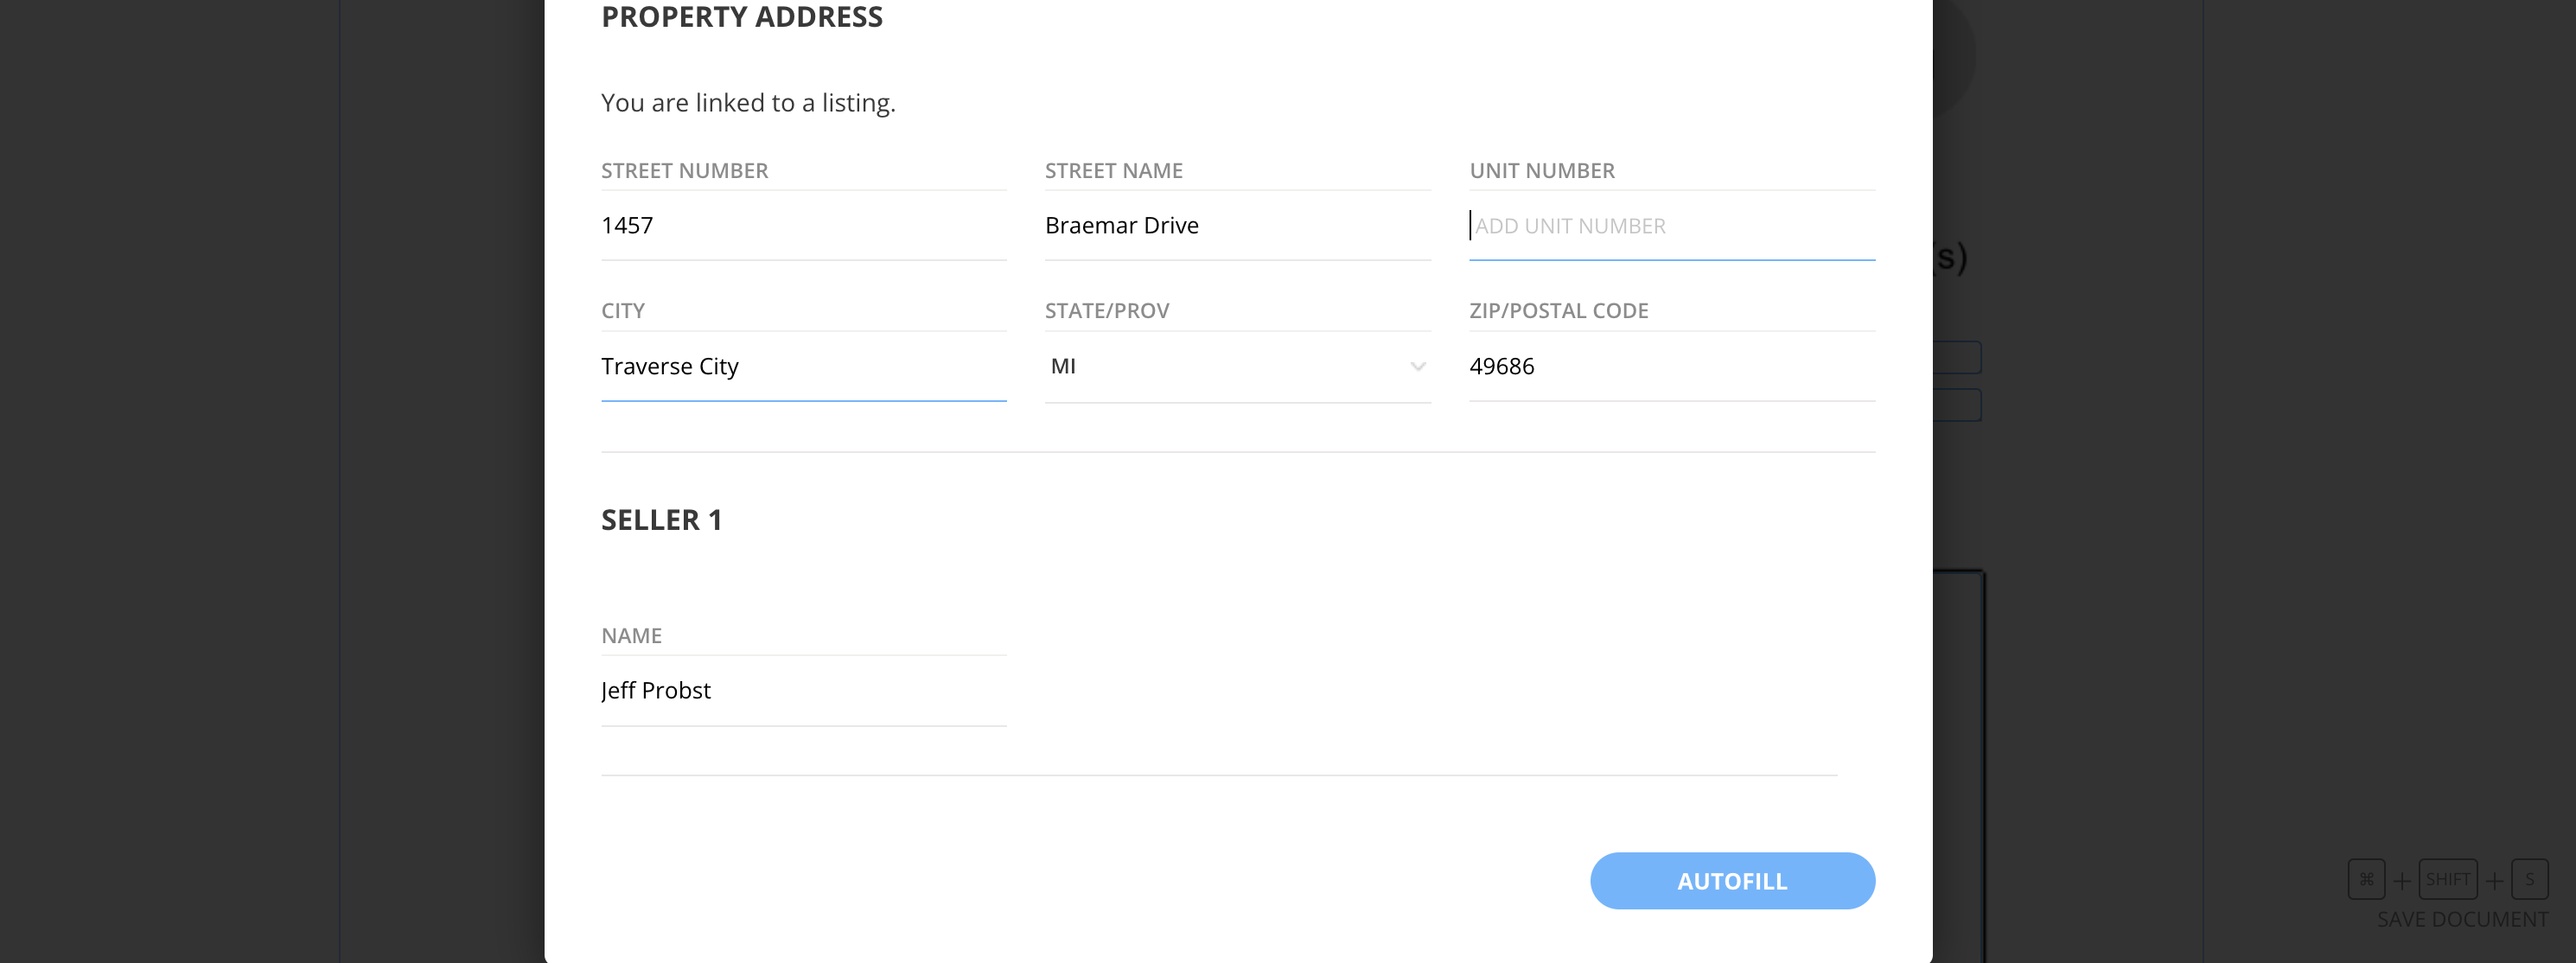
When you have filled out all the information on this window, click the Autofill button at the bottom right. Make sure to scroll all the way to the bottom.
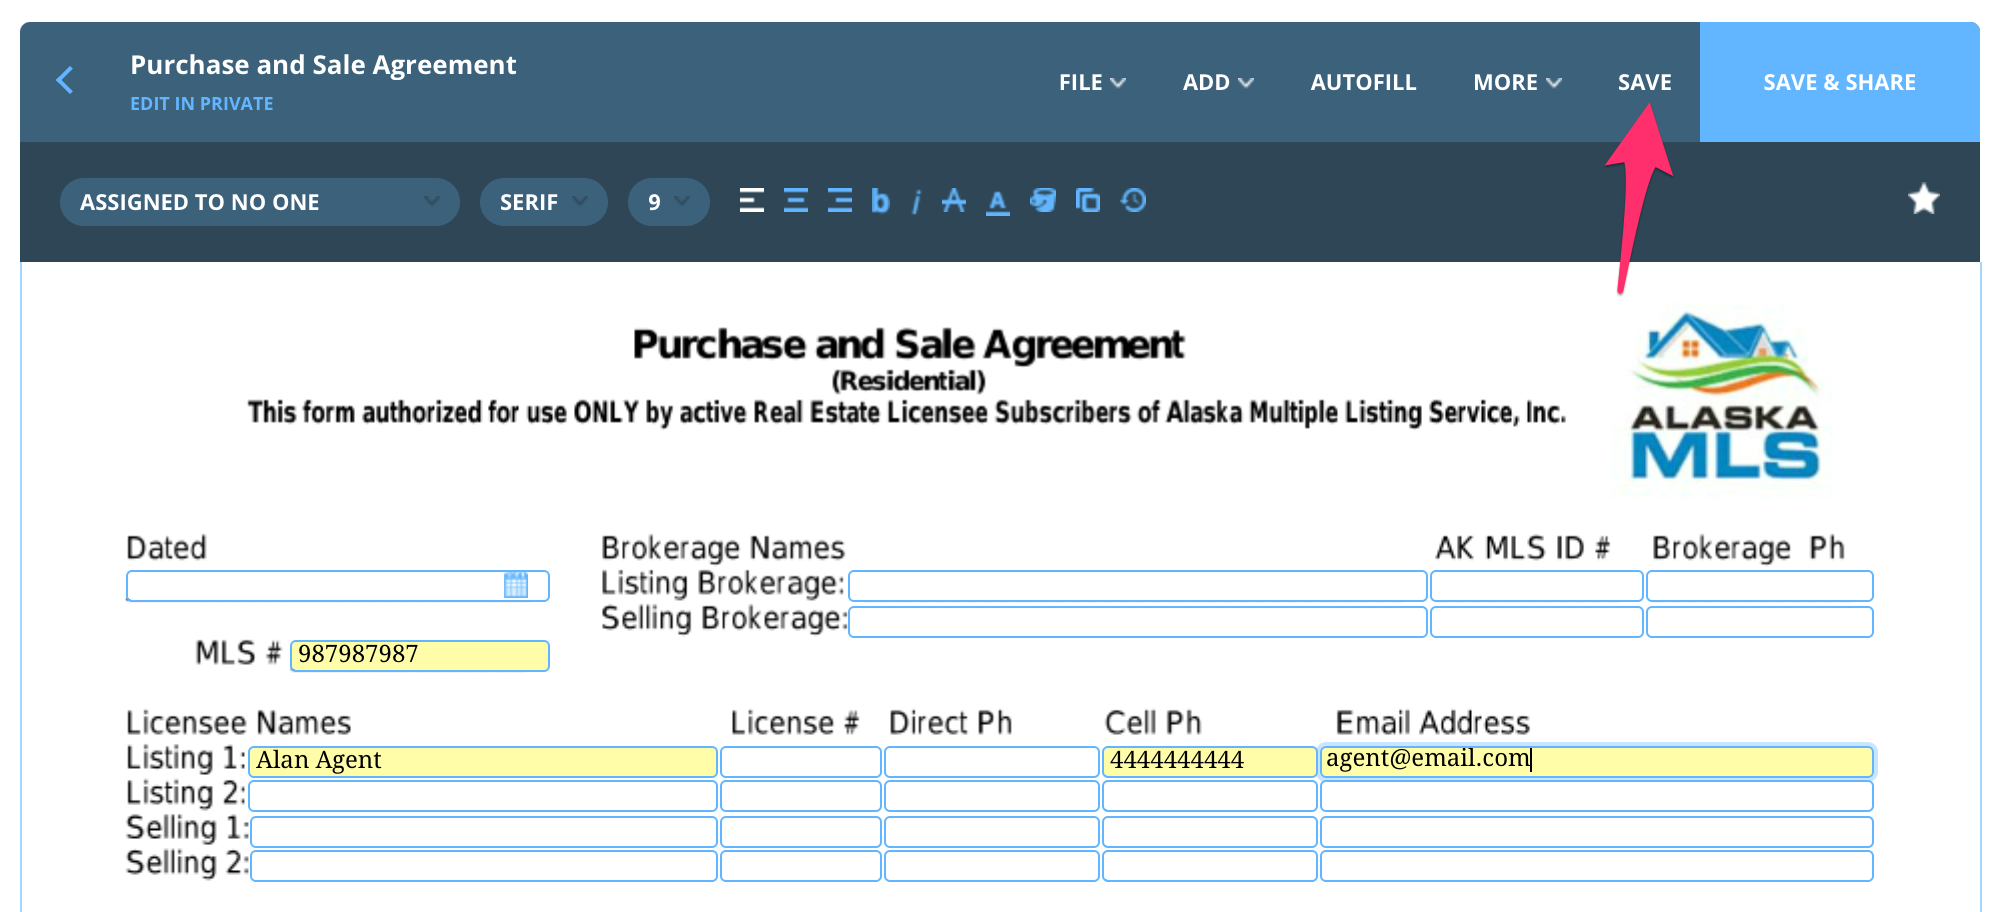
Any autofilled fields will appear highlighted in yellow. Review them for accuracy and consider saving so that you will not need to use the Autofill window again if you leave the document. Click Save to the left of the Save & Share button to continue working. You may edit any autofilled fields at any time.

Fill out the rest of the document to your desired completion. Click on text fields to type manually. You may also make selections in any check boxes and radio buttons.
Use the new toolbar that appears upon clicking on a text or date field to edit font, size, and formatting. Hover over each icon to learn what it means:
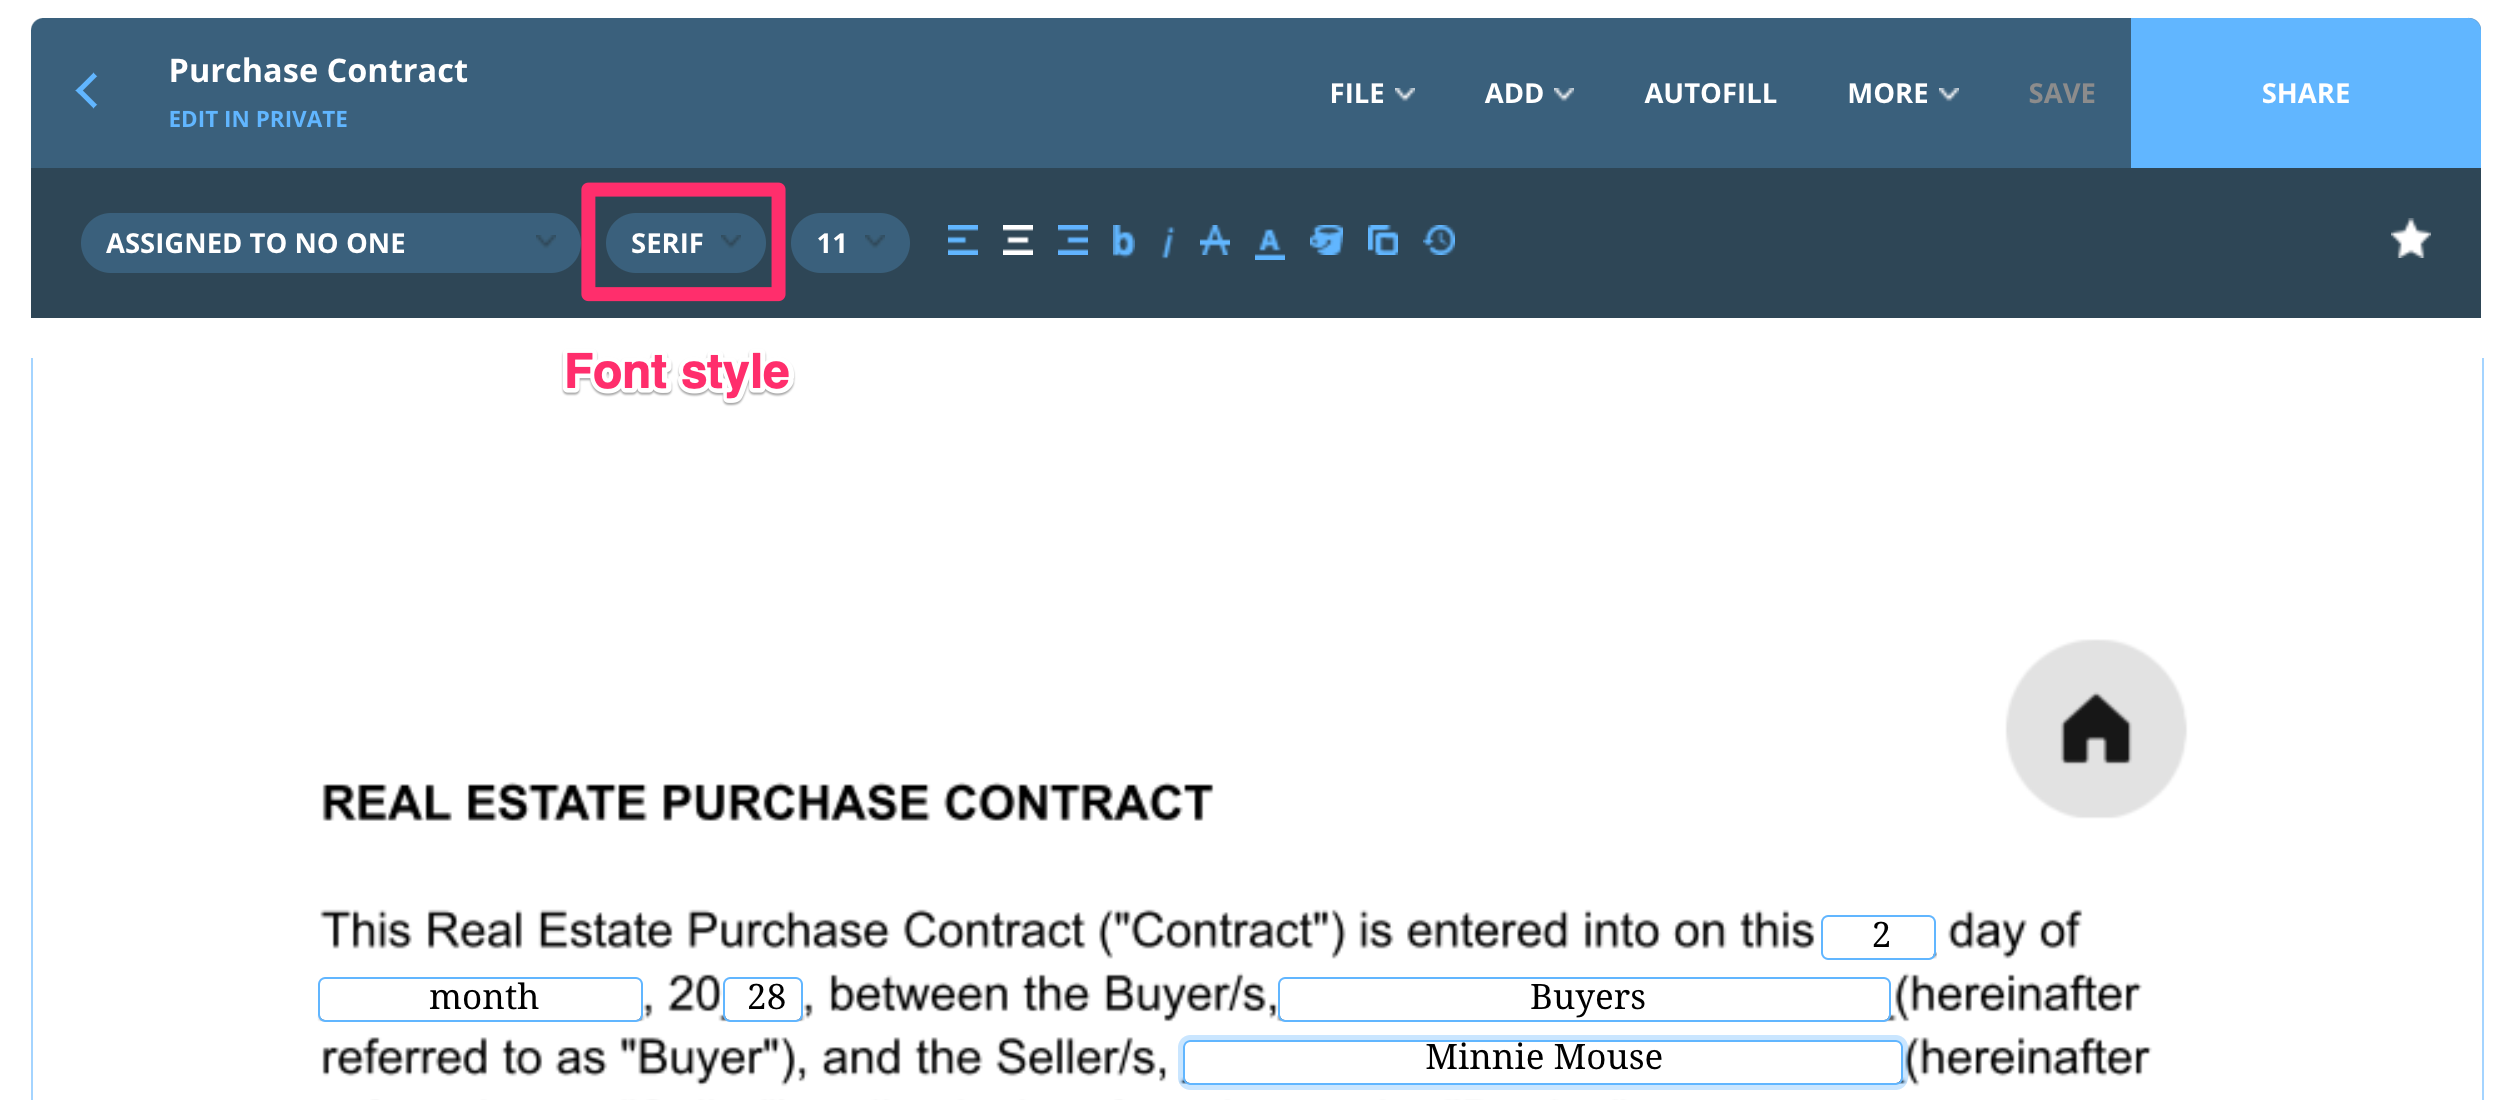
Font Style

Font Size
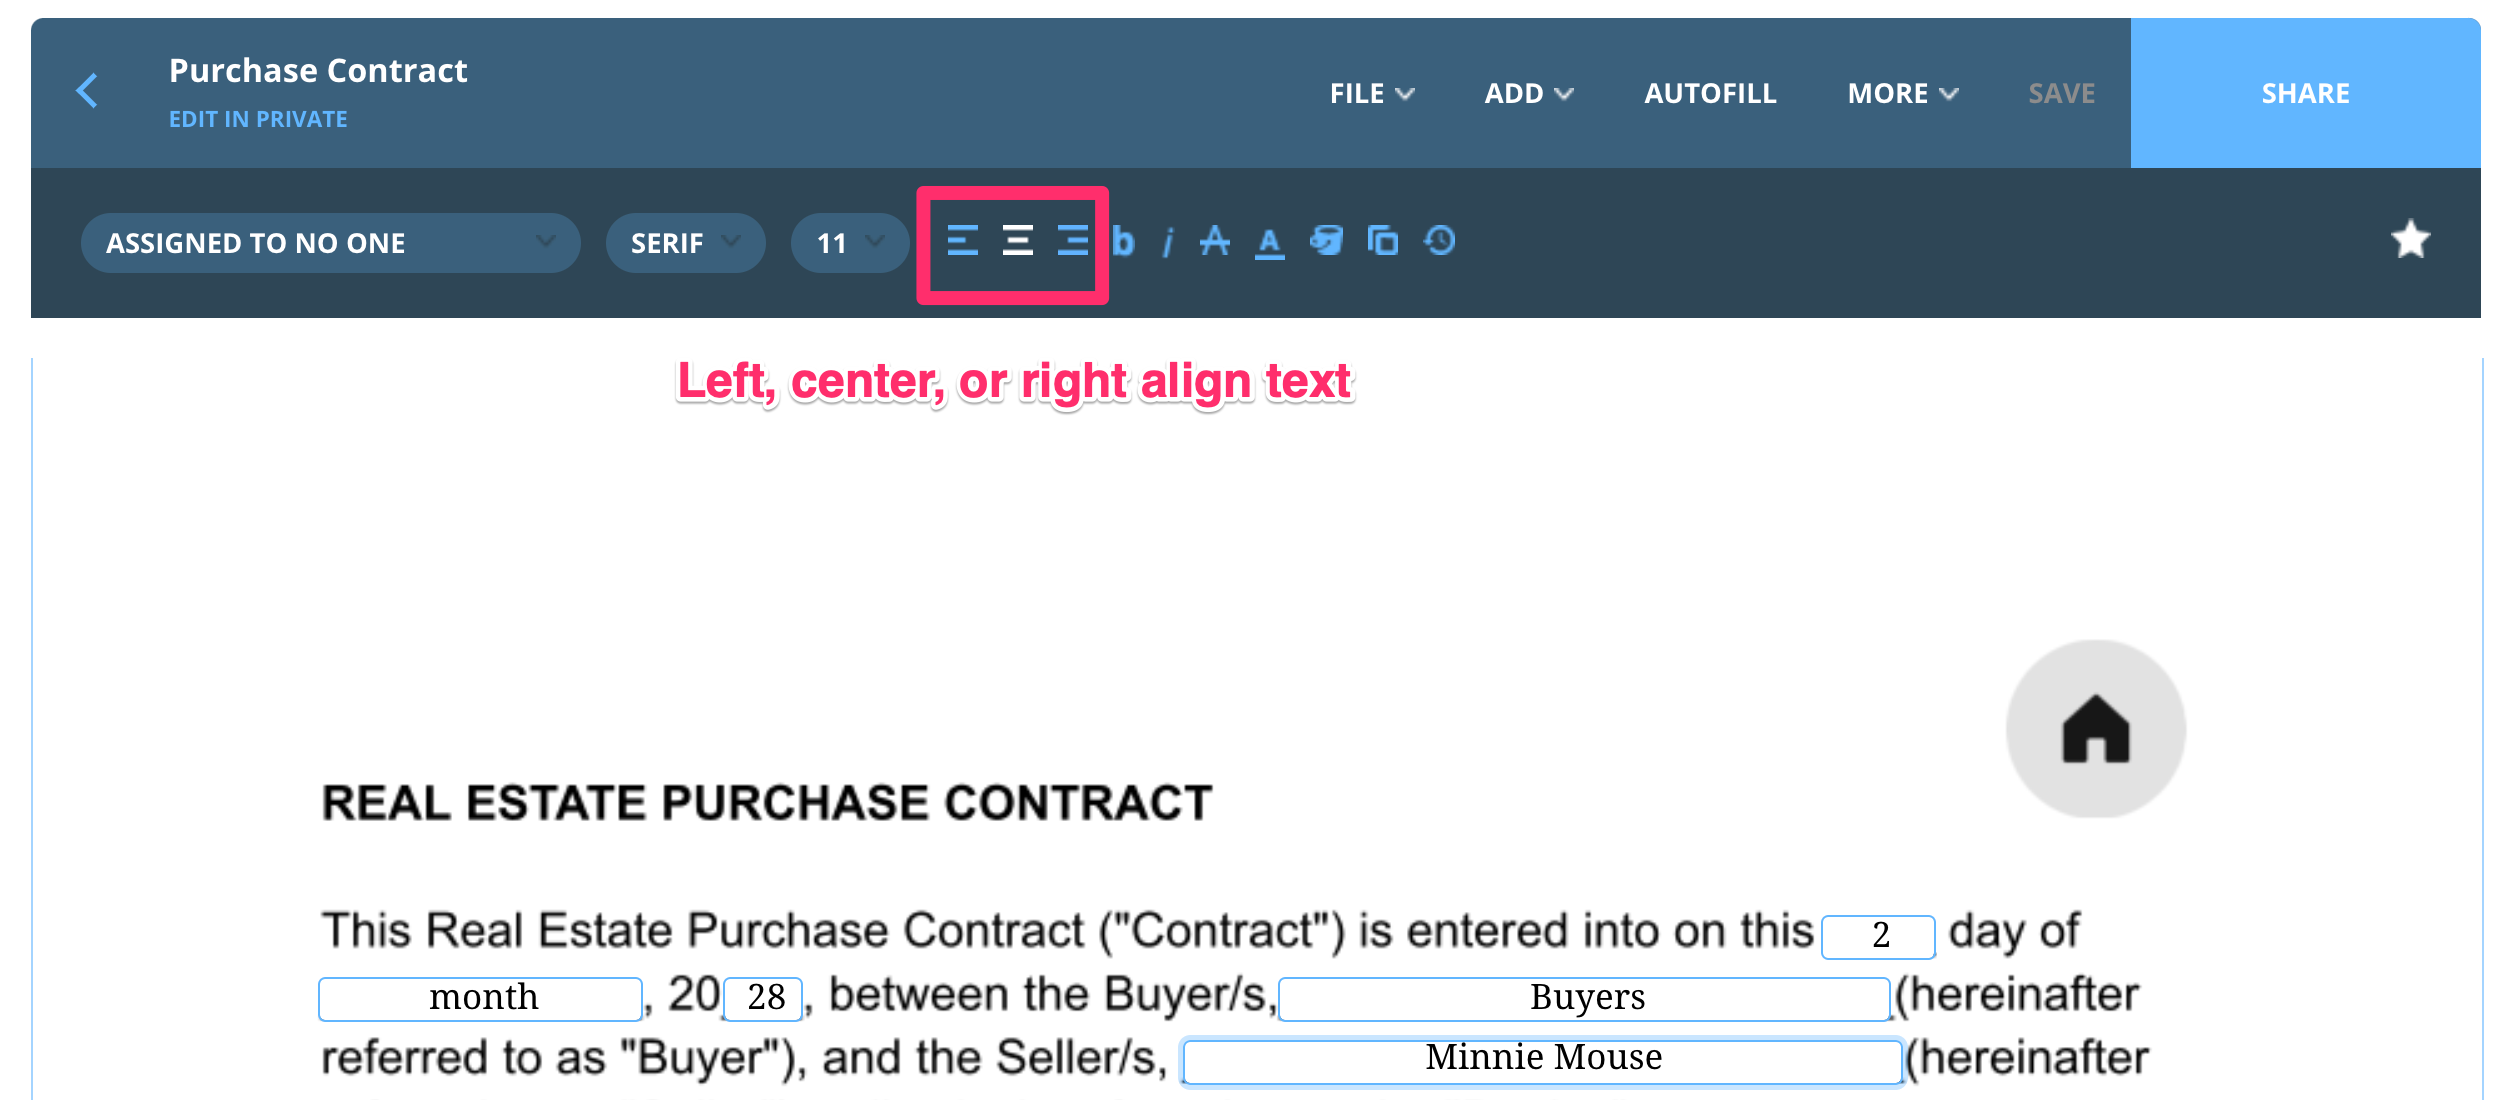
Left Align, Center, or Right Align text
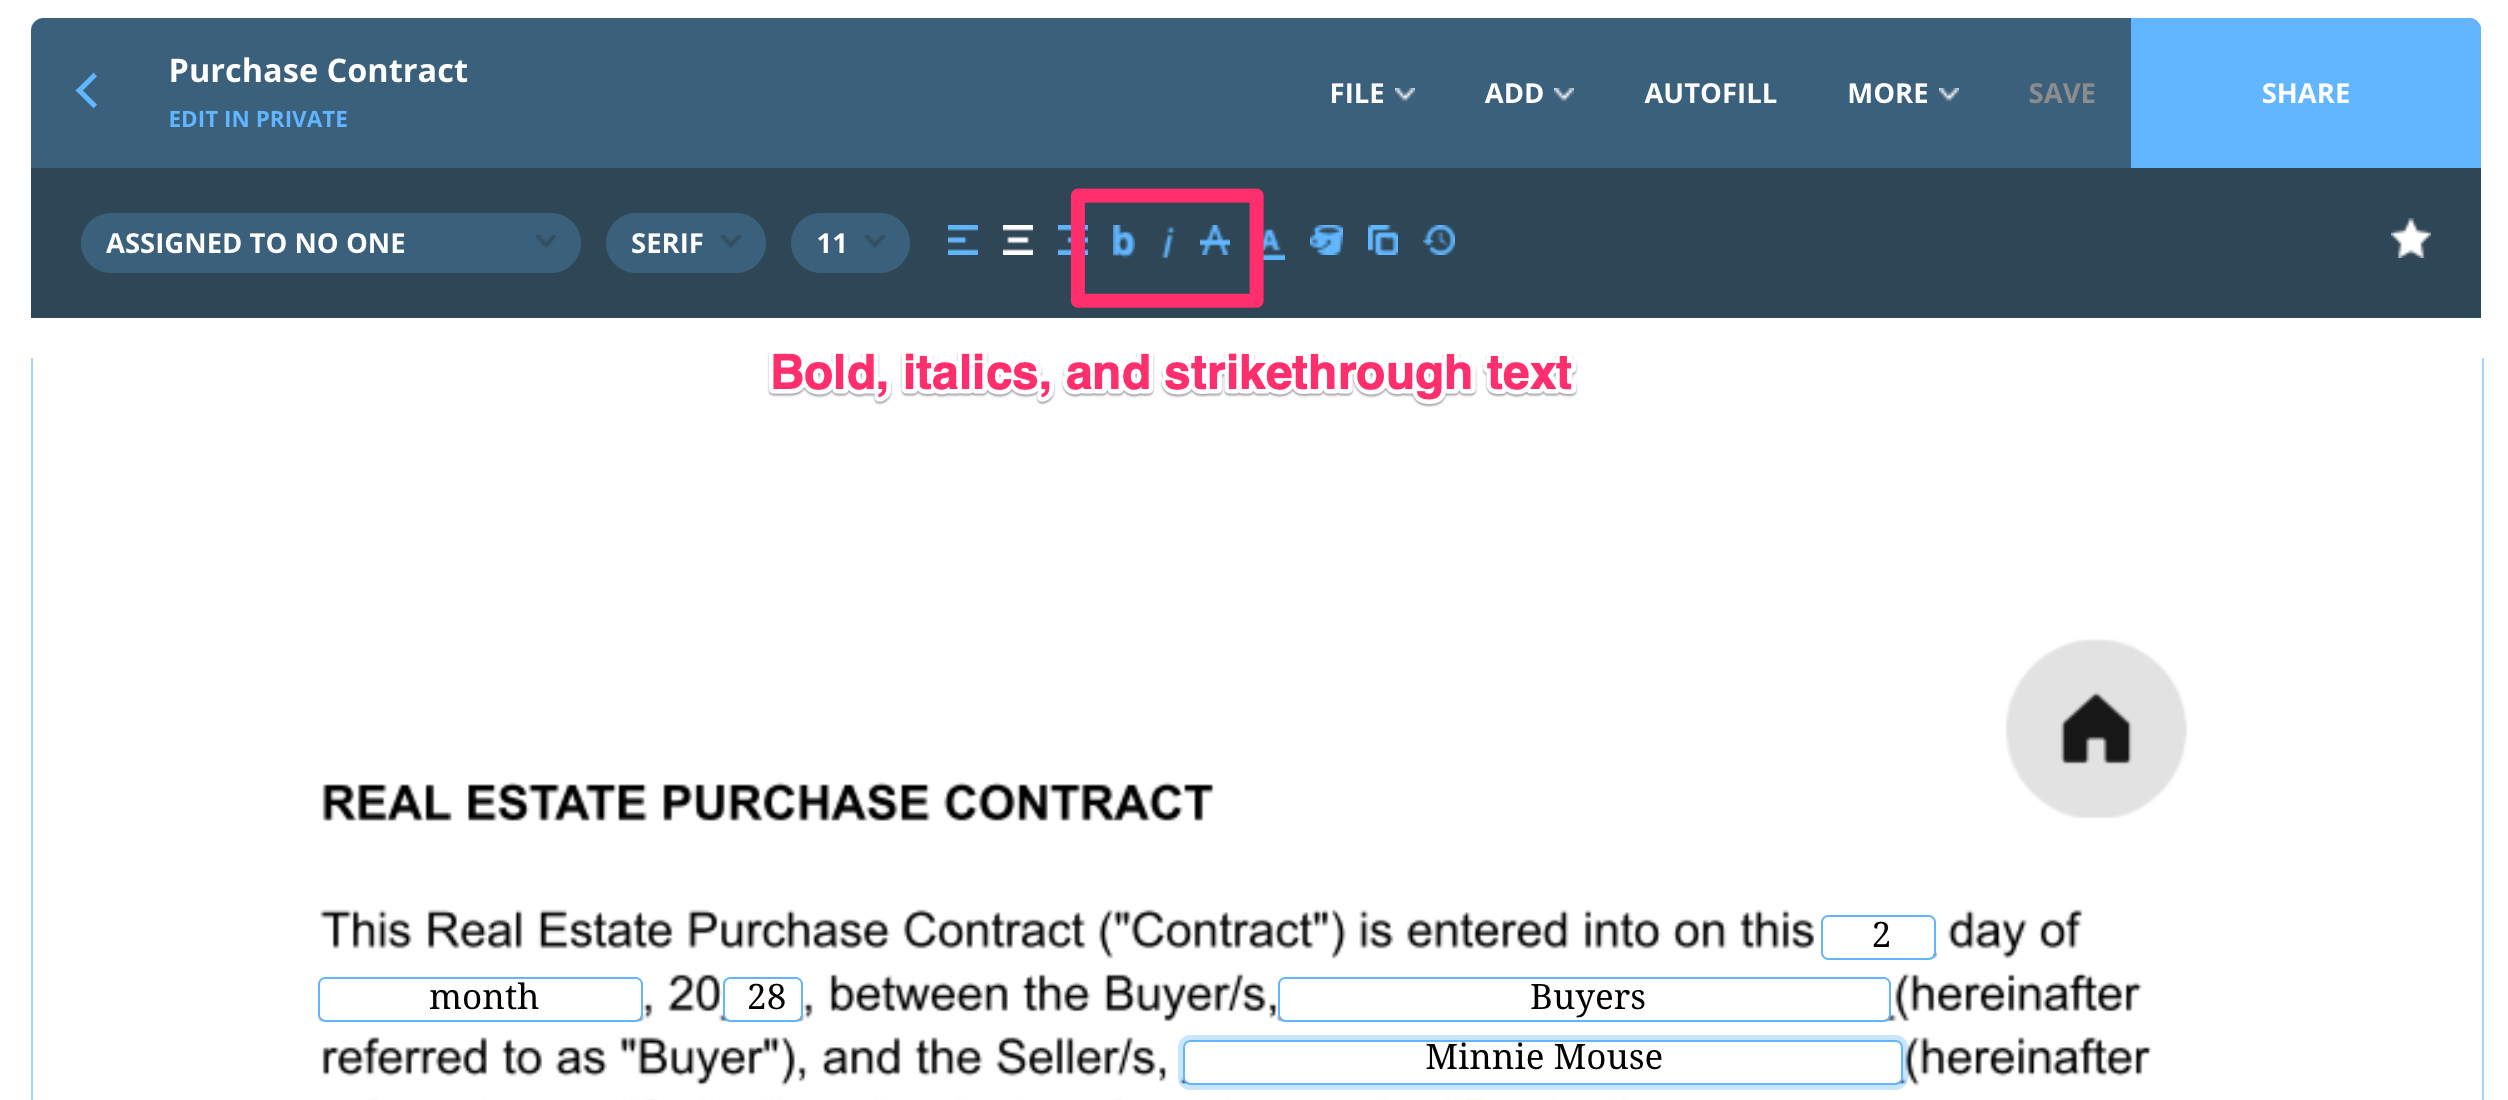
Bold, Italics, or Strikethrough Font
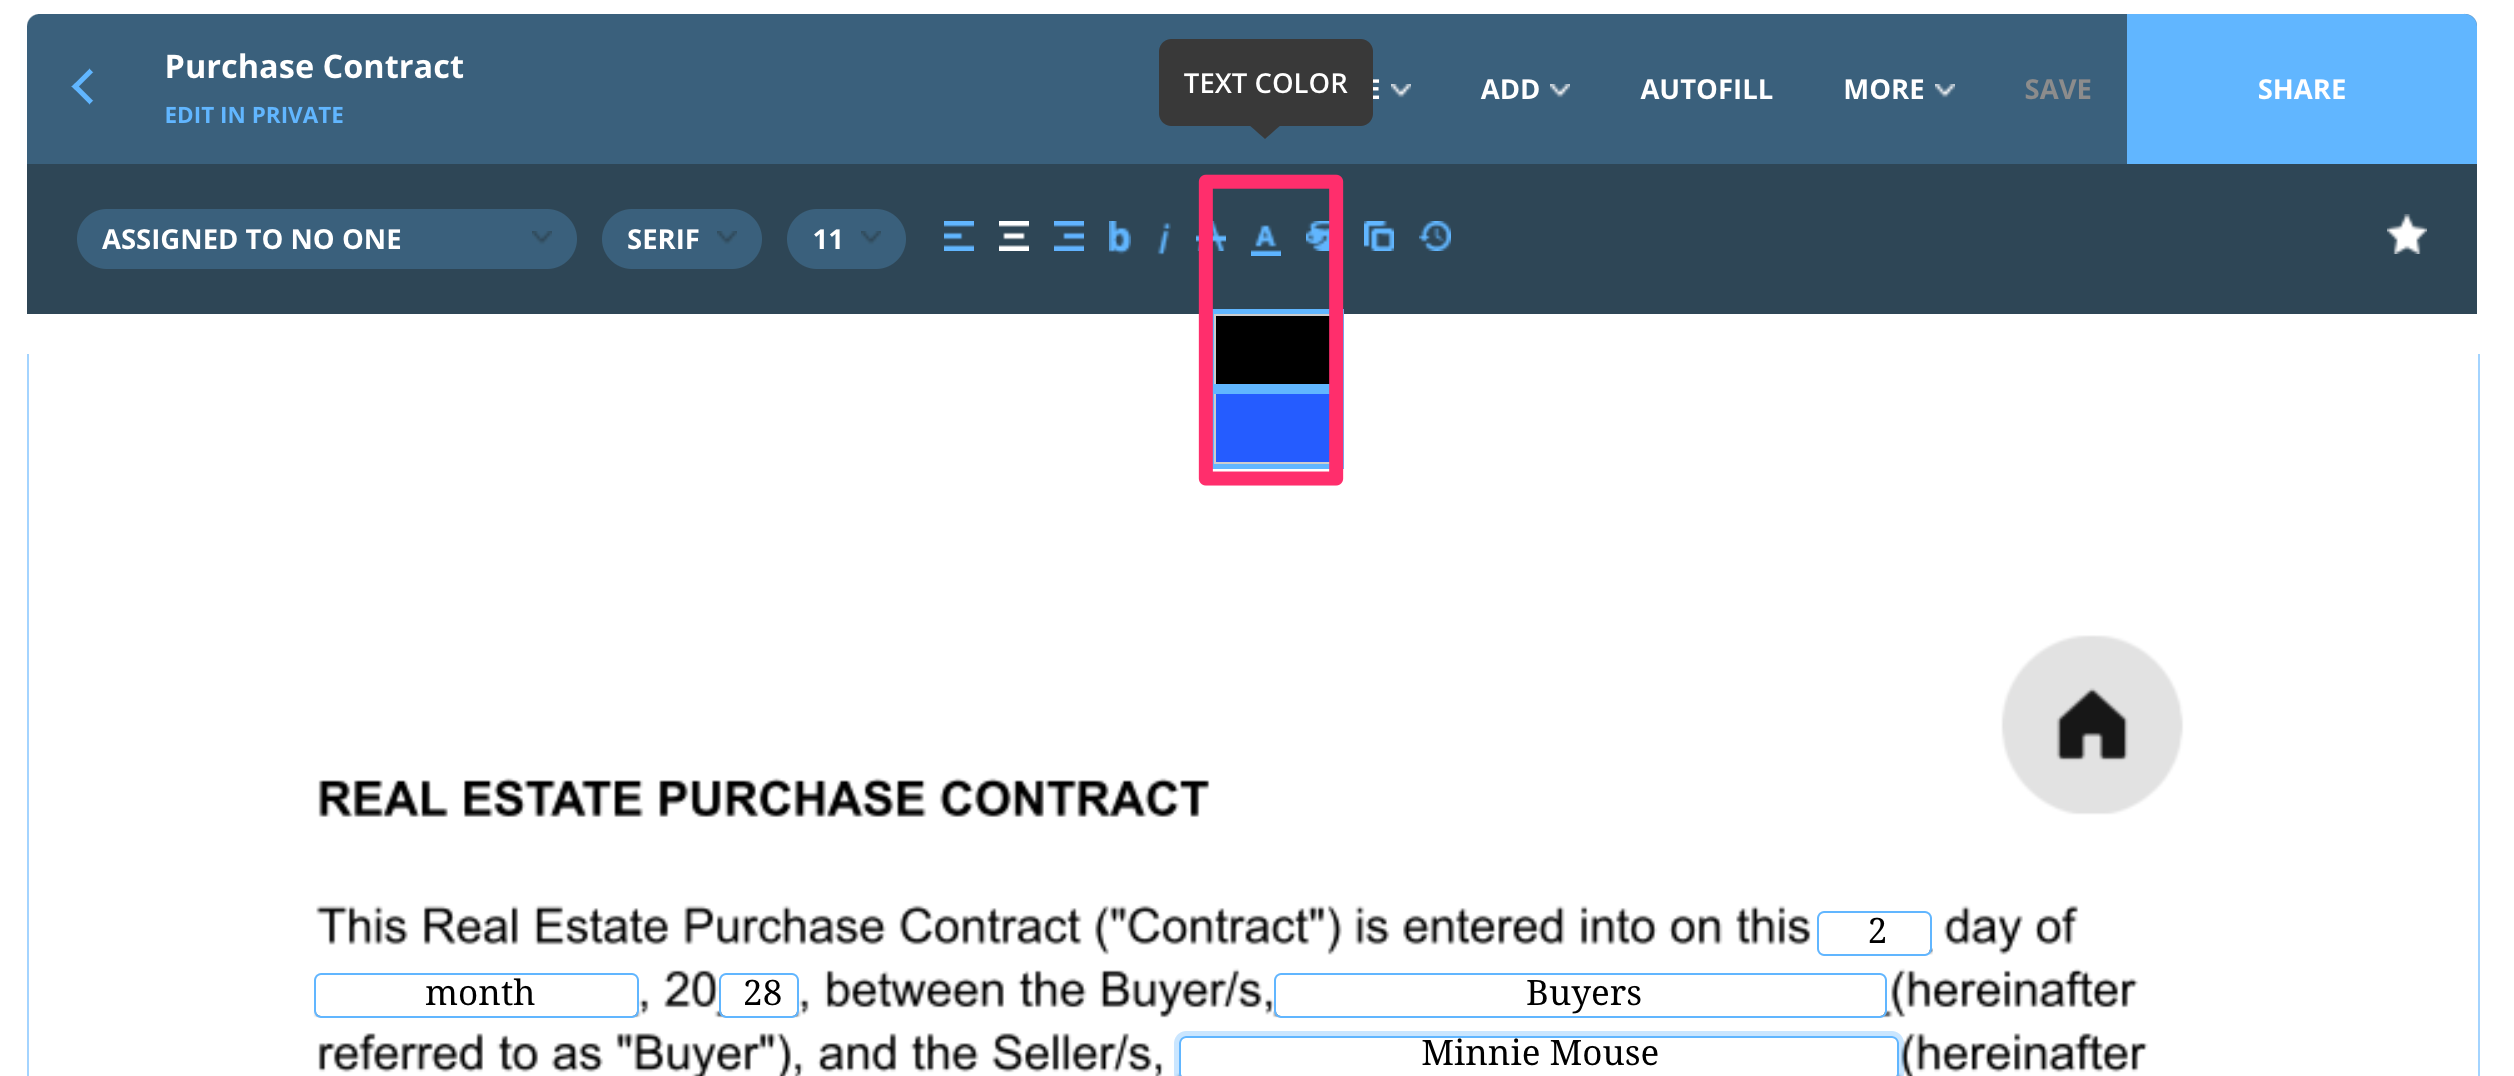
Font Color
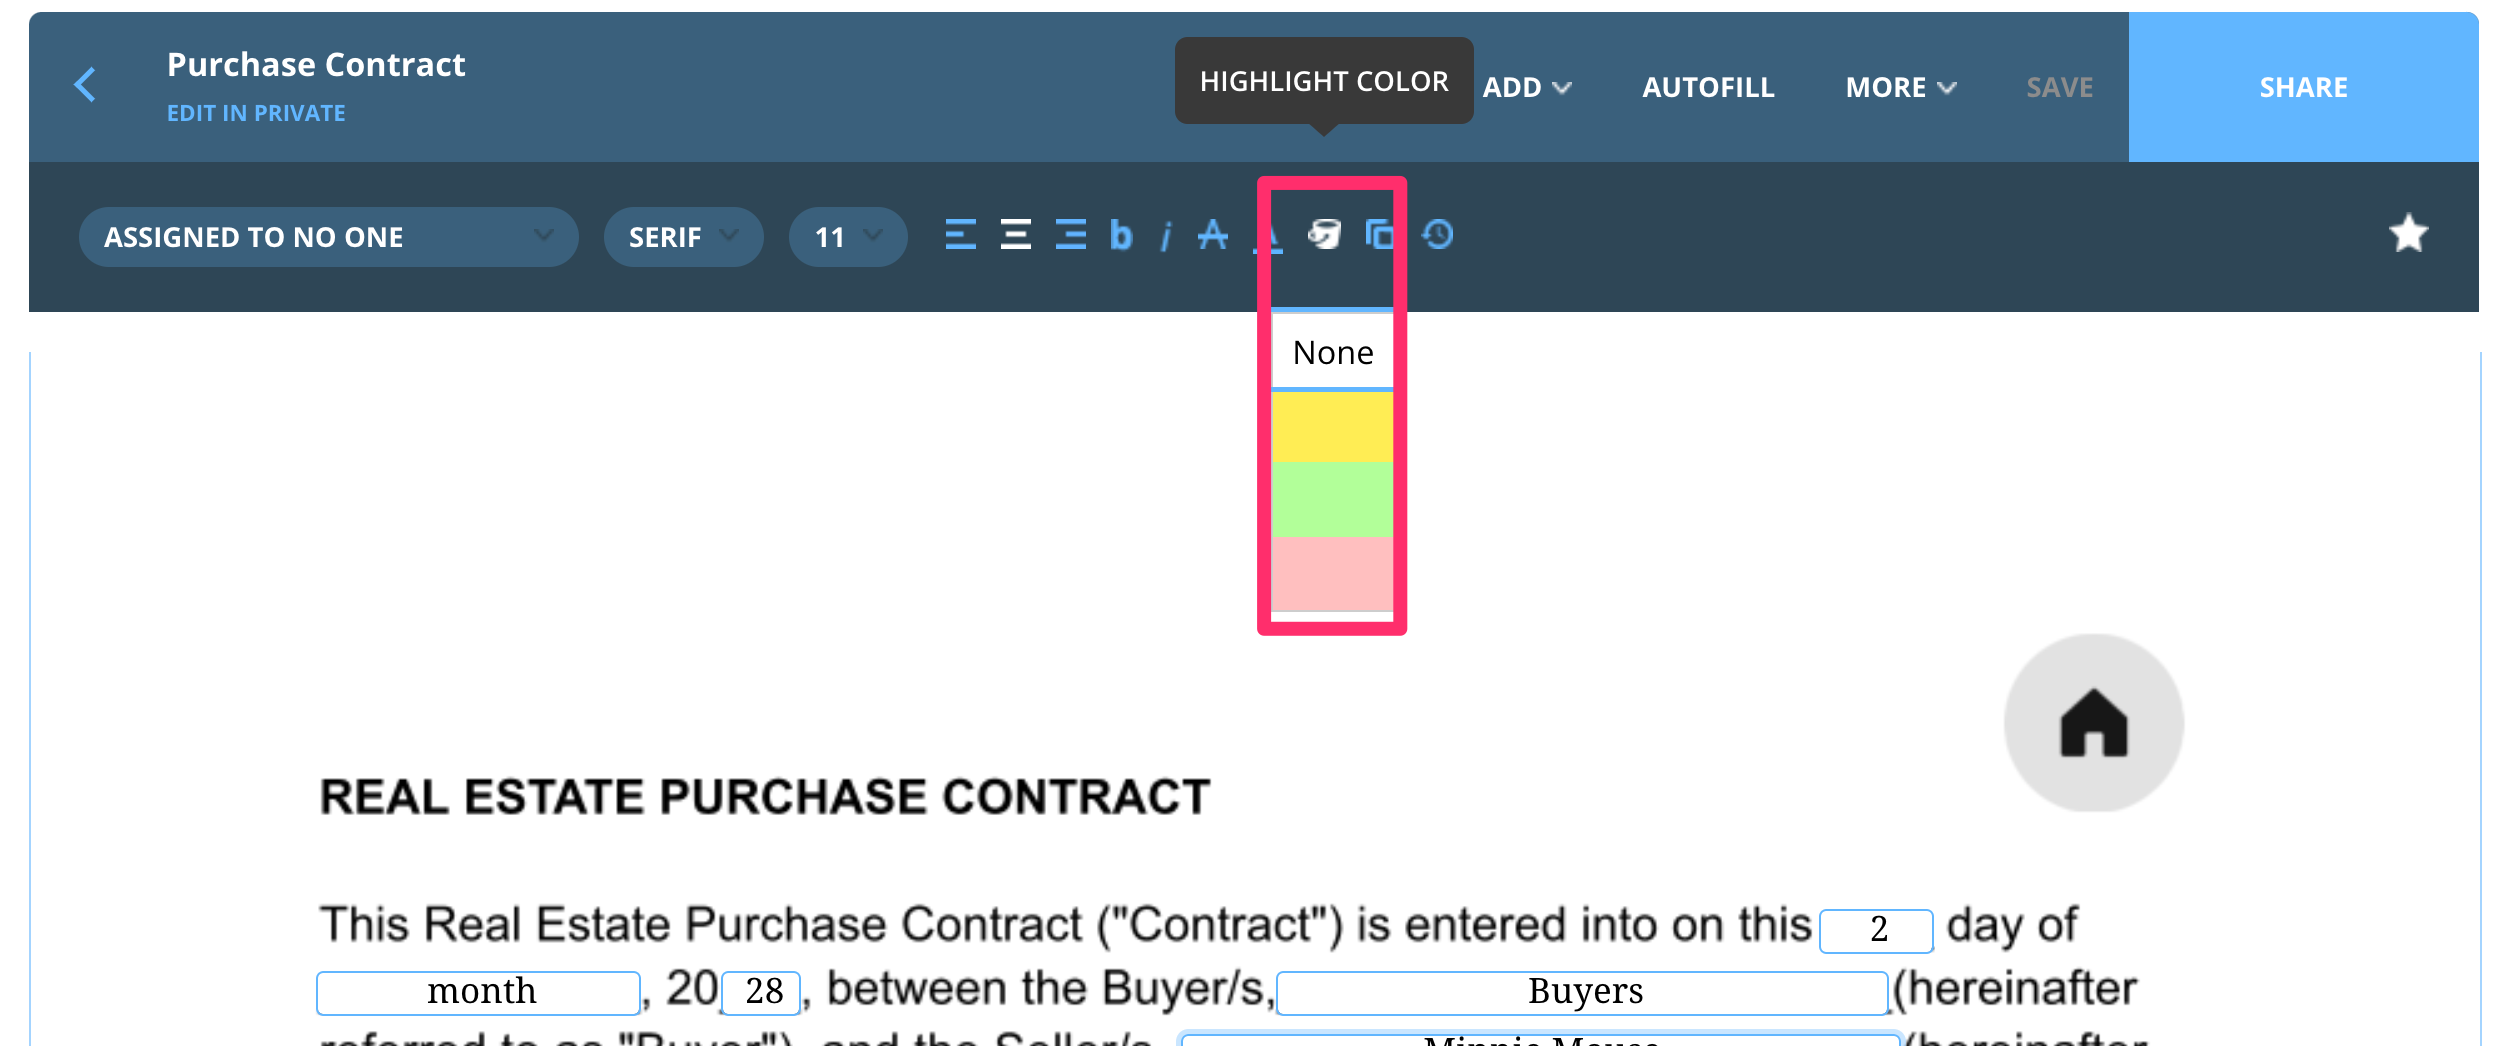
Highlight text in a field
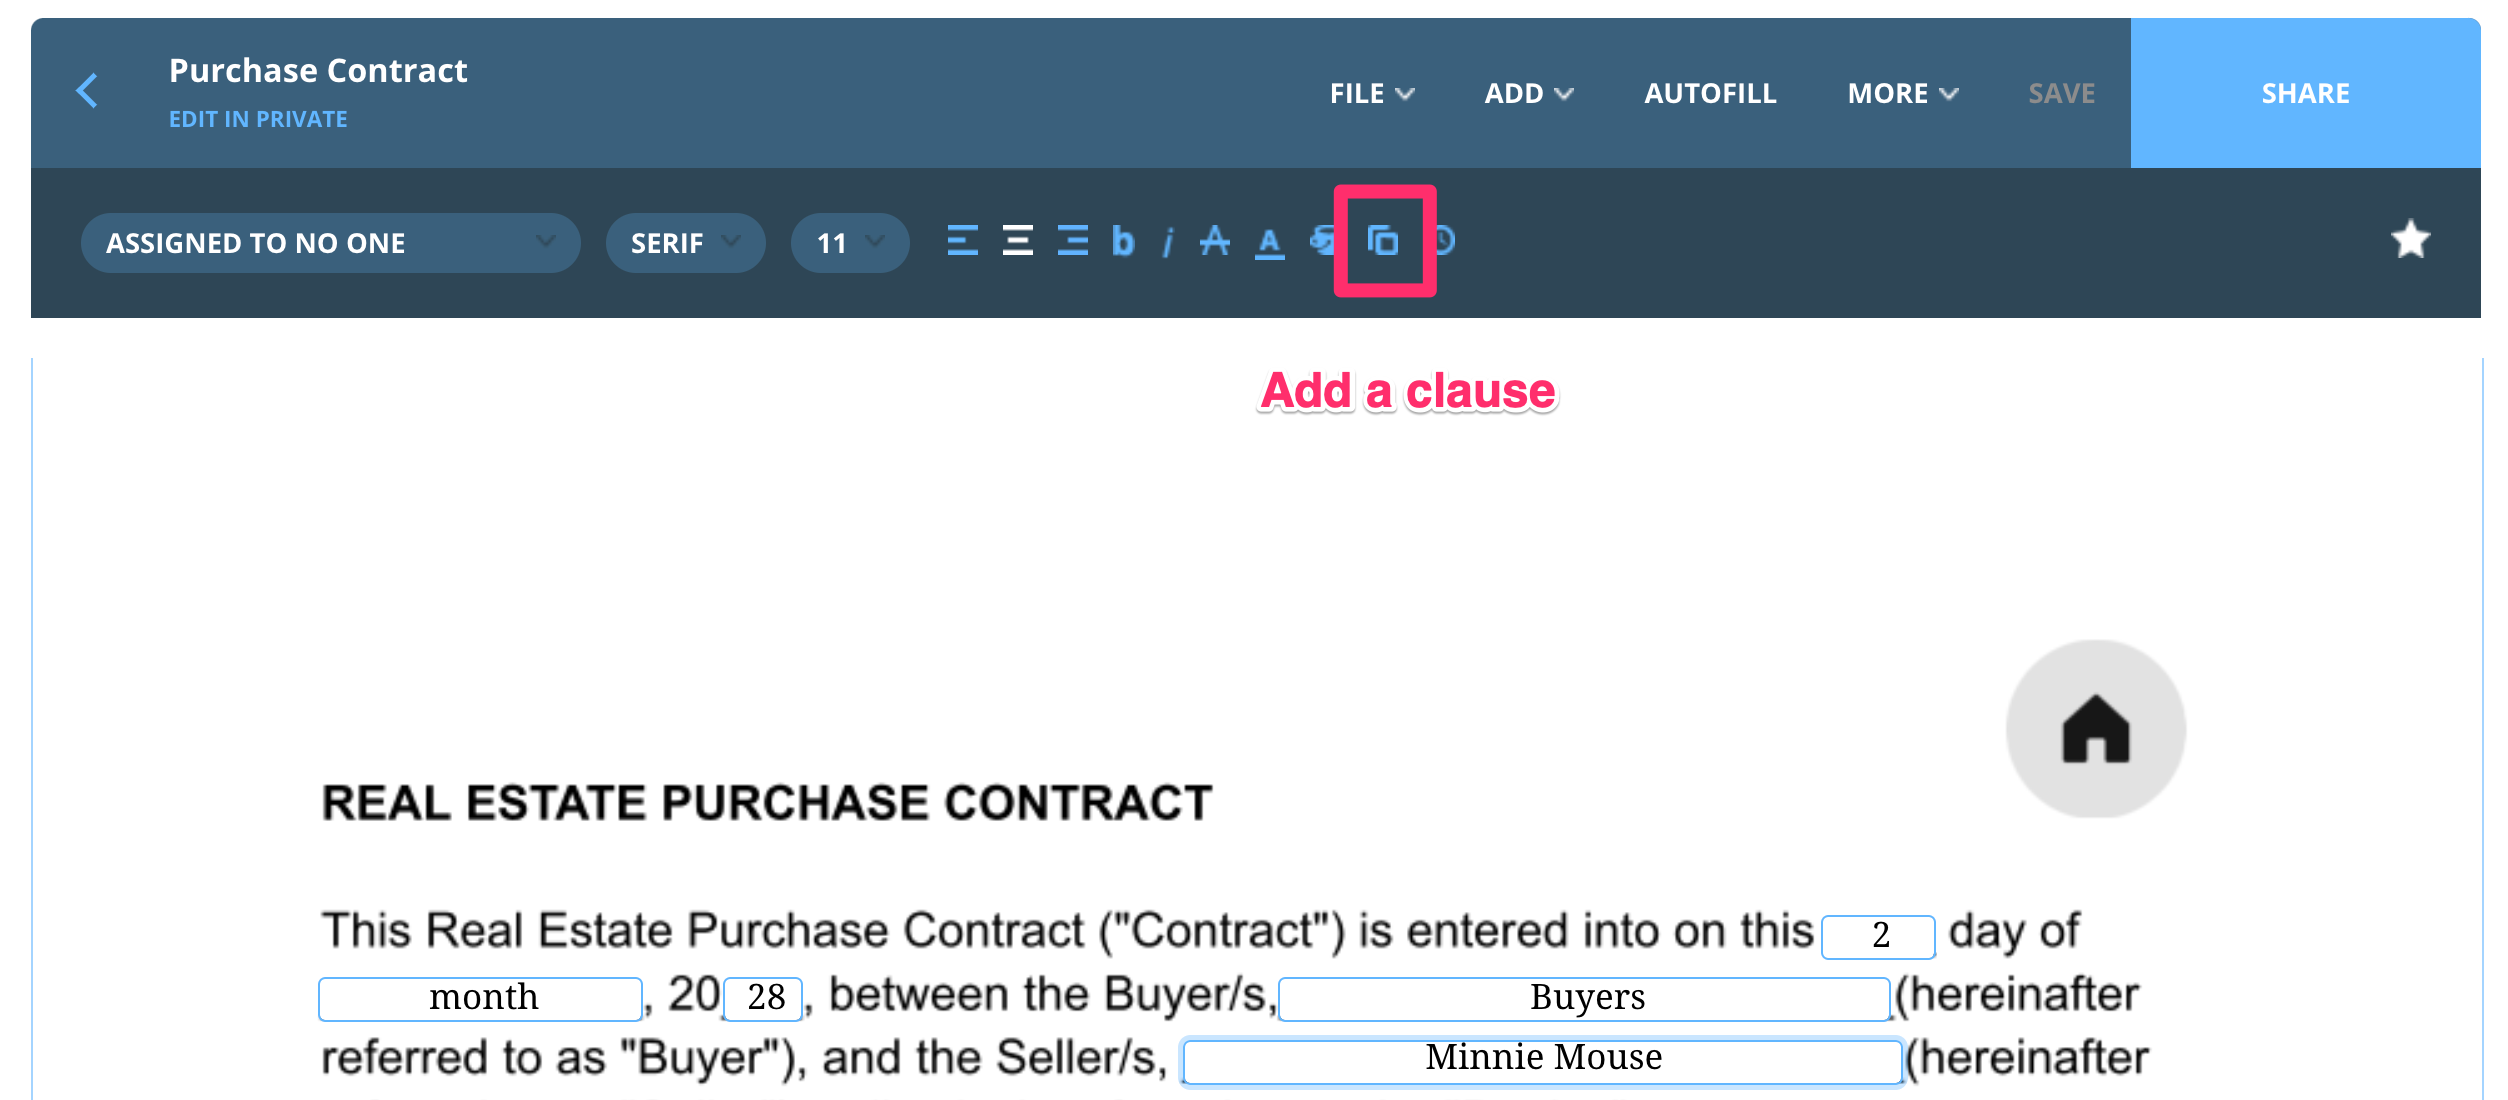
Add a clause
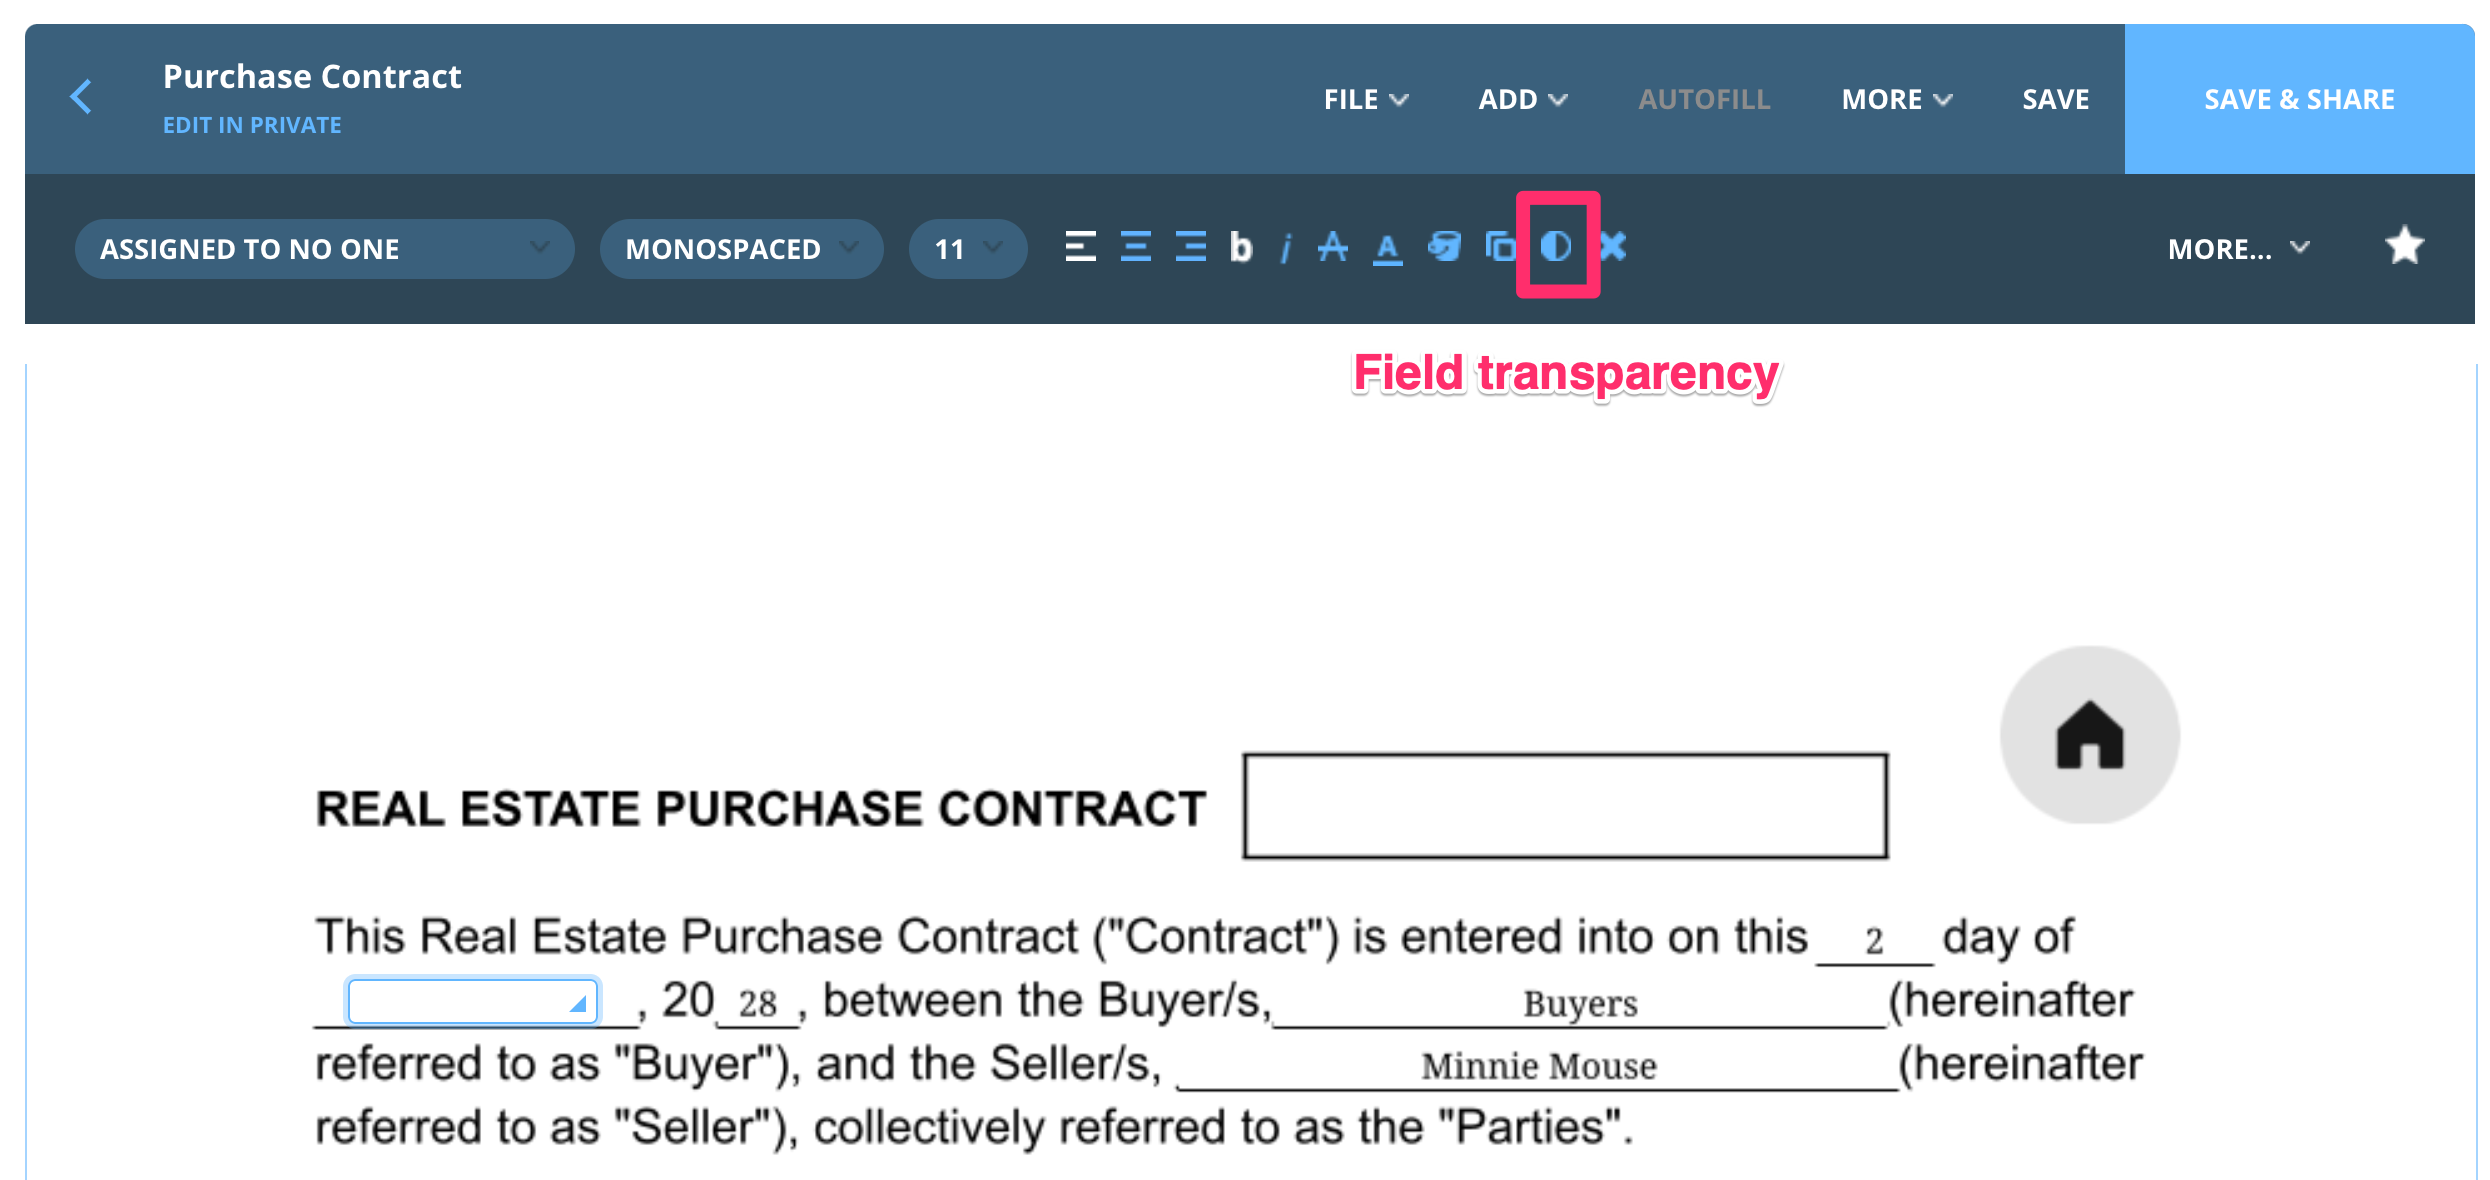
Field Transparency
Font still visible, outline of interactive field is not when a document is downloaded or printed.
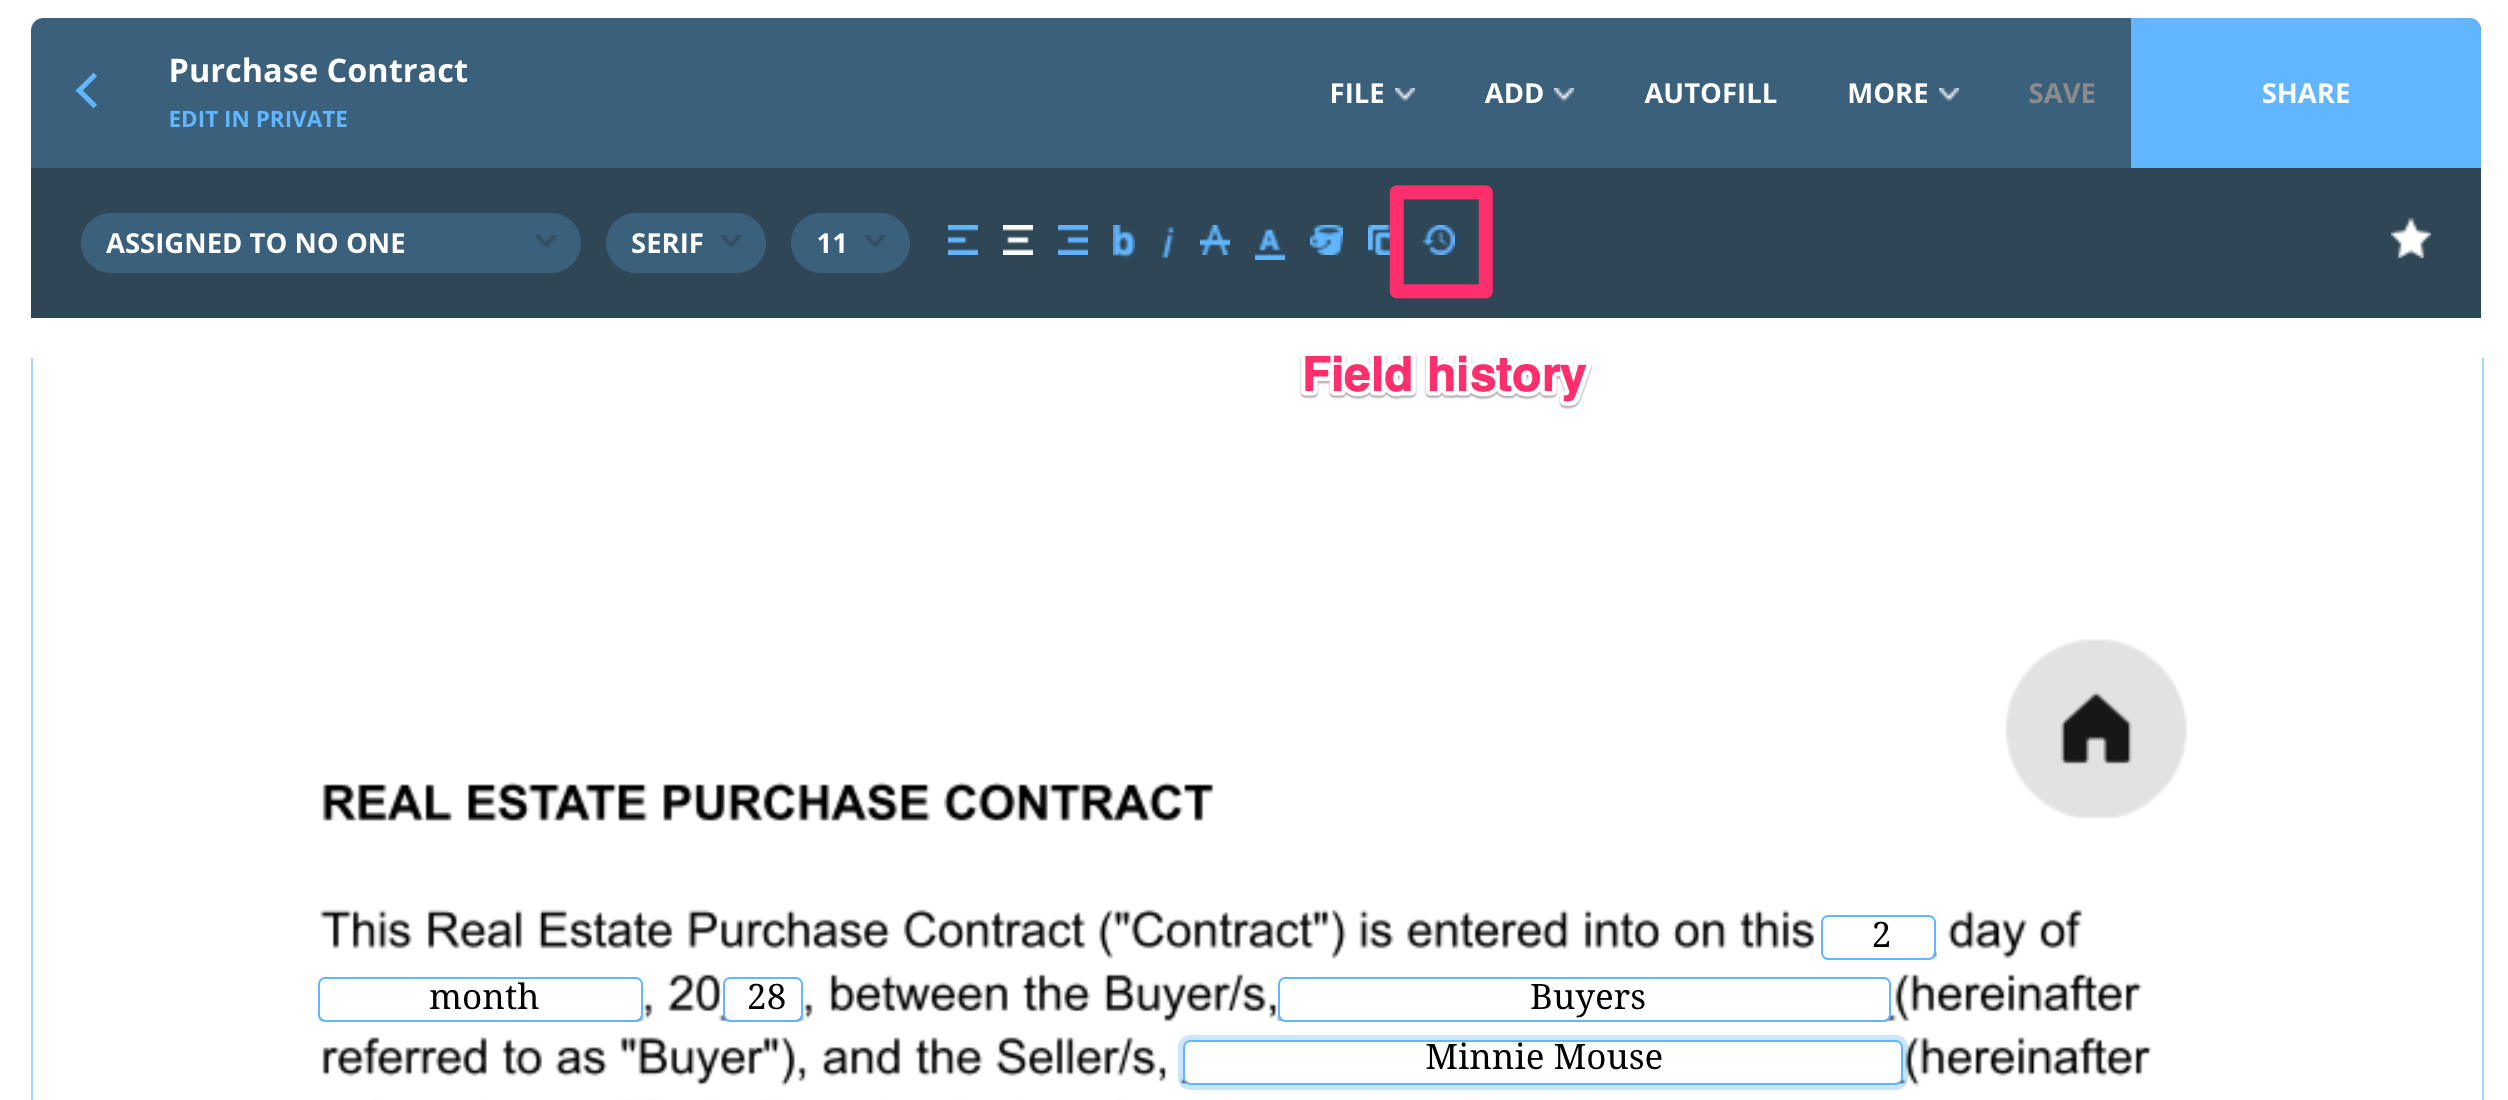
Field History
Indicates what modifications were made to the document when and by whom.
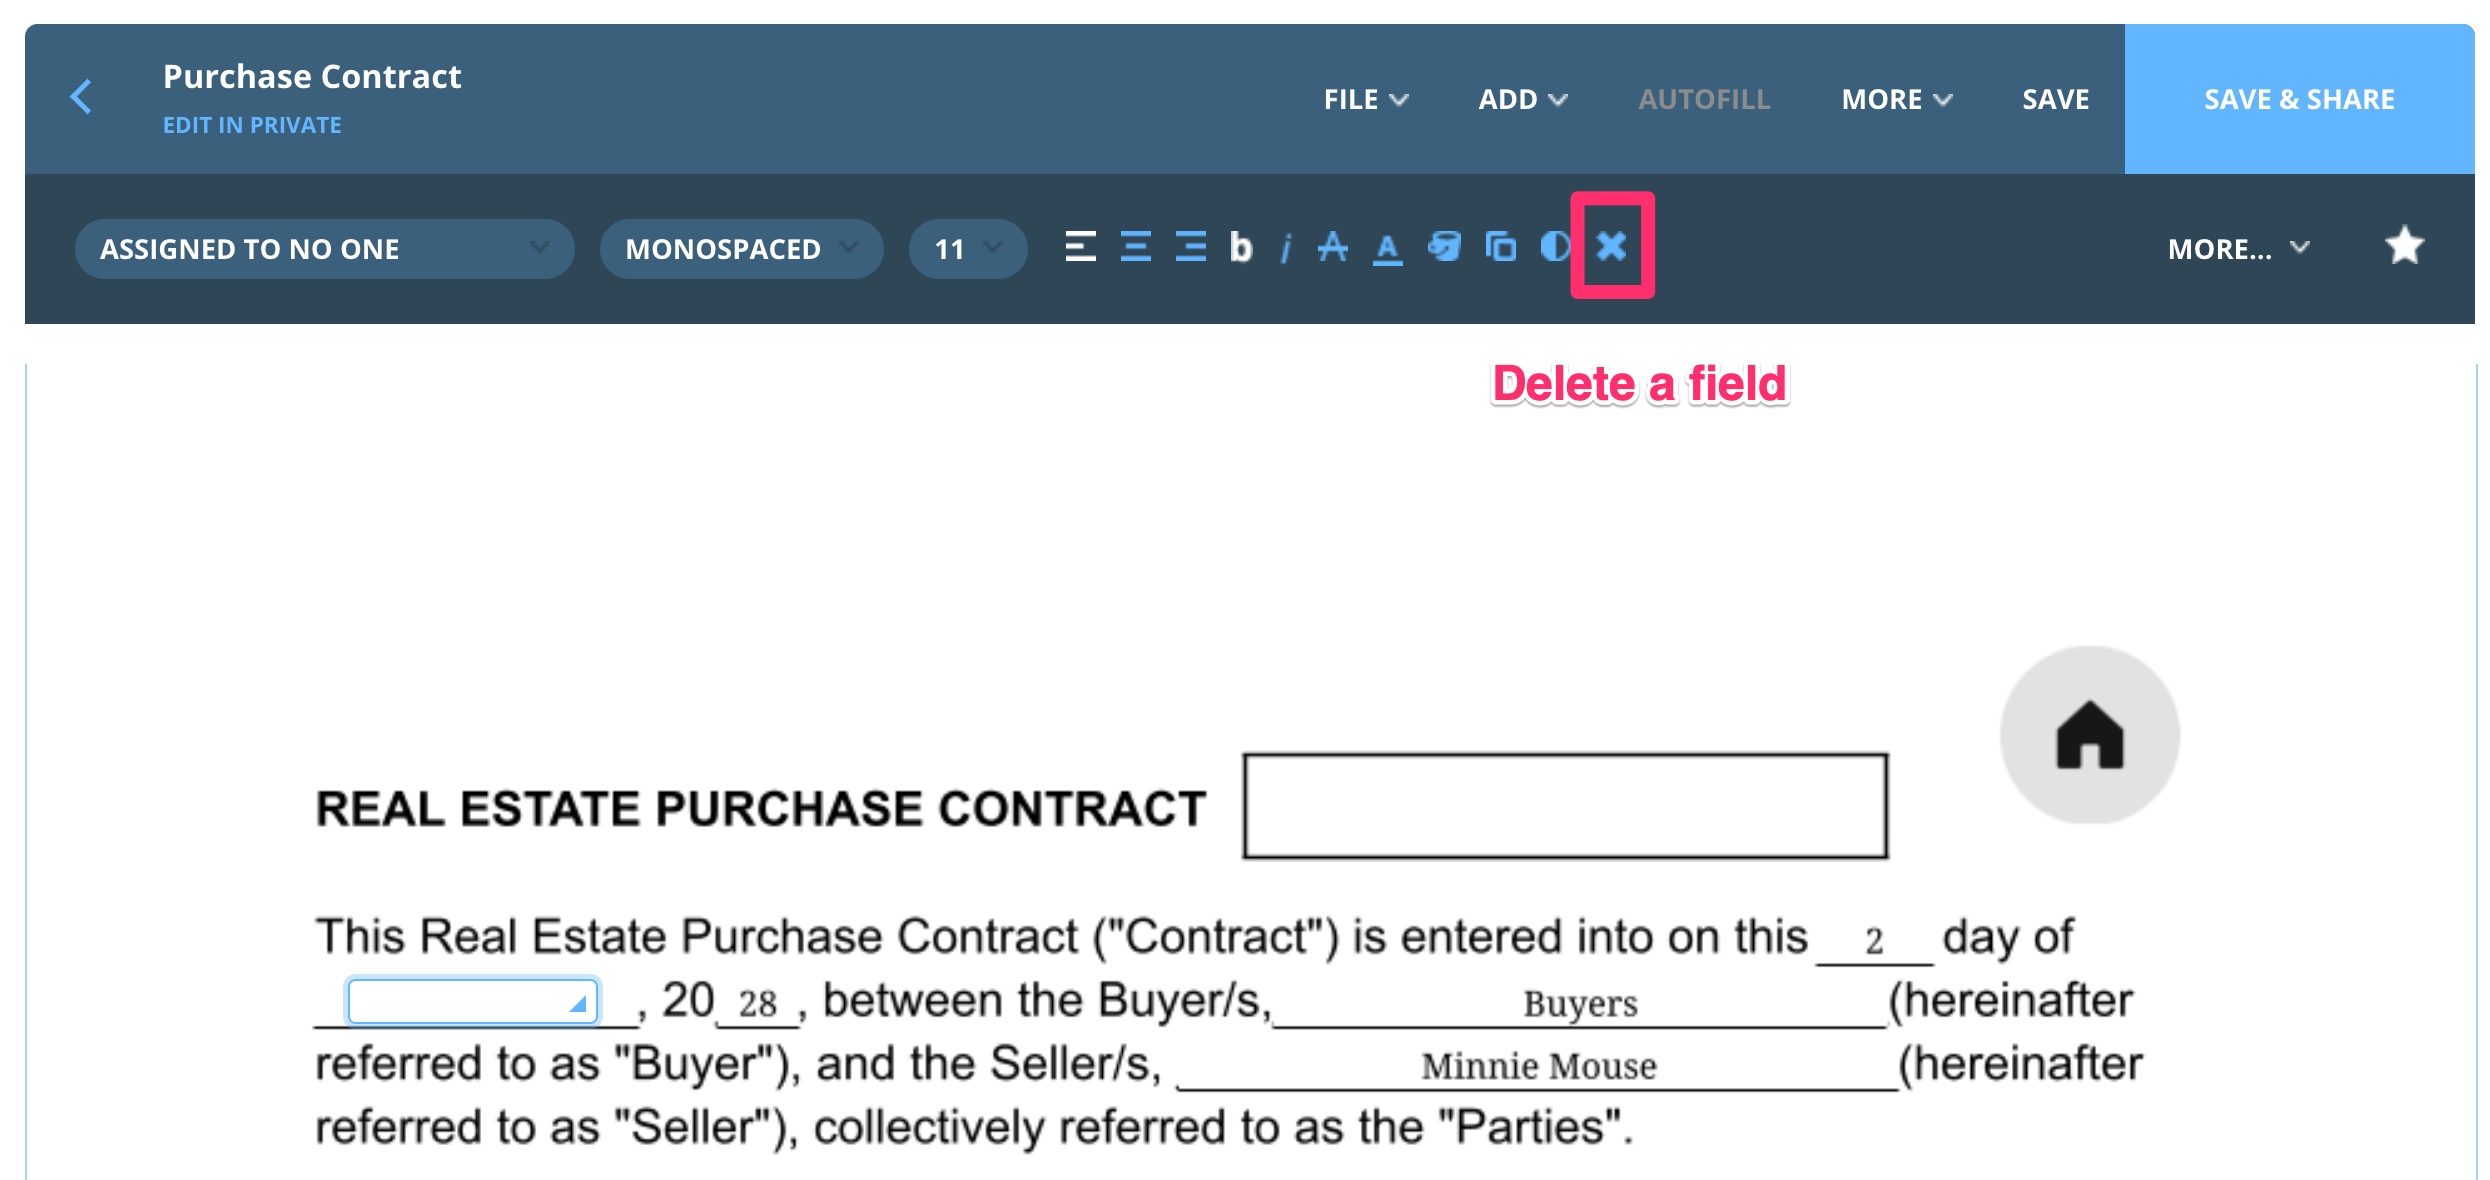
Delete an interactive field
Select a field, then click this option to delete it. On most interactive documents, you will only be able to remove fields that you place on the document.
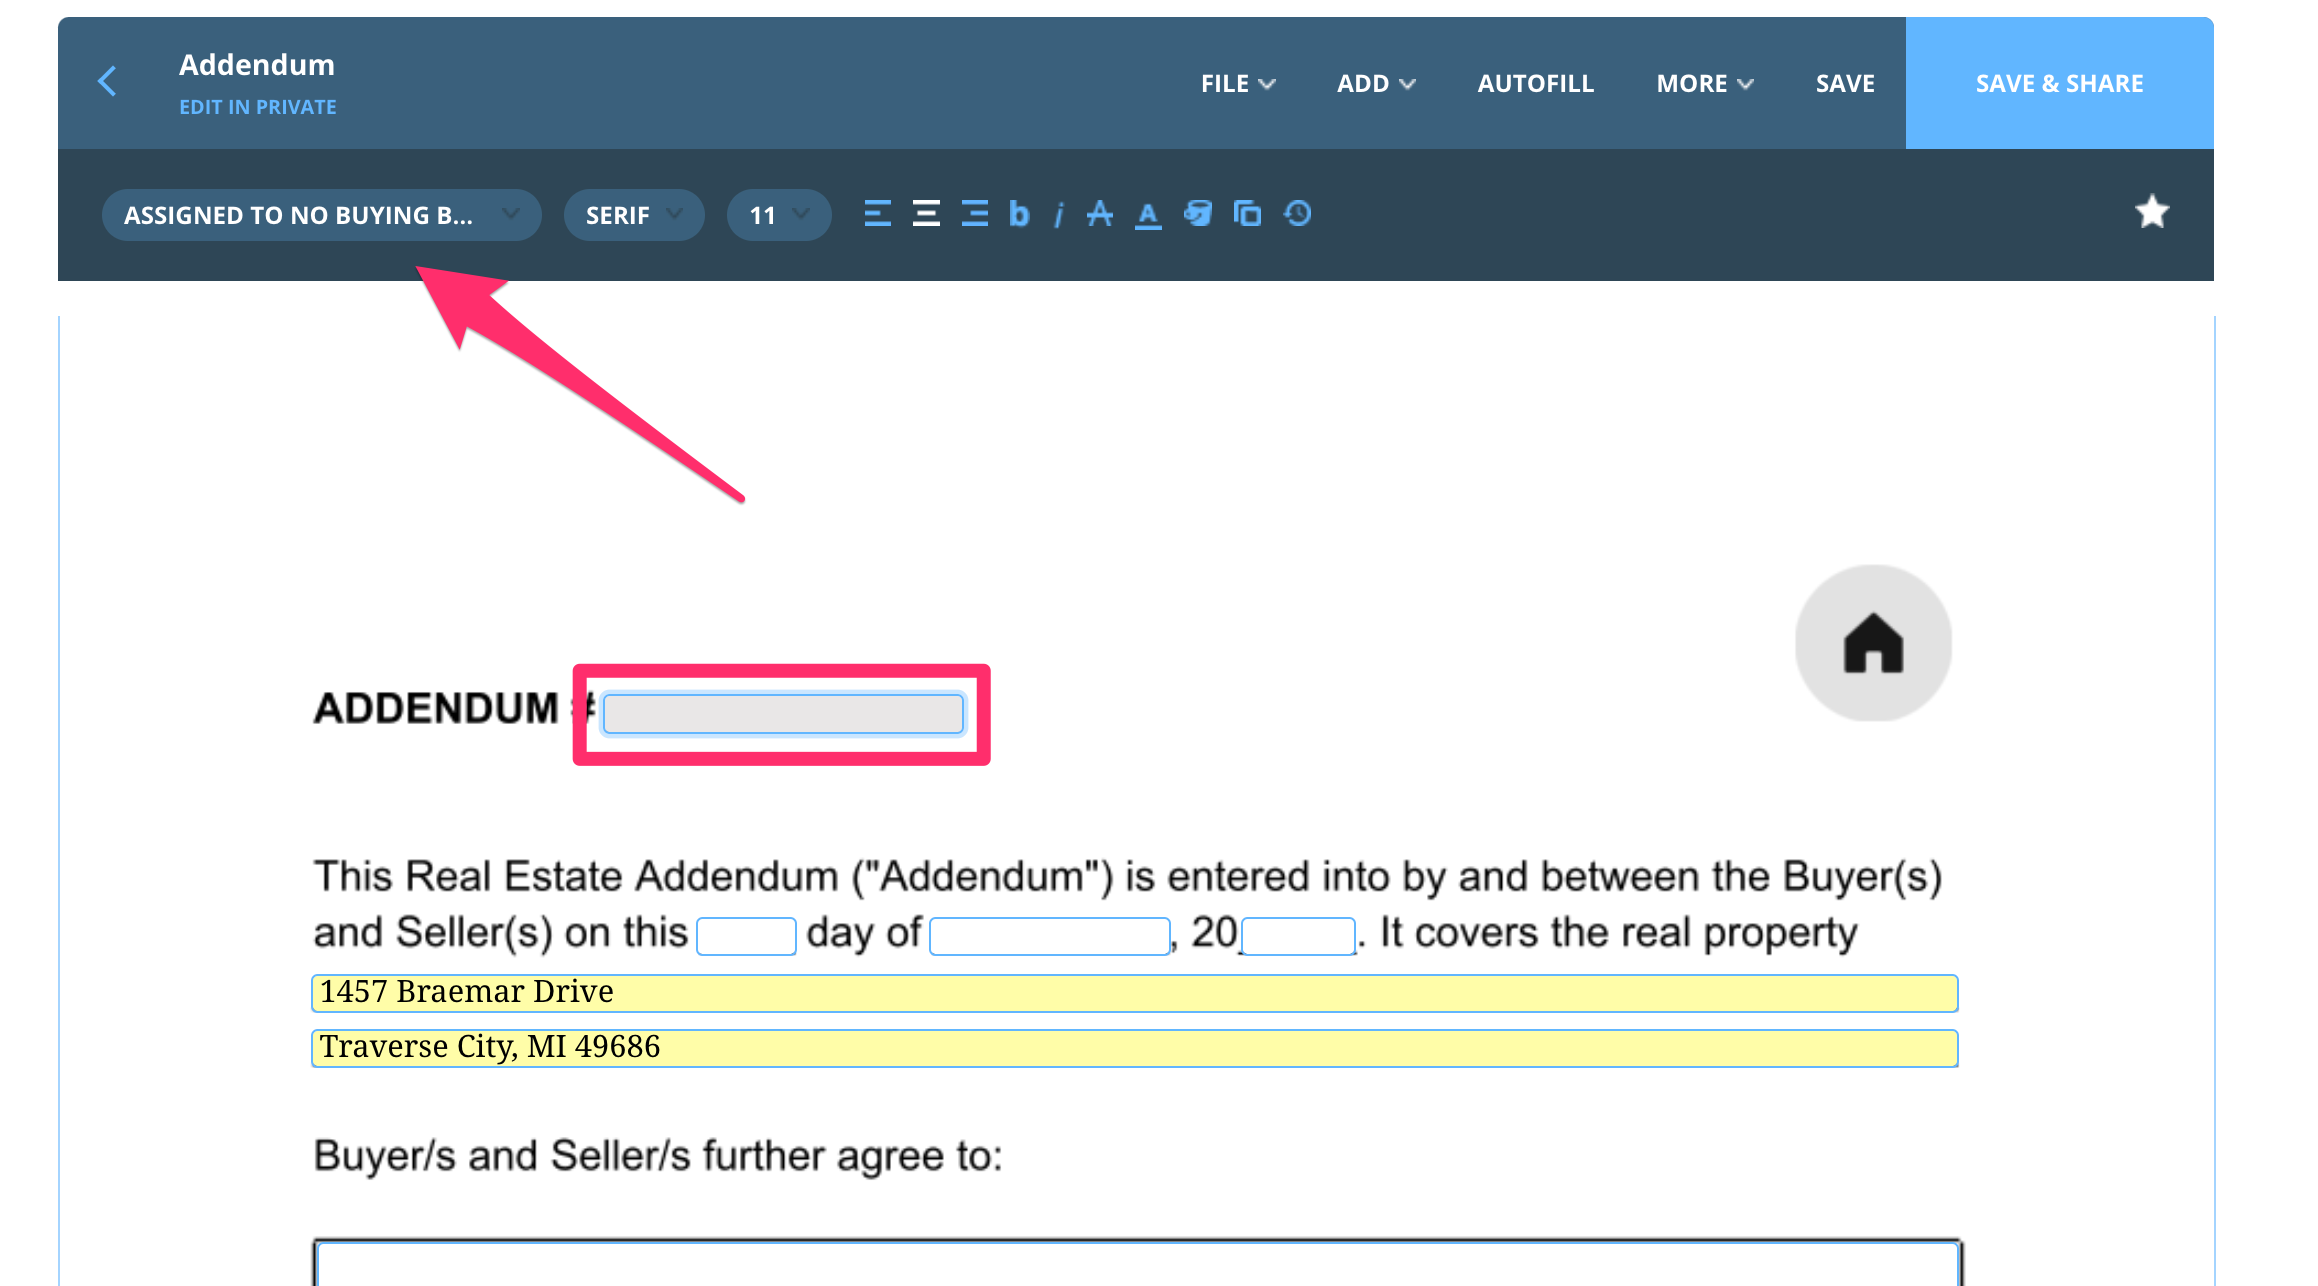
NOTE: Why can't I fill out a field? If you encounter a field that is greyed out it could be one of two reasons; the field is being used for calculations or the field is not assigned to you. In order to troubleshoot, click on the field and look to the top left to see the field assignment. You can use the assignment dropdown to assign the field to yourself, no one, or anyone and fill out the field from there.

Use the Add Dropdown Menu in the document toolbar to add additional fields. The availability of field types available will vary depending on your brokerage or association's settings.
Select a field and click anywhere on the document to place it. Hover over the triangle in the bottom right corner of the field, or the far left of the line if placing a strikethrough, until your cursor turns into a diagonal arrow. Once you see the arrow, you can click and drag to resize the field.
To assign a role or person, hover over the Assigned to dropdown menu to open the list of assignment options. Signature and Initial fields are the most common fields to which you will assign, because this is what prompts that person to sign when the document is shared. By default, a signature or initial field will assign to the role of Anyone while a text, date, checkbox, or radio button will assign to the role of No One.
- Anyone: means that any person at any time can sign in this place regardless of role
- No One: means that no one can sign in this place at any time regardless of role
- If any field is assigned to a specific person, only that person will be prompted to sign.
Once you are finished working with your interactive document, you're ready to share it for signing! Use the Save & Share button at the top right of the page.
Learn more about sharing here.
Set Up Flat PDFs
The dotloop Document Editor in a loop is where interactive documents are prepared for sharing and signing for a particular transaction. It is also where flat PDFs/non-interactive documents can be made into interactive documents within a loop. There are many features offered in the loop document editor including autofill and signature/initial assignments that prompt your clients to sign.
This article covers making a PDF in a loop interactive. To learn how to work with interactive dotloop documents (documents that have already been set up) in a loop, check out this article.
Open a PDF document in a loop by clicking the document title in the Documents section. This might be a document that you have uploaded to the loop from your computer, for example. Follow the steps below- be sure to click on each step to read more.
Need help with custom document templates that you can use in every loop? Check out dotloop PRO! CLICK HERE for more information.
The document editor toolbar contains many options for adding and making modifications to your interactive fields.
Document Title
By clicking on the document title, you can change the name of the document while it is open.
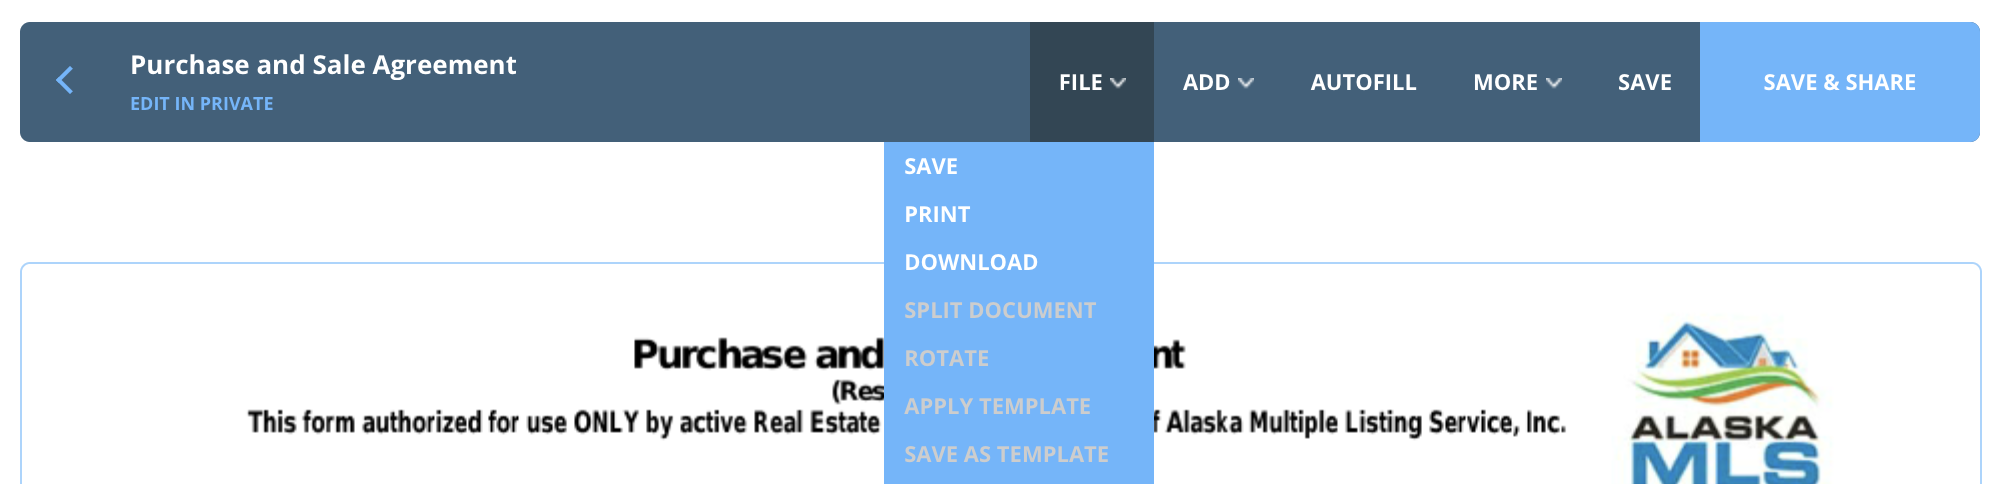
File Dropdown Menu
- Save
- Print
- Download
- Split document (must be done before any interactive fields are applied)
- Rotate a document (must be done before any interactive fields are applied)
Apply template
Save as a template
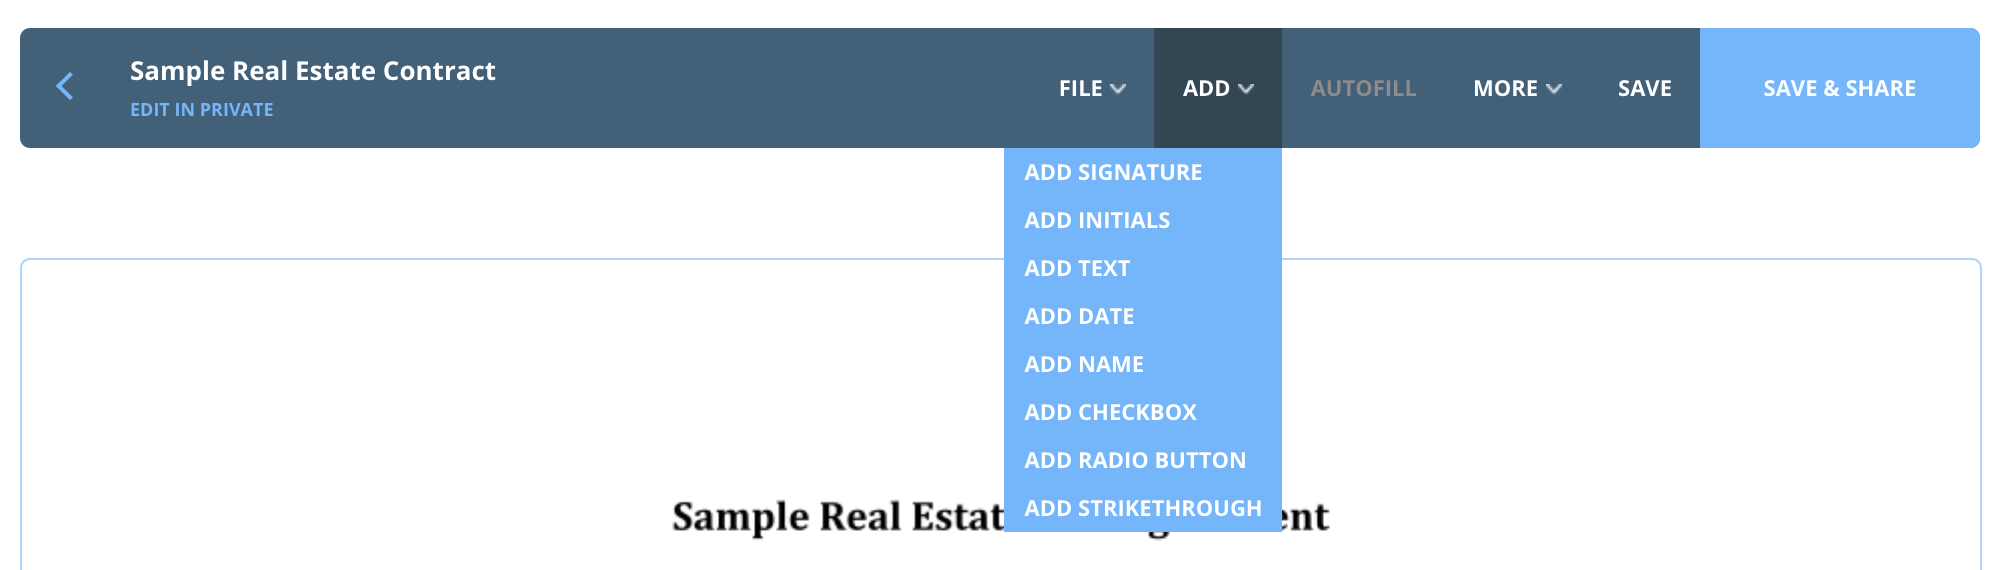
Add Dropdown Menu
From the Add dropdown list you can select different interactive fields to add to the document.
Autofill
This feature can only be used with interactive documents, such as those provided by your brokerage, association, or ones you set yourself (
see more on creating templates here).
More Dropdown Menu
- Review Notes
- Show Tasks
- Document History
- Host in-person Signing
Save
Share
There are two methods to adding interactive fields
2. Using the Add dropdown list found at the top right of the document editor page.
After making a field selection, find the location on the document you would like to place the field and click. From the Add dropdown list, you can add the following interactive fields:
Signature
Signature fields are used to indicate consent.
- They are legally binding and carefully recorded with time stamps and dates.
- Signatures must be assigned to a specific role or person to prompt the signer to sign once the document is shared.
Initial
Initial fields are used to indicate consent.
- They are legally binding and carefully recorded with time stamps and dates.
- Initials must be assigned to a specific role or person to prompt the signer to sign once the document is shared.
Text
A text field is the most commonly used field because it is a blank slate to which almost all applications/tools can be applied
- Can be assigned to a specific role
- Can change font type, size, alignment, color, highlight, and transparency
Date
Date fields are used when a calendar selection can be made
- Formatted as MM/DD/YYYY
- Can change font type, size, alignment, color, highlight, and transparency
Name
- Can change font type, size, alignment, color, highlight, and transparency
Checkbox
Checkboxes are used to indicate a selection where more than one option can apply.
- Can be assigned to a specific role
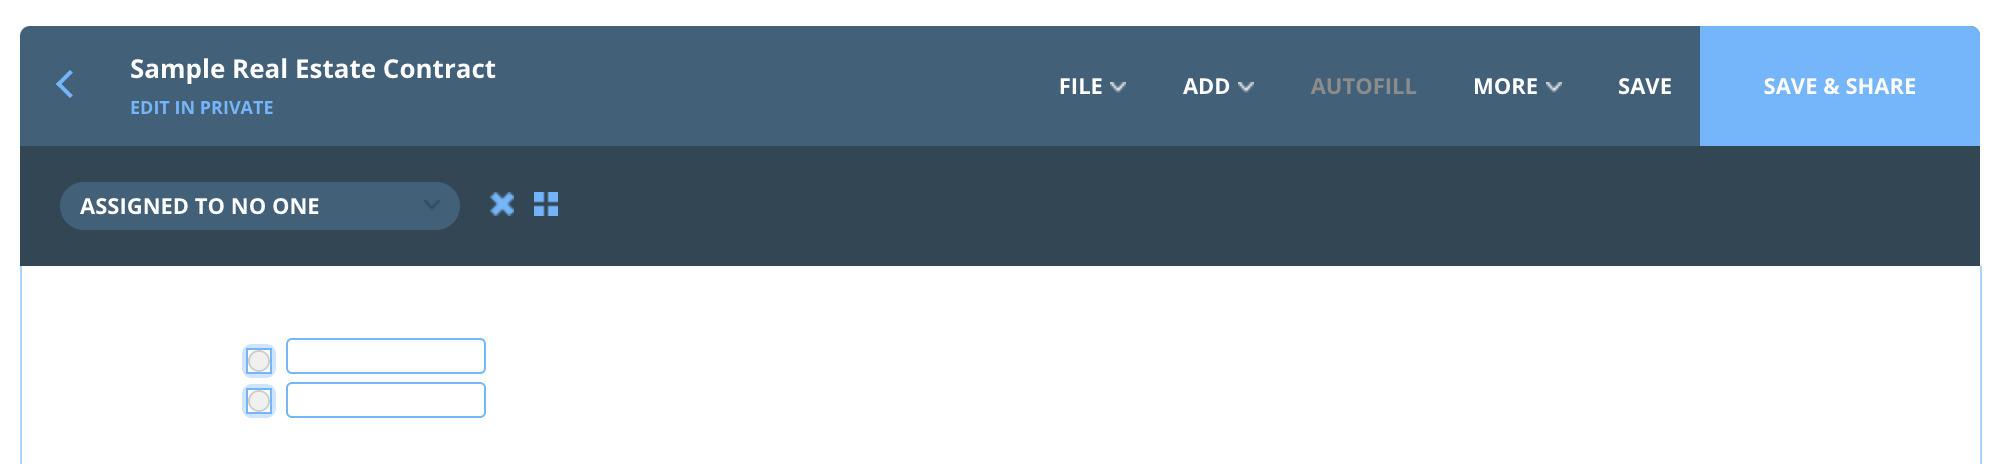
Radio Button
Radio buttons are used to indicate a selection where only one option can apply.
- Can be assigned to a specific role
- Must be in a grouped pair of no fewer than two radio buttons
Strikethrough
Strikethrough is used to cross out a selection on a form.
- Can be assigned to a specific role
Upon adding a new field to a document, you can see another line of options appear in the Doc Editor toolbar. Hover over each symbol to see its meaning. These options vary depending on the field, and which options are applicable (if the second toolbar has disappeared, simply click on a field to make it appear):
'Assigned To' Dropdown Menu
Choose who has permission to make modifications to a field. This is important for assigning signatures and initials.
Font Style
Font Size
Left Align, Center, or Right Align text
Bold, Italics, or Strikethrough Font
Font Color
Highlight text in a field
Field Transparency
Text still visible, outline of interactive field is not when a document is downloaded or printed.
Field History
Indicates what modifications were made to the document when and by whom. This option only appears when a document has been saved.
Delete an interactive field / Remove a field
Select a field, then click the X to delete it.
Group Interactive Fields
More…
Opens Advanced Options window: change the size of an interactive field by the pixel make an interactive field non-editable once in an active loop.
Save These Styles as My Default
If you have created a new font preference in the field selected, you can choose to make that your default font style for document creation in the future.

To assign a role or person, hover over the Assigned to dropdown menu to open the list of assignment options. Signature and Initial fields are the most common fields to which you will assign, because this is what prompts that person to sign when the document is shared. By default, a signature or initial field will assign to the role of Anyone while a text, date, check box, or radio button will assign to the role of No One.
- Anyone: means that any person at any time can sign in this place regardless of role
- No One: means that no one can sign in this place at any time regardless of role
- If any field is assigned to a specific person, only that person will be prompted to sign.
To group interactive fields together:
1. select the fields that you would like grouped together so that both are highlighted in blue.
2. use the Group button on the Toolbar.
Signatures and Initials
When multiple users are required to sign a section only once, signature and initial fields can be grouped to prevent a double signing. For example, at the bottom of an addendum, two sellers need to sign:
- If both signatures are assigned to the role of the seller, but ungrouped, the first seller will be prompted to sign in both places.
- If both signatures are assigned to role of the seller and grouped together, the first seller will only be prompted to sign in the first signature field.
Text Wrapping in Text Fields
Where large text boxes in place of multiple lines of text can have the font-size modified and additional lines of text can be added, text wrapping maintains the integrity of the form for legal compliance.
Radio Buttons
Radio buttons are intended for either/or, or yes/no answers They must be grouped in pairs of no fewer than 2 before the document will save
Once all of the document fields are placed and assigned, you can complete the document by typing directly into any of the text or date fields, making checkbox or radio selections, and self-signing any relevant signatures or initials. To learn how to sign a document yourself,
see this article.
Once your document has been set up and completed to satisfaction, you are ready to share.
Check out this article to learn more. Be sure to view all the sharing articles in the section by using the links in the left column of each article.
Sharing for Signatures
Remember, documents are always private until shared. After selecting documents to share, you will decide how recipients interact with those documents by selecting a Share Permission.
Documents can be shared individually or in groups. To share documents, open your loop and follow these steps.
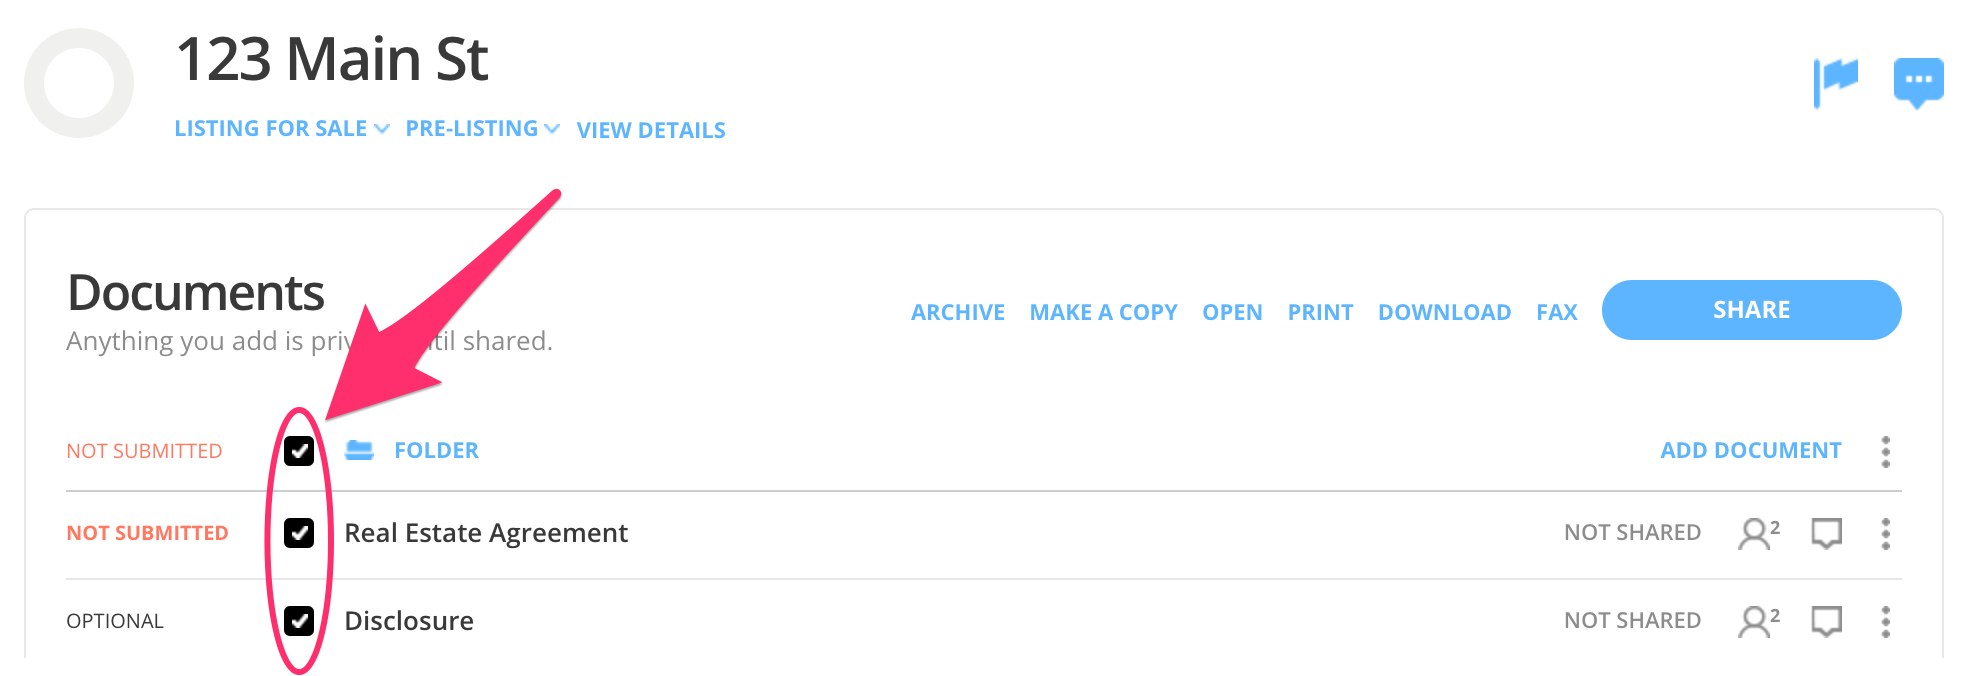
There is a checkbox to the left of each document in your loop. Click in the box of each document that you are ready to share. A Share button will appear in the upper right hand corner of your loop’s Documents section.
Note: if you have documents that need to be shared with different Share Permissions, you will need to share them in two separate groups. For example, on a Listing Contract you will give your seller permission to sign, but on a Residential Property Disclosure you will give your seller permission to fill out and sign the document.
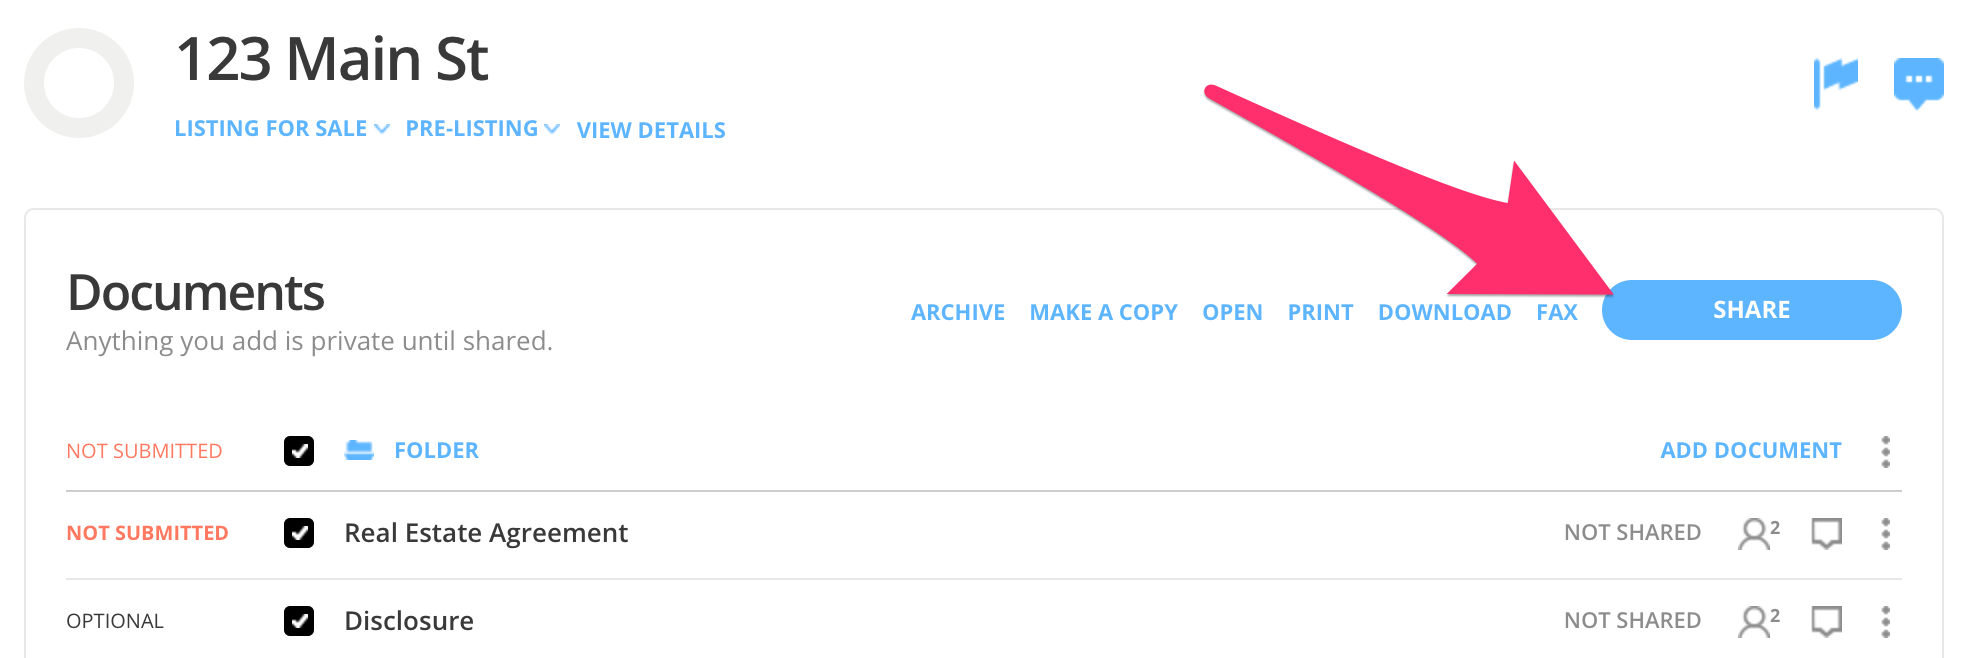
Click the Share button in the upper right hand corner of your loop’s Documents section. A Share Document window will appear in the middle of your screen.
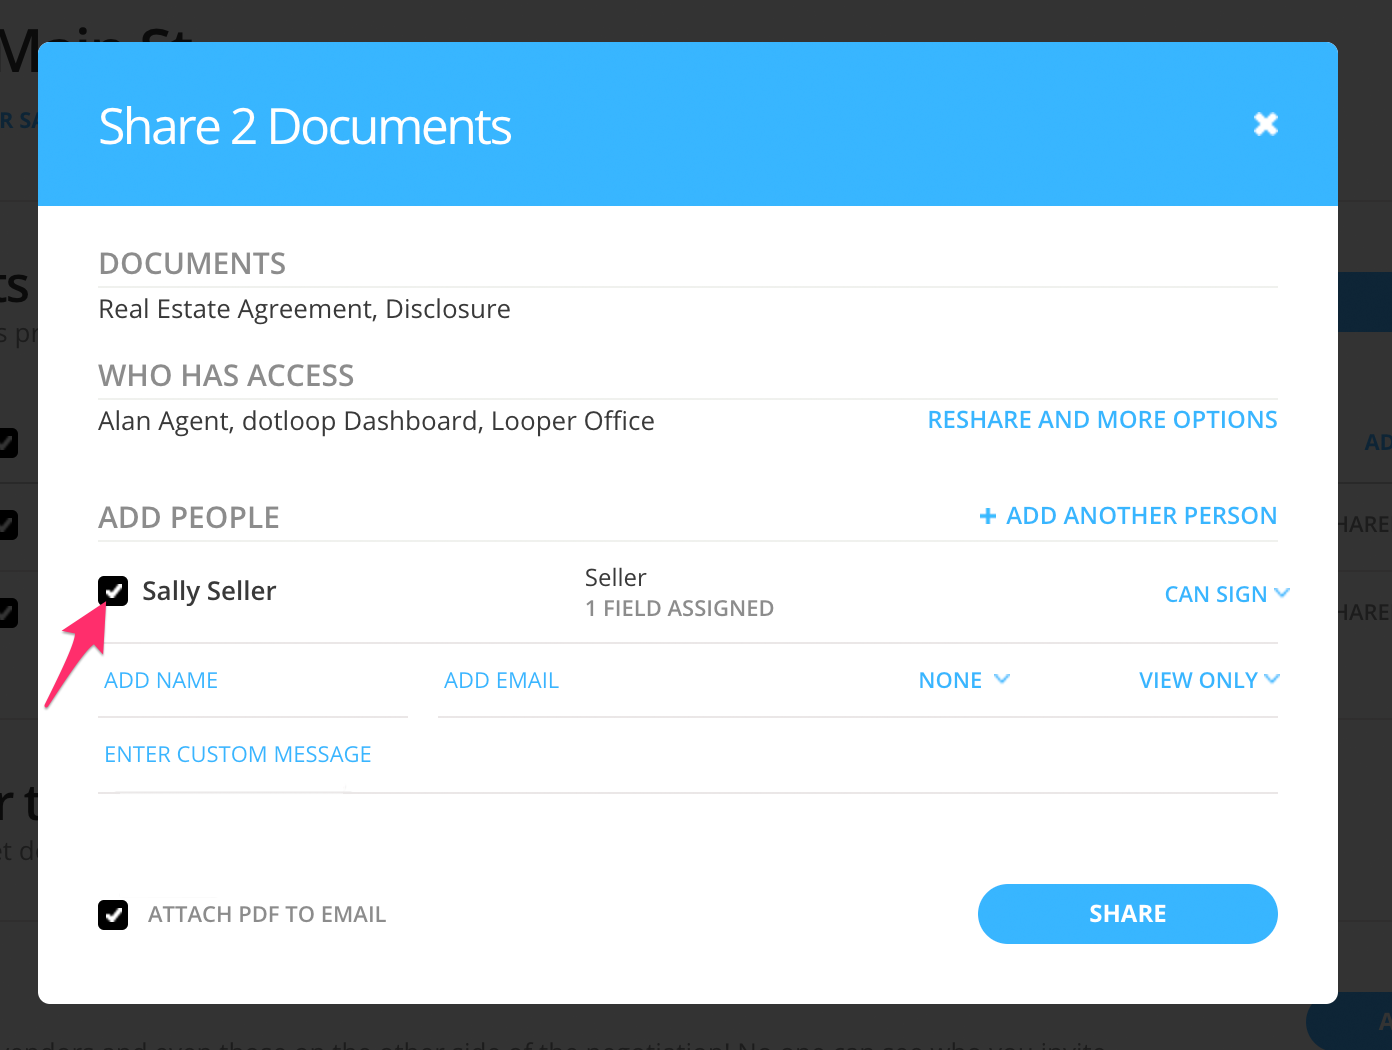
Share Document window includes an Add People section. Click on the box to the left of each person that you’d like to share the documents to. You may also add a new person to share to by entering their name, email, and choosing a role. Adding a new person here will add that person to the loop.
To the right of each person is a dropdown list of Share Permissions. Confirm that the Share Permission is set correctly or click on the dropdown list to change the Share Permission. There are 4 Share Permissions:
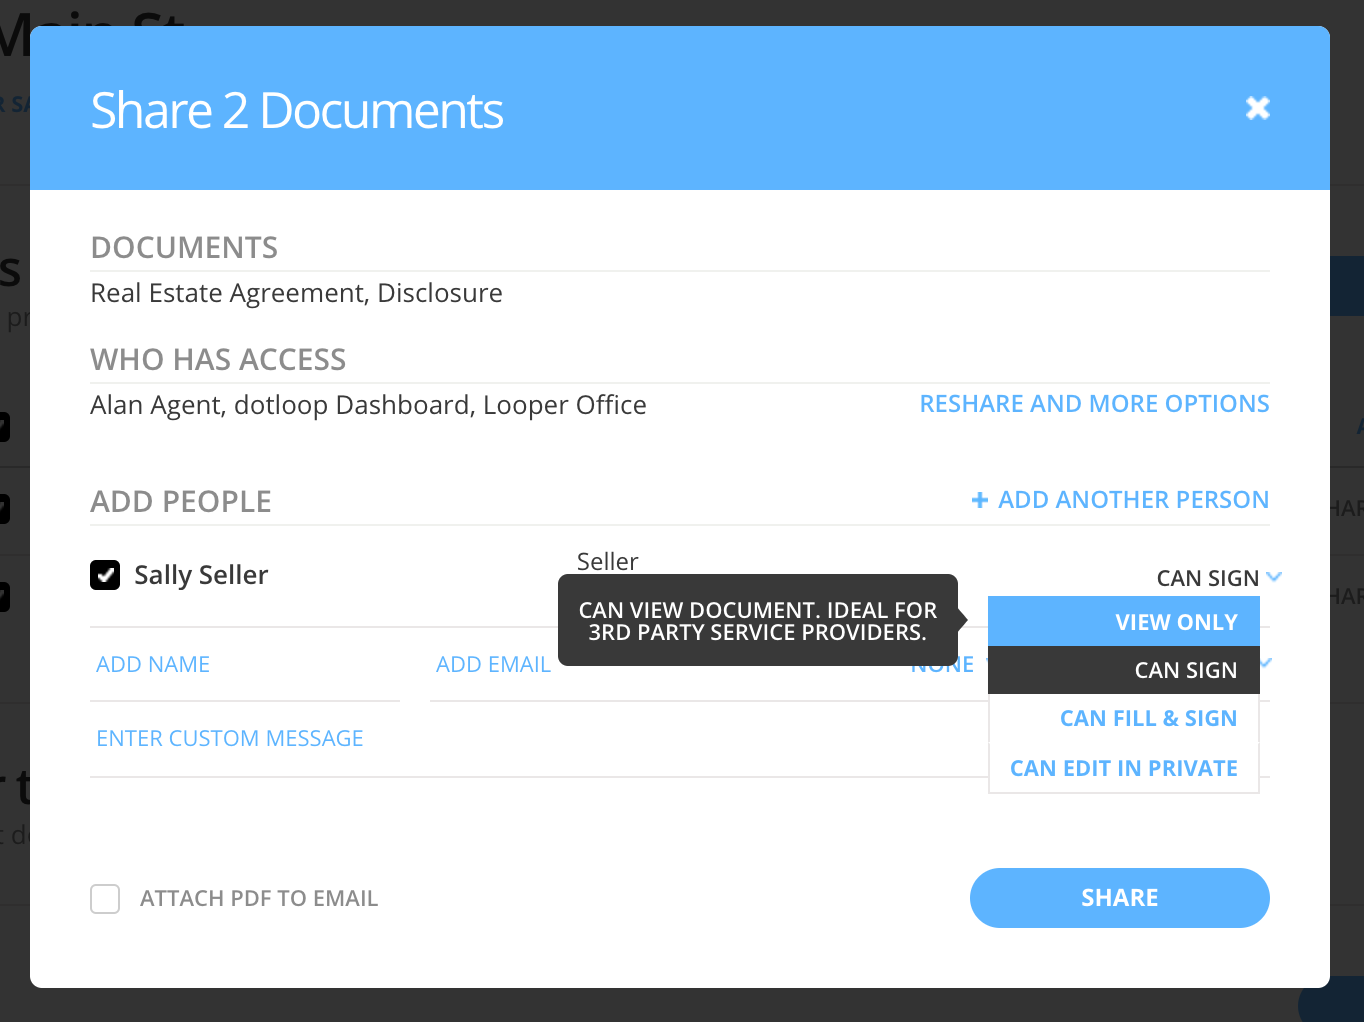
View Only - allows recipients to view the documents. They cannot sign the documents and they cannot make changes to them. They can however print or download the documents.
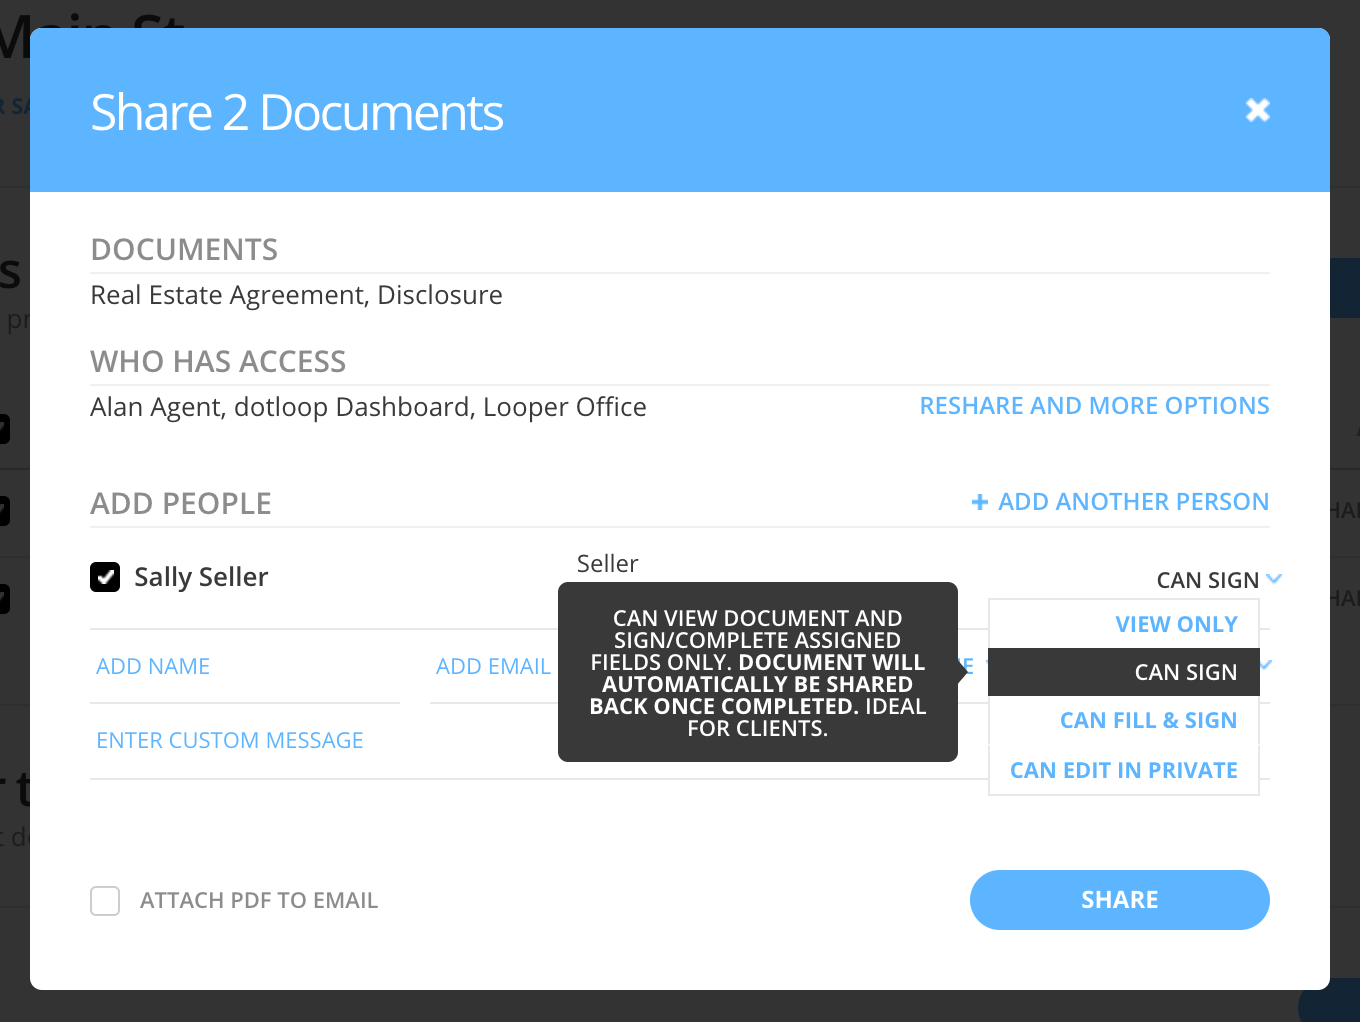
Can Sign - allows recipients to view, sign, and complete assigned fields on the documents. After the recipient signs, you will be notified and the documents will be shared back to you automatically.
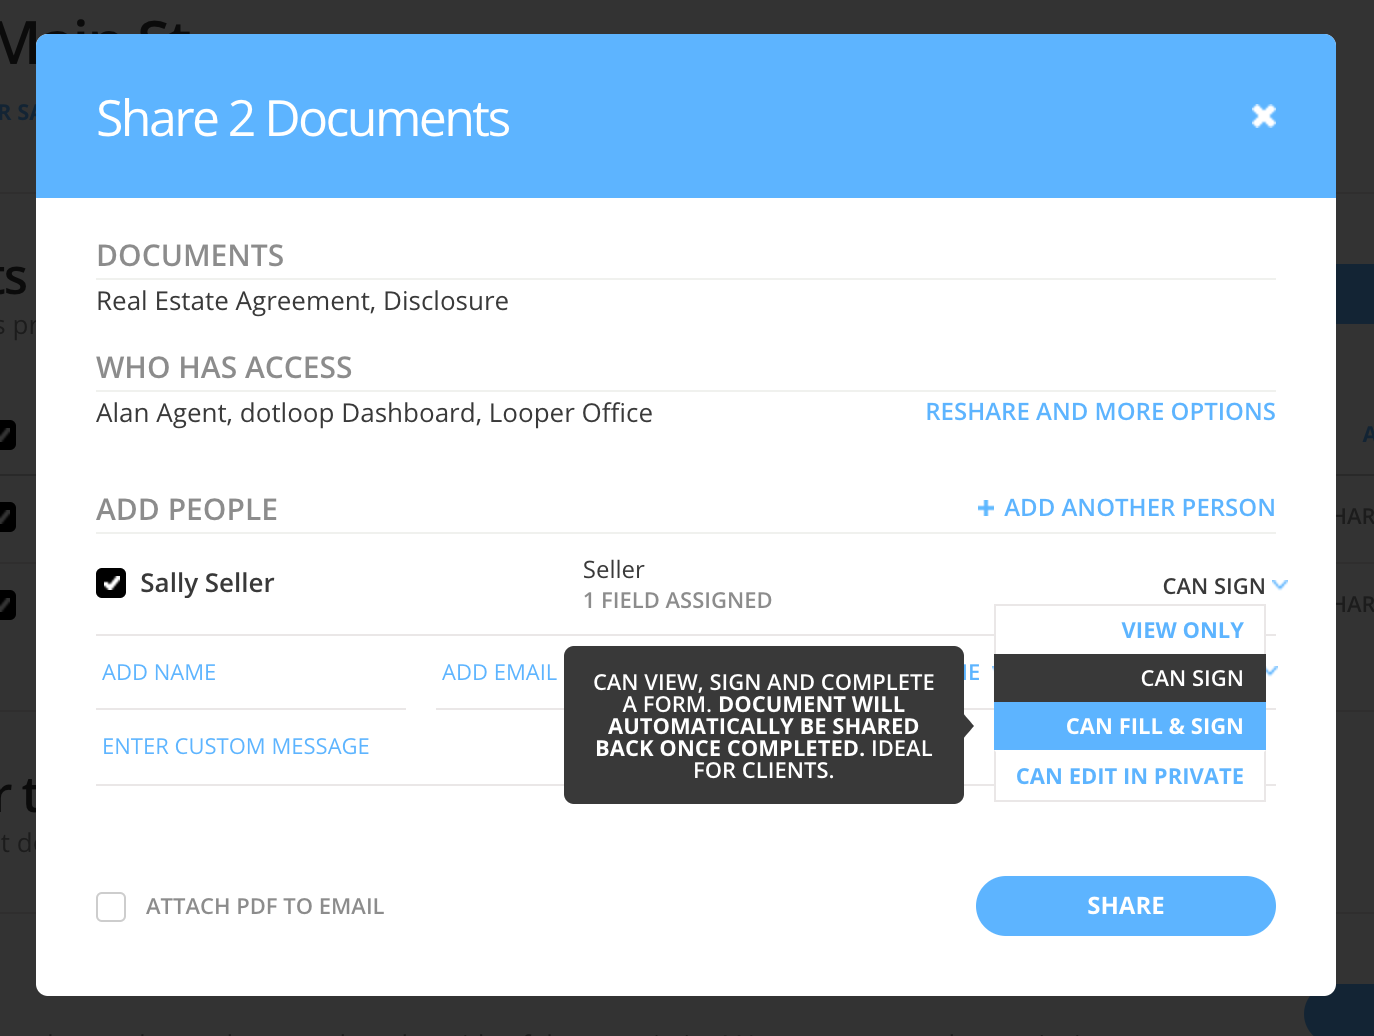
Can Fill & Sign - allows recipients to view, sign, and fill out documents. After the recipient fills out and signs the documents, you will be notified and the documents will be shared back to you automatically.
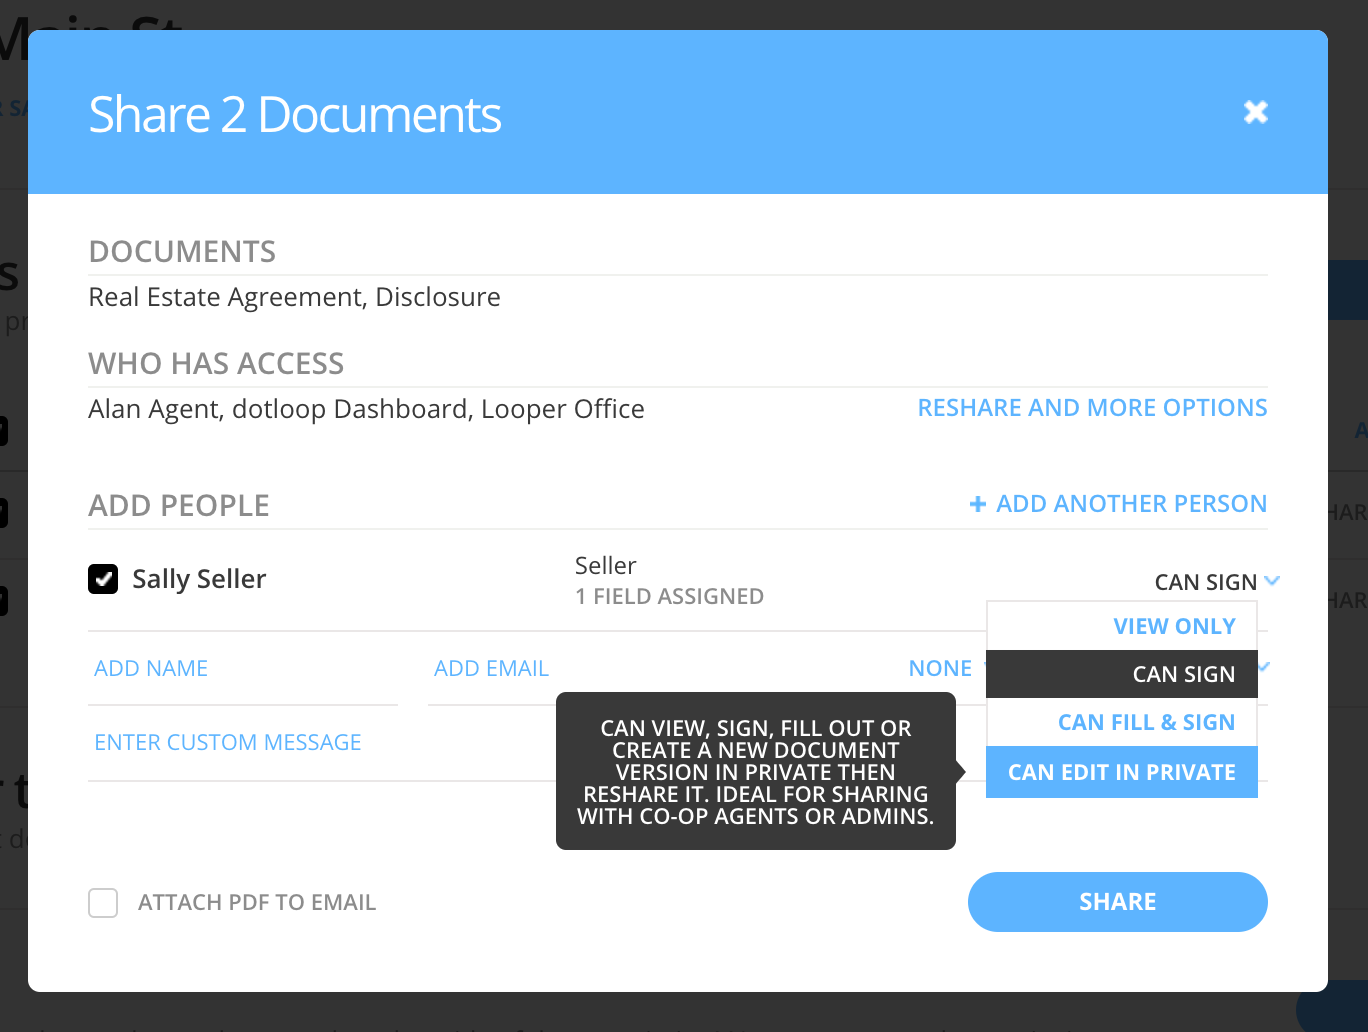
Can Edit in Private - grants recipients the same editing functionality that you have. It’s the Share Permission that should be used when collaborating with other real estate professionals. This permission should only be used with other professionals involved in your transaction. This is the highest permission for a document, meaning you can make any changes needed (everything tracked, of course, in dotloop), alter field sizes, delete or place additional fields, and fill out anything you deem necessary. Any changes made to a previously signed document, by design, will wipe out signatures ensuring no one is agreeing to term edits made after signatures were placed. This permission is ideal when sharing with co-op agents using dotloop.
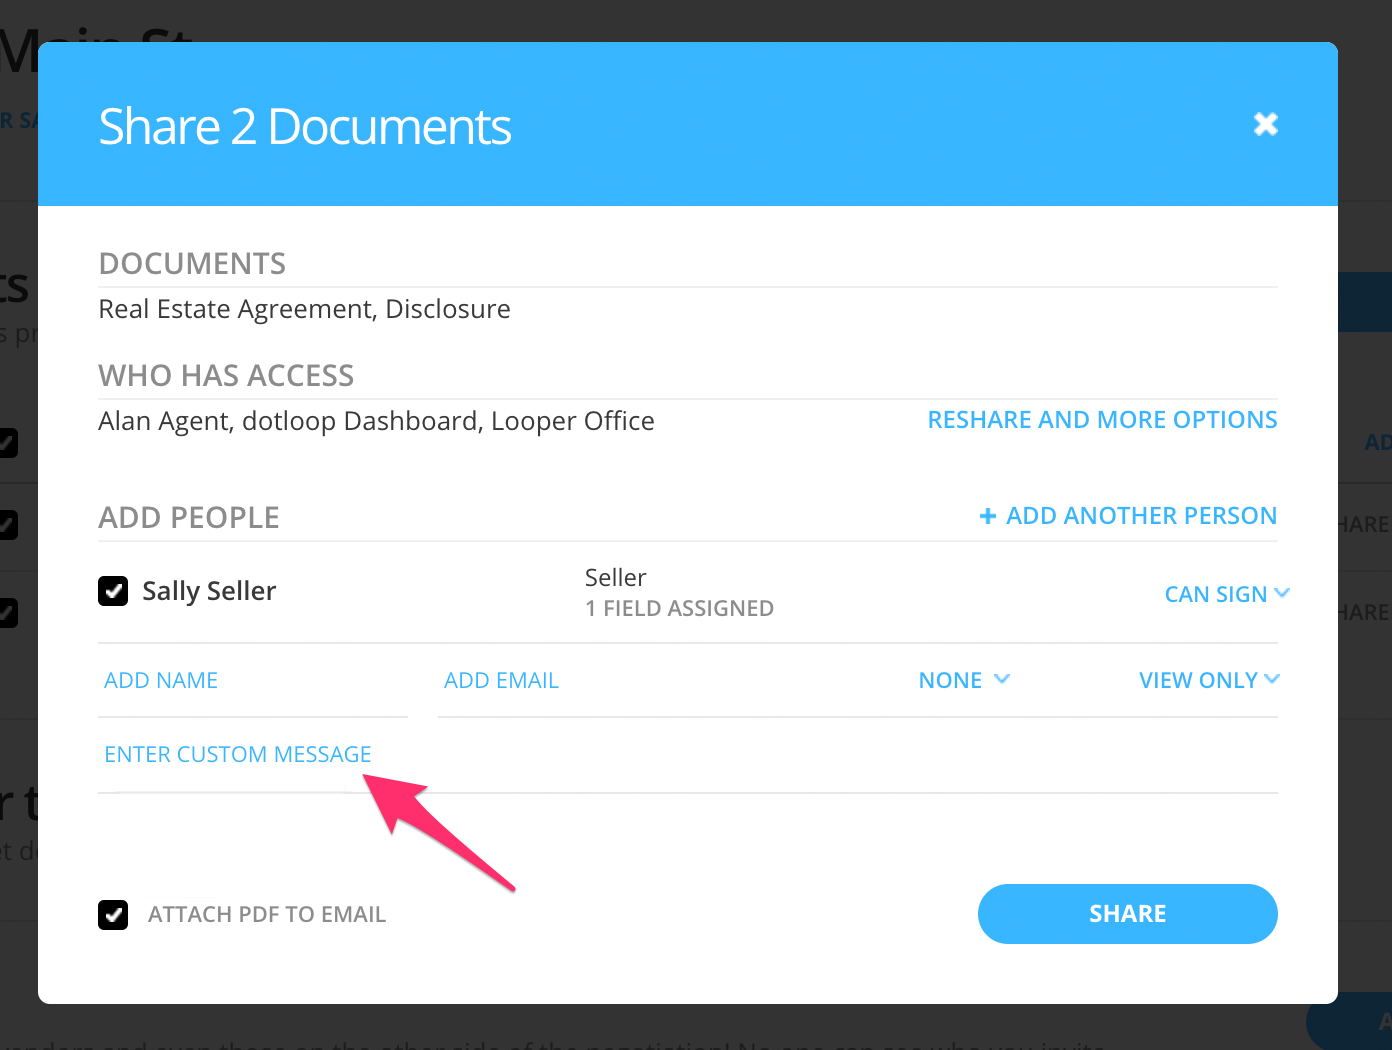
Below the Add People section of the Share Document window is a line that says “Enter Custom Message”. Type a custom message in the box and it will be included in the body of the email.
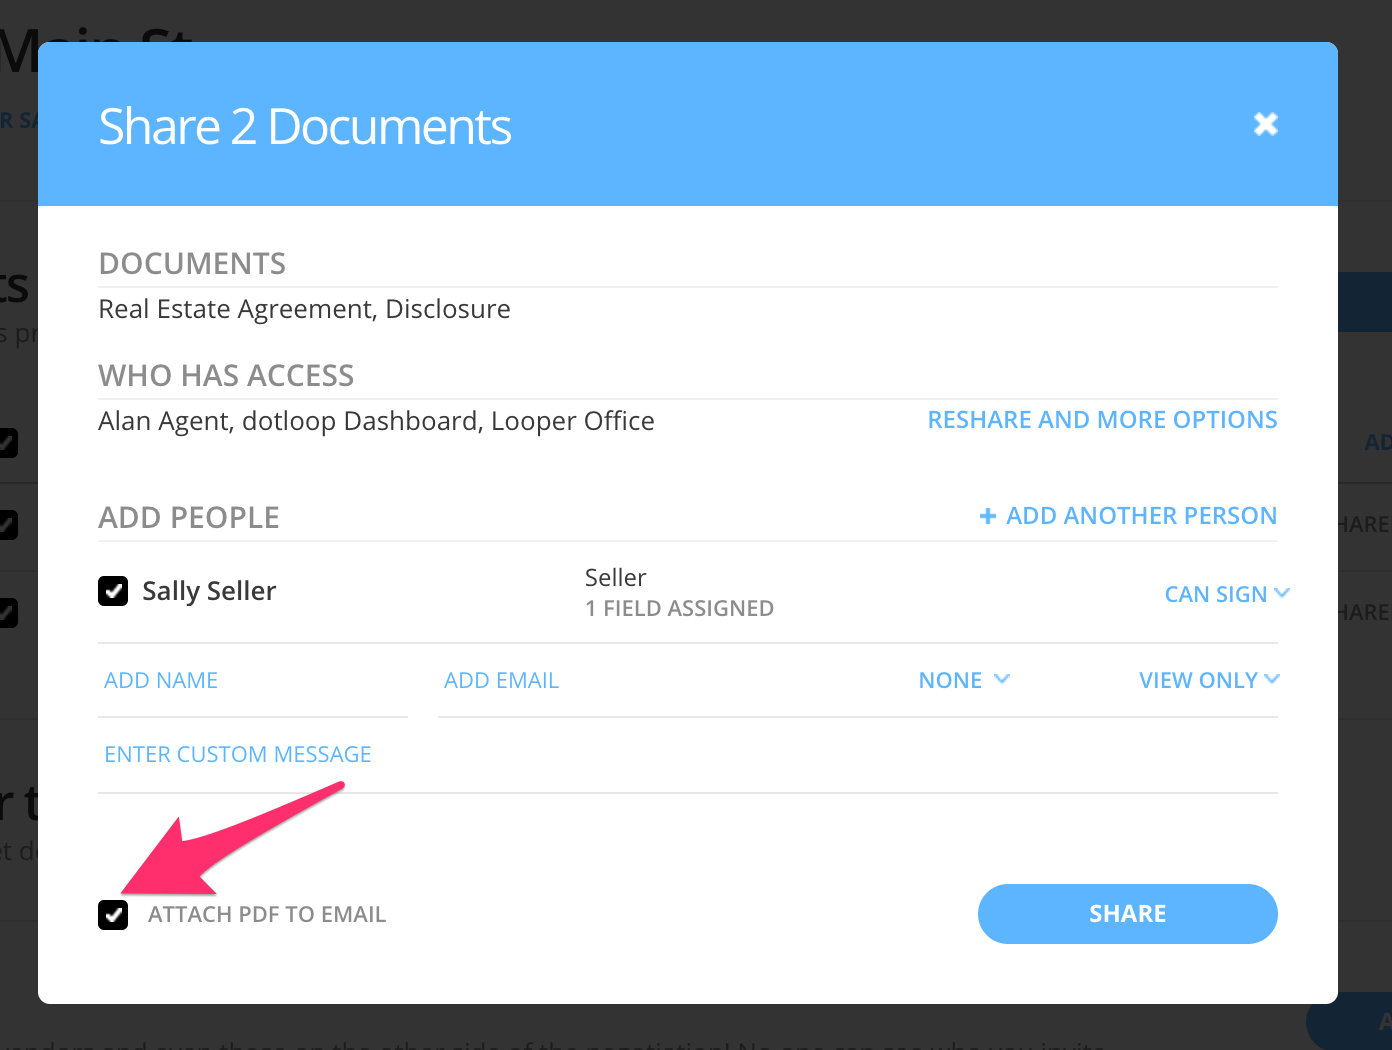
In the bottom left of the Share Document window you will find the option to attach PDF copies to the email. Check this box if you would like to attach PDF copies of the documents to the email.
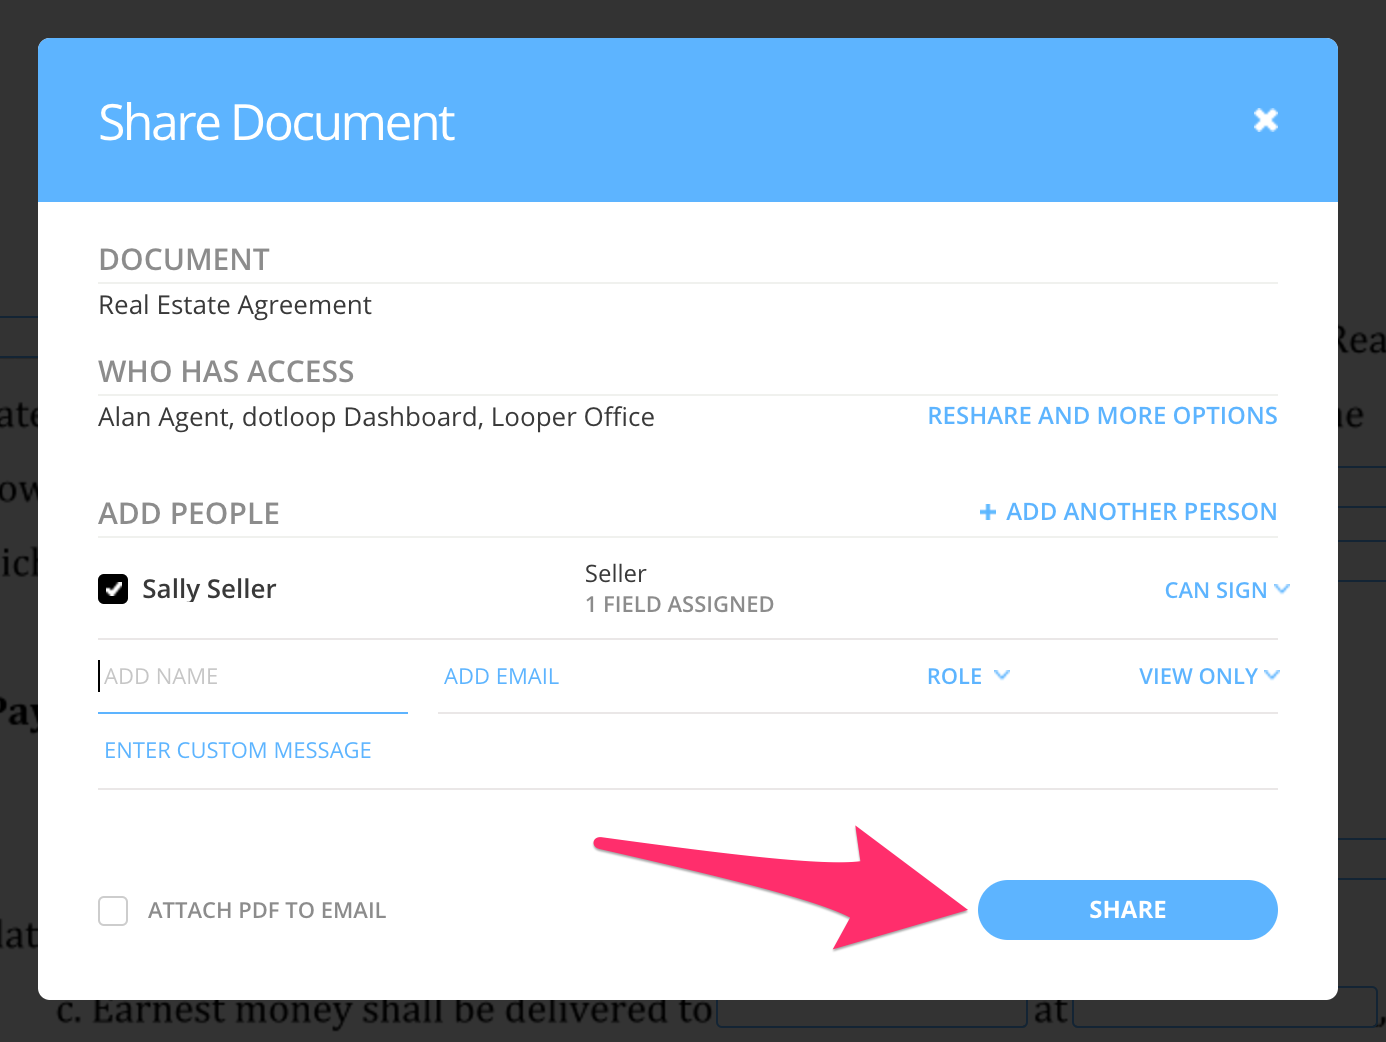
Click the Share button in the bottom right corner of the Share Document window. This will send an email to the people you’ve selected.
Once the document has been shared you will see a status to the right of the document name.
Click here to view an article on sharing statuses.
- Not Shared: This document has interactive fields, but is currently not share to anyone (regardless of if the interactive fields have been filled out and/or signed).
- Waiting On Others: This document has been shared with at least one person who has fields directly assigned to them to fill out or sign.
- Signed: This document has had all fields directly assigned to all recipients filled out and signed.
- Part Signed: This document was returned from a recipient with only some fields directly assigned to them filled out and signed.
- Updated: This status is triggered when some change has been made to a document by someone other than the person who shared the document. This change includes all changes to a document that do not include any fields that are directly assigned to a recipient.
- Blank(no current share status): This status means that the current document may be shared with someone, but has no fillable fields for the recipient.
- If you are receiving an error when trying to share after checking “Attach PDF to email”, you may be over the size limit that can be sent in an email. Try unchecking a document or two, and then sharing with a PDF attached.
- Not all documents will present you with the Autofill window. This will only be the case for interactive templates.
- If Can Sign is greyed out and cannot be chosen as a sharing permission, this is because there are no fields assigned to the individual you would be assigning Can Sign to. Go back into your documents and double check your signature and initial fields, this will then allow you to select Can Sign.
- An individual's share permission will default to Can Sign if that individual has signature/initial fields assigned to them within the document/documents you are sharing.
- If your clients are not receiving documents you can check the status of the share via the Activity Log. If there is an issue with the share you will see a log entry stating “Status: something went wrong. Check with the recipient or reshare the document”. This typically means that either the email address is misspelled, or that the client's email client is bouncing the emails back.
Submitting for Review
The last step in creating your transaction is submitting for review. LPT will not be able to see your loop or any documents within the loop until you submit for review

In either your main loop view, or the view details page of a loop, click the Submit for Review link at the top of the page.
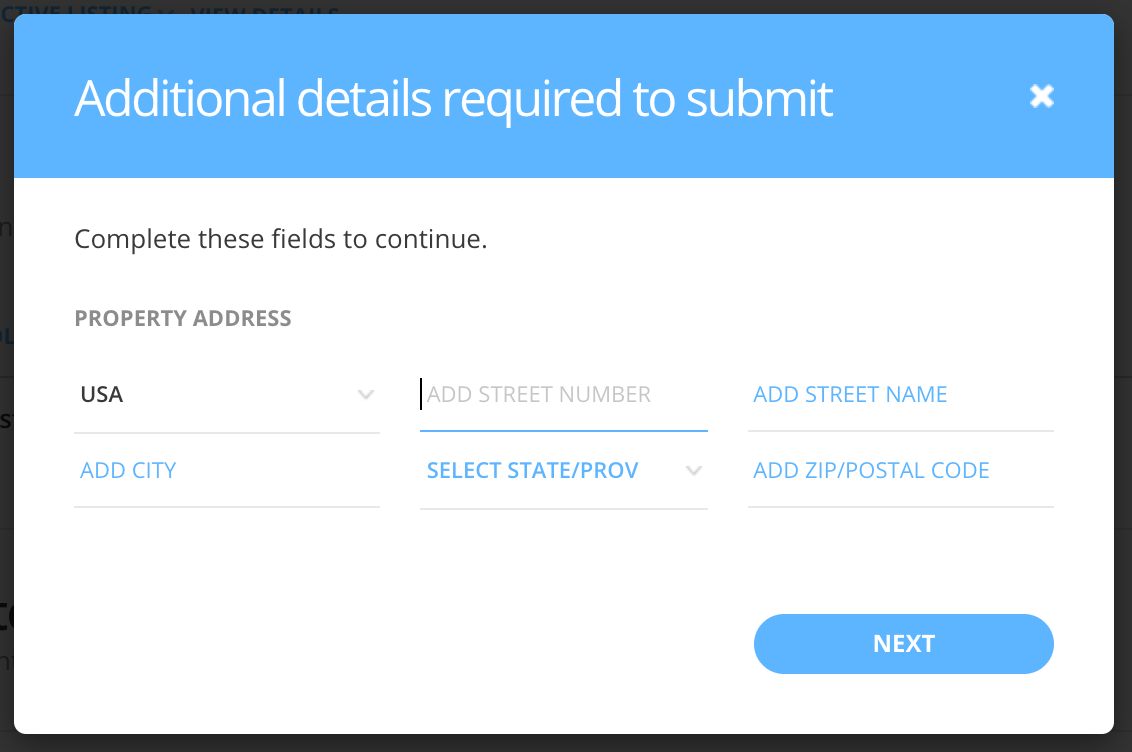
Fill out all fields and click the Next button.
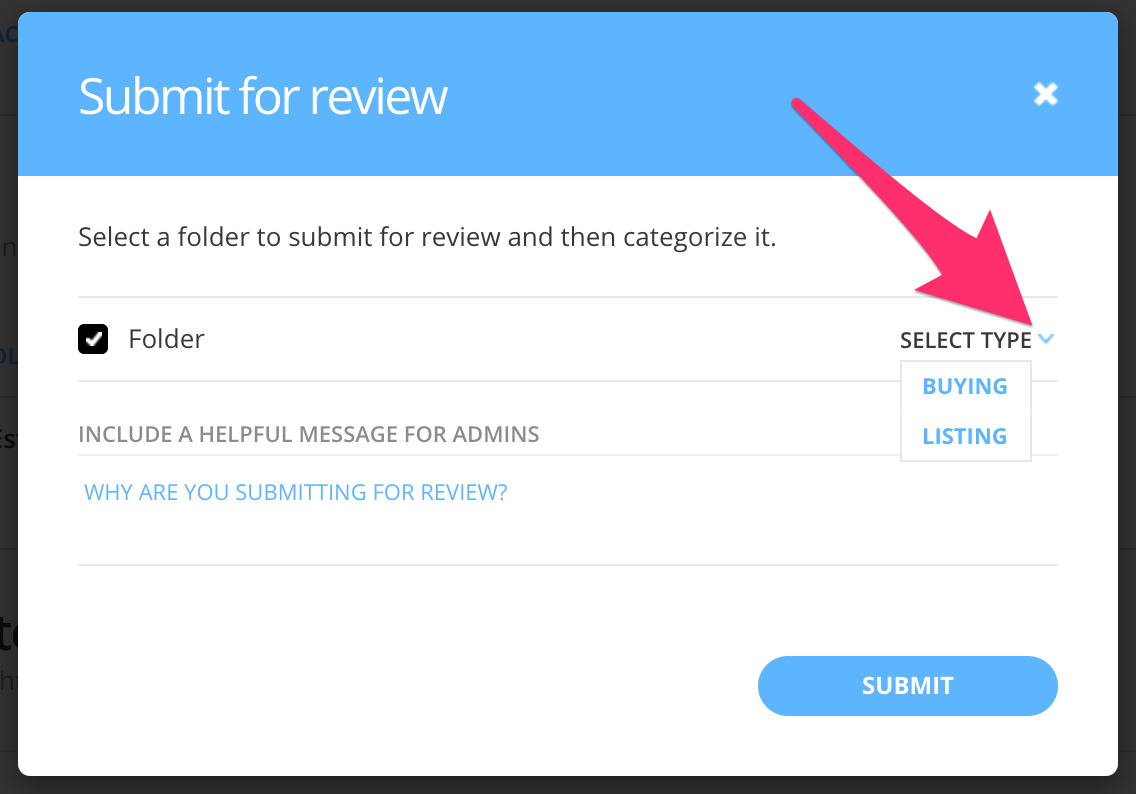
Checkmark the folder(s) you wish to submit. Once checked, select the appropriate workflow from the dropdown list to the right of each folder. (Optional) Type a custom message to your company. When ready, click the Submit button.
Note: you can only submit entire folders for review, but any approved documents will not be submitted.
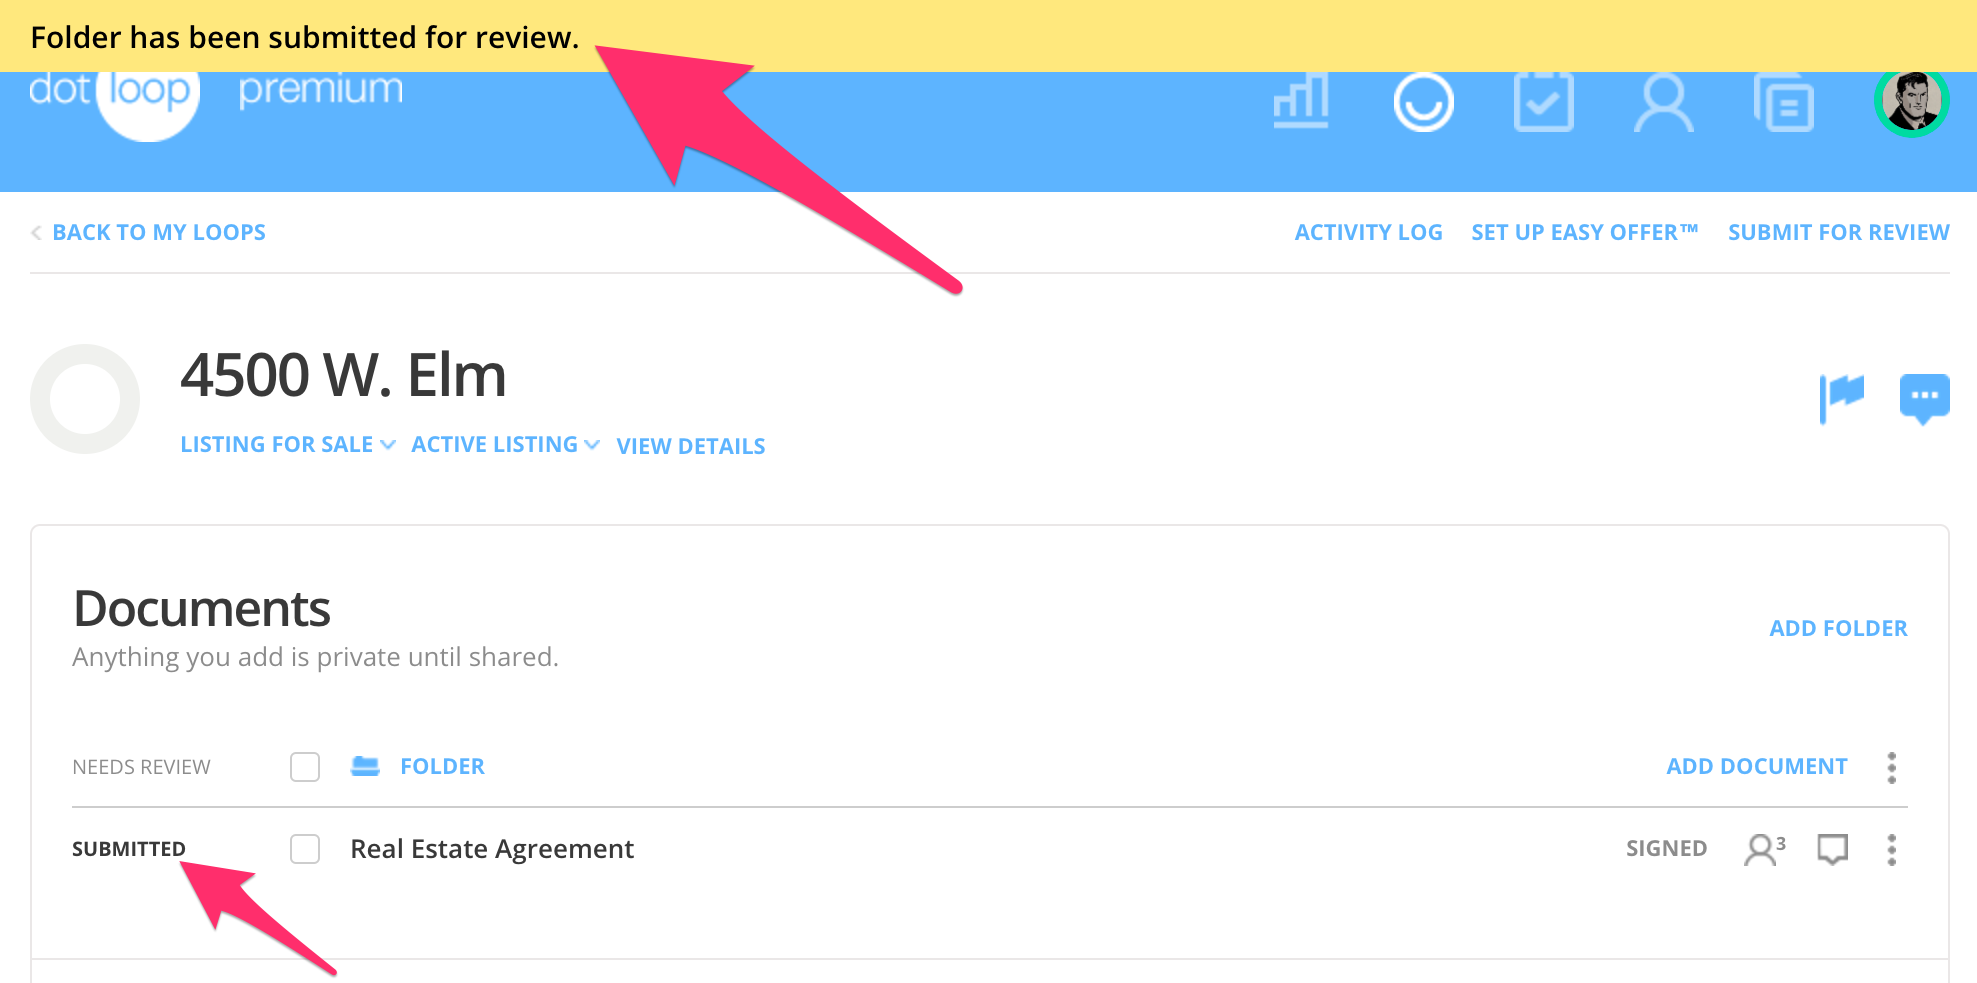
A banner will appear at the top of the loop letting you know your submission was successful. You will also see “Submitted” next to each document in the folder(s) submitted to.
NOTE: Once a document is approved it should not be moved within the folder or to a different folder.
.png)


